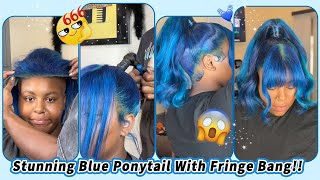
2 Tone Wig Half Black | Half Blue ~ The Blue Is Custom Color
- Posted on 03 February, 2021
- Color Lace Wig
- By Anonymous
SO I USED THE BLUE AS A BASE COLOR BEFORE I PUT THE BLACK ON TOP TO KEEP THE BLACK FROM FADING. BLACK ALWAYS NEEDS A BASE COLOR EITHER DARK BLUE, RED, DARK ORANGE, OR BROWN WITH RED HUES.
What is up my love? Yes, we are about to get into how i meet this two-tone wig. This is half blue and half black um. I custom-made the blue color. Of course, i'll show you guys exactly how i did that as well as i got this black really really dark all right, so i'm using regular jet black from kiss i'm going to go ahead and put that into the container before i even get started just to Make sure that i have all of my colors set and ready that way. Once i start coloring, i don't have to do a stop-and-go thing. You know what i'm saying, even though i'm gon na have to do a couple of things and before i even get to this black. But yes, you guys i'm gon na be mixing. Um royal navy blue and i am also mixing that with azure. Both are kiss temptation: colors, hunty, okay, yes, so i'm gon na mix those together. The reason why i chose these two because that real navy blue is like really really dark um, and i wanted like a little bit of um, more of like a gem color to shine through that. So the first thing i'm going to do is i'm going to mix my purple shampoo with my water baby: okay, yes, hunty! So no specific amount just enough that i put in there um i'm mixing these two together and i'm going to spray this on the hair. And i'm going to rub this all the way through, because this will tone my hair and make sure that once i put this blue on here, it does not turn green um. The reason why i do that, because you guys most 613 hair, has really really yellow hues, and i want to get rid of rid of all those yellow hues and make sure, like my color comes out perfectly so you'll see me um finish spraying this all the Way on here, i'm not it's not going to be really damp, because it's only one small bottle like you, can literally lather the hair up and spread that shampoo suds, i mean spread those shampoo sauce all the way through the hair. Okay, it just needs to cover everything every strand and it needs to be rubbed through. So, yes, babes, i'm rubbing this through on both the top and the bottom throughout the entire wig. I'M just spraying this all the way through here making sure. Like i said i get this mixture on absolutely every single strand: honey. Okay, yes hunty me, so i really just um rubbed it through for about a good 15 minutes, and then i rinse and then towel dry. Okay. Yes, so i can start um my next test. Of course, i run the hair out too because guys you know water can get trapped into that cap and it will leak down into the hair, so all that extra water - that's coming up out of there, i'm just gon na ring all of that out. So the next thing, of course, is i'm gon na comb all of the hair straight. I need absolutely all of the strands straight honey. Okay, yes, so that that way, when you i'm applying the color onto the hair is not, i don't have to worry about um. Any discoloration or anything, i'm also going to first start with applying the base color um when trying to achieve any type of black um on the top, a dark black at that that won't fade the best ways for you to attempt this color is to put a Base color down first base, colors being it could be a red, it could be an orange, it could be a brown with red hues in it or it can be. In this case, i chose to do it with the blue. I wasn't going to make half the hair red and i'm already using blue, so the purpose of me doing this this way as well. Um like i said to make sure that i already have a color as the base color. In order for this to go on top of the blonde, you guys, because if you try to go and put this straight onto the blonde, it will you'll either either get a gray color or it won't take all the way. Um it'll be very, very spotty um. You guys yeah i'm using the sponge with this one as well. You guys sponges, definitely help you rub the hair. I mean rub the color all the way through um. You just need to make sure that your sponge is wet and you could dip it in the color and put it on there and you just make sure that the color fades all the way through the hair. I really really like this technique actually using the sponge, because yeah like i can get enough um color onto the sponge as well as hunty um. It gets up there in those roots like not the actual roots, but where the wefts are, because you guys know that that part can be really really thick um and trying to use a color brush on that part. Unless you have a really really big color brush um, you need a lot of color to saturate that part to make sure that you don't have any white spots up there, because more than likely that's where your white spots will be um, but for the rest of The hair, like i said, i'm able to use this sponge to rub this through um and make sure that this color gets on absolutely every strand, nice and even hmm me so no specific technique with the sponge you guys other than it just needs to have color On it, whatever color that you're using um, especially when you're trying to use that to just color hair to me, i find this a lot easier to do with a sponge as well as doing it with a um doing it with a color brush. It'S a lot faster for me as well me now, one of the most tedious tasks that you will ever do when you are coloring a wig, especially if you're trying to be very very careful, is just applying this color to these roots. More than likely, i like to use a small brush, preferably something like this, like an edge control brush, because um the bristles are short on both the comb and the brush, and i can use both tools. If i need to. I can use the comb to comb. The hair out i can, i can use the brush to apply the color and it will go on evenly and it will go all the way down to the knots without actually getting on the knots. Okay, me me so when doing a base, color anyways, i allow the base color to sit on there for about 30 minutes, and then i rinse and dry. I do not shampoo it. I rinse i dry so now i'm going to go ahead and apply that um that black on top of this blue, i'm also going to do an extra layer of blue on top of the other side as well, because i wanted that blue to be a little Bit darker, okay, all right so huh like i said empty all the black into there. I actually emptied another bottle of black into there um, and i'm going to apply that on top of the blue that the first one was uh. The first ones that i put in there was like jet black, so it's just like black black um, the other ones were um, the other one. The last bottle of black that i put in there was a natural black. So, of course, i need gloves because i'm not trying to get my nails mixed up, even though i still end up messing up my nails, but once i end up getting to the blue, i guess i don't know. Oh you know what my gloves broke, but uh. These do work with the extra large gloves um having them over my nails and everything they just extra big. But now i'm going to section off the hair, hunty. Okay, yes put it to the back, all the way straight down the middle. Yes, that's what we're gon na do right there, yep, nice and smooth right down the middle flip that around go all the way down. Why would i try to use my nail girl? What is wrong with you y'all, i don't know. I don't know what in the world i was doing: okay, hunty, okay. So after i took 10 years to section off this hair, i'm going to start applying my black onto here. Wham bam. Thank you! Ma'Am! Okay, yes hunty! Let'S go so i'm using my really big frame our brush on my painter brush, because i need to get this black everywhere on this side. Okay, so i'm applying this black to here, um very, very heavily. Actually so i'm going to be going over each area more than once the good thing about using black and then going over each area more than once is i don't have to worry about um any spotting or everything black is black. It'S going to be black um. I just need to make sure that i cover every uh inch every little piece of blue as long as every piece of blue is covered or whatever your base. Color is as long as that's cover and it's black you're, totally fine, okay hunty, but i'm making sure that i get the black on this middle side. First. That way, i don't have to worry about um, going over all the way to the middle. Every time i need to paint a section now so now that that part is taken care of. I don't have to worry about making a mess. On the other side, i'm going to start going layer by layer layer by layer is always best to do just because you'll be able to get into each area, especially when you're doing something like this um, where i have to over color a whole nother color. You know what i'm saying: okay me: hmm, hmm! You you so babes, as i was saying before, black is really really tricky to try to maintain on 6 13 here but, like i said as long as you have a base color first to put on top of that white hair, then you will have to um. Then you're a-okay to go ahead and start putting that black onto there now once i get up here to um the lace part, i'm just very, very carefully putting this black onto here, still not getting it on to the lace but yes, honey. I'M going i'm being very, very careful to go right down to where i see i colored the blue edge me, oh hunty, so yes, after i have this black onto two here. The next step, of course, is to apply the second coat of the blue, and i did do that off camera. You guys, sorry, sorry, sorry, but i was able to um completely cover that it's the exact same blue that i mixed earlier um. I had put half of it onto the entire wig first and then what i had left i put on as a second coat onto there, so it's exact same mixture of the navy, blue and the azure, and this is how she came out. Babes, yes, hunty! Oh, my god like when i said this to my client like and i saw her like look huh. I'M done he go hunty she's like oh, my god, you body this. Yes hunty! Only for you baby. I love you honey. Okay! Yes, but yes, you guys. I had so much fun creating this wig. This was a very magnificent wig. I love this concept that she brought to me that she wanted me to create for her because um like i said she always gets blue, like that's her thing like she's, so pretty with her blue, wigs um and then this half like half blue. This gives her a real good diversity like she can. Um uh switch her hair from one side. She has, it looks like she has a black wig with blue or she could switch her parts to the other side and then it looks like she has a blue wig with black hair, underneath it's really really pretty like omg hunty. Yes, you know how to give her a little bit of um baby hairs and everything for her to rock yes, hunty, yes, babes. So of course you know i'm always going to play in the hair period. That'S just the end of the story. Okay, because i need to show you guys exactly exactly what she looks like at every angle, okay, but let me know what you guys thought in the comments below um. Of course, i would love to see you guys recreate something like this maybe use a different color. I don't know um. It would be very very pretty, though um and whatever you guys, recreate it either drop it in the group like if you're in my class drop it in the group up under this post or babes, you can drop it um in what the wig group, the wig Talk group, if you guys are not a part of the wig talk group, yet you need to be hunty what yes best wig group on facebook periods hands down; okay, so yes, babies! You can join that group, though, in the link below hit the link below that says. Wig talk join here and i'll see you guys next time in the next video period. Thank you. Um

Comments
Dea Mone: You Bodied TF Out This Wig
Wynekia Holston: Hello you are awesome you’re videos are very detailed. I love ❤️ your work. Can I ask you a question where did you purchase your wig head feom?
Kissesoxo: I love your videos but I'm having a real hard time making a wig this is the first time I'm making a wig and using a sewing machine. Is it better if I just pay for your class? Like I'm a beginner like on level stupid