Attempting "Claw-Clip Up Down" Hairstyle On 3D Full 13X6 Frontal Swiss Lace Wig Ft Afsiste
- Posted on 02 January, 2023
- Color Lace Wig
- By Anonymous
▼▼▼HAIR DETAILS & COUPON CODE▼▼▼
Wig in the Video: https://bit.ly/3U9hpFv
Coupon Code: ASHLEY to save money.
Melting Band ( no free gifts): https://bit.ly/39XeqyV
Swiss Lace Full Lace Wig Collection: https://bit.ly/3A7U00K
Delicate Hairline Skin Melt Wig Collection: https://bit.ly/2WQ7Hjy
Share looks on facebook, instagram , youtube and tag @ # afsisterwig, customers will get 15 dollar for next order.
Afsisterwig’s *NEW* Delicate Hairline Skin Melt Lace Wig
♥ All hand tied hairline, clean, delicate and natural, giving real SCALP vibe!
♥ No extra plucking needed, totally beginner friendly!
♥ Upgraded real skin melt swiss lace well blended with different skin tone!
The Skin Melt Wig is totally beginner-friendly, in the past three months, we have been making our best efforts to adding more density options, perfecting the plucking the hairline, adding the removable elastic band and optimizing the bleach technique to provide the perfect products.
INVISIBLE SWISS LACE: We upgrade our lace into Raschel net and bobbinet made of polyamide.The reason why we choose high-end swiss lace is that even with much higher price, it can be more invisible and undetectable especially when melting with glue. No matter what skin color you have, this skin melt lace will definitely match.
Wig SKU: AF0085
Hair length: 20"
Hair density: 150%
Cap size: Medium 22.5
Cap construction: 3D 13x6 FULL Lace Front
Contact Us:
➞ website: https://afsisterwig.com/
➞Email: [email protected]
Follow US:
➞Instagram: afsisterwig
➞Youtube: https://goo.gl/fvBMPA
-----------------------------------------------------------------------------
PRODUCTS MENTIONED:
Brown Wig Caps https://amzn.to/3vCpVmt
Adhesive https://amzn.to/3GaHpv8
Mousse https://amzn.to/3GyhYoY
Lace Tint https://amzn.to/3Gyi0gA
Got2b Glued https://amzn.to/3YYdcIB
Concealer https://amzn.to/3IfBF64
Wax https://bedeckbeauty.com/products/wax-...
Bling! Hot Comb https://bedeckbeauty.com/products/elec...
Shop Bedeck Beauty: https://bedeckbeauty.com/
-----------------------------------------------------------------------------
Hey Girl Become a Love Bug ✨ by subscribing here: https://www.youtube.com/c/AshleyBedeck...
Email: [email protected]
Monthly Wig Sale: https://ashleybedeckhair.com/
My Amazon Store: https://www.amazon.com/shop/ashleybede...
Let's Stay Connected:
Instagram: @AshleyBedeck
TikTock: @Ashleybedeckofficial
Twitter: Ashley Bedeck
Facebook: Ashley Bedeck
#ashleybedeck
My P.O. Box:
P.O. BOX 52103
Irvine, Ca 92619
-SMOOCHES
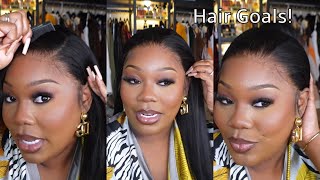
Hey guys welcome back to my channel, you guys already know it's Ashley, but if you're Tuning In For the First Time welcome today we'll be doing a start to finish, install courtesy of AF sister wig, they sent over an inspole pick and I'll show you the pig In just a little bit, but you guys can see - I definitely slayed challenge accepted so, if you're interested in getting the tea on the install as well as the style keep on watching. So for starters, this is the packaging. Of course, a of sister wig always sends their beautiful packaging as a gift. This here is a beautiful body, wave lace, wig and she is a 13 by 6 lace wig and you get the full 13 by 6 parting. As far as the lace goes. Here is a look at the wig on. I did remove the adjustable elastic band for a little bit of comfort, but of course you can keep it on for a tighter grip. Now here is a closer look at the hairline. Of course. This is Swiss lace straight from Australia. This is the real deal. Holyfield and again you get 13 by six. You don't get cheated where you can't, like part it on the side. You can do Deep Side parting or whatever you choose here is a look at the texture of the hair. It'S absolutely beautiful and of course it has so much volume, so it'll hold a curl. Here is a look at The Parting as well as a look at the hair from the back. I love to show you from the back, because it's very very important to get a good texture shot of the hair in its natural state. Again, this one is going to hold a curl for sure. So here I'm giving you just another. Look at how beautiful the hairline is. It'S pre-plucked to Perfection, so no prep work is needed. I went ahead and cut off the excess lace around the ear for each person. This step will be different as well as optional. You guys can see the lace goes below my ear, so I'm just cutting it so that it goes perfectly around my ears so that you know I could pull it back and tuck it behind my ear and whatever you need I'd highly recommend doing the bald cap Method for this wig, but I did just pull my cap back slightly so that you can't see it and that pretty much worked for me here, I'm using the electric hot comb. I love mine I'll, have it linked in the description box, but I'm just using this to pull the hair out of the way I want a clean installed, so I just want to make sure there's no like flyaways or anything like that. Now we can go ahead and cut off the excess lace if you want to tweeze tint the lace or anything like that. This would be a great time to do so, but you guys can see. None of that is necessary at all we're rocking with even today as usual, and I'm just going in with a nice thin layer and I'm just going to go ahead and apply. It apply the lace on top and then I'm going to go ahead and blow dry on a cool setting. Until I have it as dry as possible, you guys can see how beautifully this one Blends. I won't need to add any powder or concealer or anything because it already blends with my complexion perfectly here. I am just making sure everything is dry and just you know using my comb to get the hairs out of the way I don't like when the hairs get kind of like glued to the side or like crusty, so using a comb to kind of just brush Them and keep them you know from doing that is a great tip. Now we're going to do the same steps on each side just going ahead and applying your adhesive and then putting the lace on top working it in and then blow drying on a cool setting until you get your desired dryness and set and feel we are now Installed and as you guys can see, we are good to go now, let's go in and do our our dynamic duo. You guys know I love to use my wax paired with the electric hot comb. This step is going to make the hair look super flat. So there's no flyaways, it's not bumpy or lumpy around the lace. You get that bust down center. Part Vibe, and you know everything just looks like your favorite stylist. Did it opposed to like a kitchen press? So here is the inspo pick. I received the hair on that one was a little bit tighter curled, so I'm going to put my own twist to it, but I did want to go in with that full baby hair. That was in the picture. So I just cut my baby hair. As short as I desired, and I'm going in with a thin flat iron to just curl the hair away from the face, taking my time and being careful not to burn my head, because it's very easy to do so. Next, I'm going to go in with mousse, and I am generous with this and I'm just going to form the baby hair. How I want it when you're going to do like wispy baby hairs. Mousse is definitely the way to go. You can definitely use an edge control and, if you do just use it at the base, only but mousse kind of gives you that fluffy. Look that you like to see on Instagram. I opted not to do such drastic baby hair along the sides. But after seeing this video, I'm definitely going to go back in and at least add The Sideburns to match. I do feel like it does look a little bit weird with it only being in the center but um. You know in person or like when I was styling it. I definitely love this look, that's the beauty of you know wigs. You may like a style one day and then you may decide later on to add or take away. I'M definitely going to add a little bit more again to just make it a little bit more complete after the fact. Now, I'm going to let the lace set while I go in and style the hair. So if you go back to the inspo pick The Parting, it kind of did like two bangs in the front at first. I did them a little bit wider, so I re-parted to make them a little bit more narrow so that it didn't take up all the hair and I'm just making sure that the hair that's going to go up into the clip. Um is nice and flat and the lace is flat and then I'm going to pull that hair out of the way. Now we're going to take these little two bang pieces that I sectioned out and just make sure that they are pressed and neat and just pull them literally behind my head under all the rest of the hair and just use like a little thin elastic to kind Of tie that below I'm going to use my got to be glue spray to go in and just add it and just make it a little bit more shiny and flat. Now I'm going to go ahead and just pull like a half up, half down style or I'm going to take a little bit of hair and just twist it up. You want to make sure the hair is flat. You don't want it to be lumpy by any means it's going to give like an updo Vibe, and I kind of held it there in place with like a duckbell clip. But, of course, a dug belt clip really isn't a stylish clip. It is just there literally to hold it so that I can go in and bobby pin until I get the desired look and then I went ahead and moved that duckbill clip off. I think I used maybe about four Clips in total um. As far as the bobby pins go - and this is just a like small mini pack - now that I removed that Big Clip - let's go ahead and just wand curl the hair in different directions. This is just going to give a cute little look. I kind of want to go back in and do these with smaller uh curls, and I think that would give more of the inspo pick look. But for now this looks really good. Tighter curls will definitely just make the curls up top appear a little bit more shorter, so they don't hang so far and you don't have to cut the hair. But again, I personally like the way it looks with the bigger ones now to make the ends of the hair match the updo. Let'S go ahead and just curl the rest of the hair away from the face you can curl it. However, you want again if you want a little bit more definition, I'd highly recommend a smaller Barrel, but again this just works fine for what I was going for and I absolutely love love love the way it came out now we are done with the look and I love love, love the way the style came out. I love a challenge and finding new ways to style my hair. This one is definitely going to be perfect for like formal events now here, I am I'm just taking a piece of that excess lace. We cut off and showing you how beautiful the Swiss lace is close up. That was what it looked like just against my skin. Now I'm going to take my adhesive and apply it to my skin again and look how beautiful and seamless it is when it melts literally lace. Wear now, let's go ahead and see the packaging. This is the Box. The way it came in it came with the wig caps, it also came with the clips and then this little brush and that's pretty much it. I love the hair. It was perfect to work with here's a close-up of the edges and how well it melts into my natural hairline, absolutely 10 out of 10 would highly recommend all details are in the description box on this one. The hair was soft and beautiful, minimal, shedding no tingling at all. Thank you guys so much for watching and as always I'll see you in the next one smooches
Comments
Jackie Randolph: Hi Ashley this is a beautiful way to fix your wig
Nancy Williams: That hair style is so cute pretty lady
Daniel Simpson: Cute style
BAMI TV: I really like the hair
ladetra paul: