Best Chocolate Brown Curly Closure Wig Install For Beginners | Incolor Wig | Alwaysameera
- Posted on 16 March, 2022
- Color Lace Wig
- By Anonymous
friend! This is the BEST CHOCOLATE BROWN CURLY CLOSURE WIG INSTALL FOR BEGINNERS! she is a T PART wig so I didn't have to take all day plucking the hairline and bleaching the knots! AND she is a side part?! girl! summer here I come!
What do yall think?
►Use My Special Code get EXTRA $10 OFF & Free Gift:: Y1TB
►Buy Now, Pay Later with PayPal & QUADPAY &STRIPE
●▬▬▬▬▬ ❤ #Incolorwig ❤ ▬▬▬▬▬●
☛Link to the wig:https://bit.ly/3pkx9sF
Hair Info:Chocolate Brown Jerry Curly Wigs Wigs 24inches 150% Density
https://www.incolorwig.com/ ➤Top Sale Wigs:https://bit.ly/3C1zIoQ
❤Invisible 13*4/13*6/5*5 HD Lace Wigs:https://bit.ly/3hlAROy
❤New Protective Style #VPart Wig:https://bit.ly/3HgWmdT
❤Affordable Lace Part Wigs:https://bit.ly/3HrqMKm
☛Top1 #30 Jerry Curly Lace Wig:https://bit.ly/36xVg0q
☛2022 New Fashion Wigs:https://bit.ly/35wAj5K
☛Affordable Buy One Get One Free:https://bit.ly/3snxwF1
☛Recommend Colored Bundles & Closure:https://bit.ly/3hkHAbu
Instagram @incolorwig: https://www.instagram.com/incolorwig/
YouTube @incolorwig: https://bit.ly/32FRNsy
Facebook @incolorwig: https://www.facebook.com/incolorwig/
Tiktok @incolorwig:https://www.tiktok.com/@incolorwig
Inquire Now: WhatsApp number: +8618703861608
#alwaysameera #ChocolateBrownwig #wigreview
H A I R / W I G P R O D U C T S U S E D
Annie shears- https://amzn.to/2MVwkDF
rat tail comb- https://go.magik.ly/ml/17cf2/
Wig grip (keep your wig in place): *LINK: https://amzn.to/2KDky1w
brown wig caps- https://amzn.to/2MVwkDF
ORS WIG GRIP spray- https://amzn.to/3q7xwIt
ORS wig grip gel- https://amzn.to/33Jq9xV
ors wig liquifix spritz spray- https://amzn.to/3LYAl6U
baby hair brush- https://amzn.to/2QoKS0E
hair clips banana- https://amzn.to/2T5mwLh
revlon blowdryer w/ diffuser- https://go.magik.ly/ml/17cfo/
zeeellee wax stick- https://bit.ly/3IiPvSl
zeeellee mousse- https://bit.ly/3sXrhqm
T I M E S T A M P S
00:00 intro
01:40 CHOCOLATE BROWN LACE PART CLOSURE SPECIFICATIONS AND DETAILS
04:28 BABY HAIR BASE FOR CLOSURE WIGS
07:53 how I prep my base (no baldcap method) WITH WIG GRIP
09:23 how to pluck a lace part closure
11:29 how to flatten a lace closure wig hairline (make her look like frontal girl!)
13:29 tinting the lace on a lace closure
14:51 how to cut the lace your lace closure
15:55 applying the wig using ors wig grip spray
19:26 how to do baby hairs on a closure wig
20:35 cutting/ layering/ adding bangs to a curly closure side part wig
24:42 styling the curly wig using mousse
31:59 the finished look/ final thoughts
33:25 coupon code in the description box
FOLLOW ME:
Instagram: www.instagram.com/alwaysameera
Facebook: www.facebook.com/alwaysameera
Twitter: www.twitter.com/alwaysameera
A LITTLE ABOUT ME :-)
AGE: 34
DEGREES: BA PSYCHOLOGY & HALF OF A MASTERS :-) IN CLINICAL MENTAL HEALTH COUNSELING
RELATIONSHIP STATUS: MARRIED
CAMERAS TO FILM: CANON EOS R & SONY ZV1 (SIDE VIEW)
EDITING: IMOVIE & WONDERSHARE FILMORA
SEND ME STUFF (PO BOX)
AFFILIATE LINKS WIG GRIP GEX WORLDWIDE on Amazon
*LINK: https://amzn.to/2KDky1w
*Scentbird: https://www.scentbird.com/?utm_campai...
*firmoo: https://shareasale.com/r.cfm?b=113205... _________________________________________________________________
Business Inquiries:
Email: [email protected]
*Some affiliate links are used, which means I may receive a commission should you decide to click that link and make a purchase. My content is 100% not influenced by brands, PR products received, usage of affiliate links, or brand partnerships
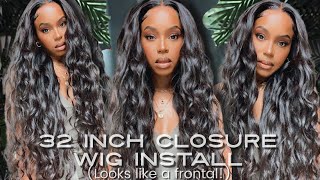
And i turned it sideways to give it more of a frontal sort of look now. This is a dead giveaway but boom who said girl. You can't see hi, ladies and gentlemen, and everybody in between i'm back with somebody else's hair and guess what it is. Wine and wigs day, clink clink clink clink clink, i'm back with somebody else's hair and i feel like a brand new girl, like i'm a whole another person change the name of my channel this ain't. Even me before we get into this hair. Y'All know we got ta talk about what we're drinking i'm drinking, my green tea. I forgot what brand this is, but i love a good green tea. Why am i acting like it's delicious? It'S not. Could you also hit subscribe and hit the post notification bell? Just so you can see every single time i post it's a good time over here. I promise i'm gon na try and make you laugh now. Let'S go ahead and get into this unit, i'm gon na take one more step. I need to get rid of this tape now we can go ahead and get into this wig. First of all can y'all believe that this is just a lace part wig. All we got is a little like a little sliver. We got a kindergarten pencil worth a part and still it's giving lace frontal it's giving. Well. Let me not show you this side, because then i'm just going to tell my tea. It'S really good for beginners or for the lazy girls like me. So let's go ahead and get into the details on this unit. I want to say thank you to in color wig for providing this wig to me and sponsoring this video. This wig on my head is the chocolate brown jerry, curly lace, part wig. It is 20! Well, it was 24 inches long. Y'All know the scissors got to it. I don't know how i got there. You can see the inside of the cap. Like i said it's a closure wig, but it's a it's. A lace part closure wig, it's a little bit of lace to play with. You also have three combs and adjustable straps in the back. Of course, when i received this wig, it came in the in color wig box and inside of that box. You did receive your wig as well as gifts, and the gifts include a wig cap, the big lashes, a satin scarf and alligator clips. Those really do come in clutch. I love those clips. I have so many of those and, of course, inside that box, like i said you receive your wig now when you receive your wig, she comes in this machine, curl sort of texture. So when i pulled her out the box, i decided i wasn't gon na wash her wash her or bleach. The knots i didn't feel like it was necessary to bleach the knots, because the color of this wig is a little bit closer to my skin tone. So there was no need for me to muss and fuss around the knots of this wig, so i was able to pull her out the box and do a little bust down. I love bust down. I love saying bust down, but i don't think i know what it means anyway, i was able to buss to buss it down. The great thing about this wig is that it's perfect for beginners, because you don't have a lot of lace to mess with the more lace. The more problems i'm telling you and the thing about this wig is that it has one. It has a little bit of lace, you have your lace in the middle and your lace in the front, and it's like a 4x4, so it was just like in a and the rest of this is tracks. So so i didn't have to do a lot to customize this area, because there wasn't a lot to mess with the cap is shaped for it to be a middle part, but you know i freaked it and i turned it sideways to give it more of a Frontal sort of look now this is a dead giveaway but boom who said girl? You can't see it. So if you want to see everything that i did to customize, this wig cut this wig, how i made her look like a lace, frontal, easily and seamlessly very detailed instructions for you, girlies. Please keep on watching and i'll be back with my final thoughts and a coupon code. Okay, let's go ahead and get started. Let me go ahead and get my green tea. Let'S get our sip in because y'all know y'all know we always need a sip, so bitter we're gon na go ahead and start with our base. Now y'all know this is a closure-ish wig. It'S a lace, part closure wig. So we got ta. We got ta be innovative with this one or we're gon na be innovative. Today, i'm super excited about this one, because i already got a plan. I want to start by trying on the wig, because we're going to do a side part with a lace part wig. These wigs where's the wig at hold on what do i do with it? These lace part wigs, are made to be middle parts. Oh look at that rich color. Yes, ma'am! It'S made to be a middle part, but we're going to wear it as a side part. This is what i'm going to do. I probably need to mark off my forehead hold on hold on. I want bangs out ooh that comb look at how pretty this is we're trying on the wig, because i'm trying to figure out where am i gon na put my baby hairs, the natural ones we got ta put a baby hair right here and we got ta Put baby hairs like right here: can i mark off? Should i mark off my forehead, like girl, we're about to mark off our foreheads? This is this is called innovation, okay, so this is where i need to start my baby hairs, because this is where i want. My part right here and right here, not marking the face with a lip pencil shout out to iman once i get into it, this is going to be real cute. We got to cut her up. We y'all know we're going to chop her up. Um we've marked off our place on the head of where the lace is going to be, and now we can figure out what we're going to do with these baby hairs. So now that it's marked off, we can start with our next step. The base needs to be different. I have to pre-do my baby hairs, so i don't have to like pull them out from under the wig, because that's how you destroy your baby hairs y'all know i'm protecting my baby hair is like i'm, the bodyguard and my edges of whitney houston. Okay, i'm gon na start by laying down some baby hairs. Let'S go ahead and brush this hair back. The reason why i want to lay down baby hairs first is because it gives a more realistic look to under the wig, so you just don't have like scalp wig scalp wig scalp. The gel that i like to use is the olive oil fix it grip gel. I like to use that for my edges in particular, i don't put my baby hairs like this high, but i'm gon na have to put baby hairs right there anyway, but i'm just gon na put baby hair right here and usually i just do the ear tab, But i'm about to do three of them. This is about to be a baby haired uh moment, but this is how it's gon na have to look. I'M just gon na do a light. One right here, one more yes, y'all see that it's going okay and then, since the closure's gon na stop right here, i'm not doing baby hairs right here. I'M just doing baby hairs right here by the ear tab. So they stick out. You see what i'm saying black owl, how you like me now there you go, that's a pretty long one. I don't like that, but that's what a girl all of the baby hairs have been laid down, and all we have to do is let this dry and once it dries, we can go ahead and put on the wig while we're letting those baby hairs dry. We can go ahead and do our base, i'm the girl that can't do the ball cap method. Let me not hate, i can't do the ball cap method, so i don't believe in it. It'S a myth. I i don't believe in it. I'M going to go ahead and do my own base, so we're going to start with a wig grip, let's put the wig grip on and what the wig grip does. I talk about this in every single video girl. You can skip ahead if you want to the wig grip, keeps the wig or wig cap in place and stops it from moving, because my biggest issue with with caps is that they be sliding slipping and sliding around. On my head, like it's a waterpark, i don't like that. We'Re popping on a new wig cap and i'm gon na, take my instant age rewind concealer in the color deep bronzer we're just gon na color it in to get the right skin tone we're going to color it in in the areas where the lace is going To be lacing, where the closure is we've successfully colored in the wig cap, the wig cap is colored in and she's ready to go. Our edges are still drying a little bit, so i'm gon na give them like a couple more minutes to completely dry down and then we're gon na try on our wig and get her started girl this. This gon na move fast today i'll be playing with y'all. Okay, so the baby hairs are crispy crunchity. We can go ahead and put on the wig and see what it's hitting on. Let'S go ahead and toss on the wig. Since that's done, let's see how the baby hairs are fairing. My hair is darker than this wig, but this you know that's fine, okay, so the wig is on and next we need to go ahead and work out. This hairline, so y'all know it's time to pluck i haven't plucked in a long time. I don't even know if i got my my tweezers are over there because i done abandoned them. I haven't plugged in so long. What we need to do next is pluck this hairline. So this wig, like i said, is a lace part wig. So you ain't got a lot of lace to work with it's just like a little tiny, little sliver of a part and some little leave out in the front and behind it is tracks. I'M gon na go ahead and show you where the tracks are y'all see the tracks are right here. So if you plug too much, you really gon na be able to see them. If you plug too much you're gon na end up looking a full, it's just. What'S going to be so, we just need to do a little bit and not too much so, let's start plugging and when i pluck i like to pluck behind the hairline and then move forward, so i'm just going to start here and you're basically pulling hair out. I try not to stay in one place because i'll end up creating a bald spot. I just did a little bit there. Gon na part. It see those tracks are still covered. You see so we can do like a little bit of plucking right here and just be careful. Okay, so then we're plucked on that side, and now we just have to do plucking on this side. I'M gon na do a little bit more plucking right here, because i don't want. I want this part to be a little bit thinner. So let's go ahead and pluck on this side behind the hairline and make sure you keep it moving, don't pluck too much. We haven't had a plucking party in a long time. Girl come on a plaque with me, pull this back and pluck. I think i plucked enough now we can go ahead and move on to flattening this hairline. For this week, i'm going to use a flattening souffle, because i kind of want to flatten this hair backwards. Just to give it that more, like heightened sort of look in the front, we're still gon na have bangs. So it really won't matter, but i don't want it just sitting in my face like this, i want it like a little hyped up, so i'm gon na use my flattening souffle to flatten the hairline and flatten the part. So it's going to use a little bit of mousse, i'm going to use i'm not going to use a lot! I'M just going to use a little bit of mousse like this and flatten it backwards and do the same thing on the other side and flatten it backwards. And after we do that, i'm going to go ahead and comb the hair backwards. We'Re just going to go ahead and flatten the hairline. As you can see, the hairline is dry. I had no wrapping strips, but that's okay, one monkey, don't start. No stop start, no show. Let'S go ahead and get into flattening this hairline. Let me go ahead and pull this back boom and i'm going to use my andes hot comb. This is like one of my favorite things to do and i feel like it's one of the most important steps for making my wigs look realistic. So i'm going to take the comb and i'm just going to flatten backwards. Now i pull my wig back over my wig grip to make sure i don't burn my forehead because i'm not trying to do that today and we're flattening it backwards. I don't like to take the back of the comb and just flatten it like this. We'Re going to do the same thing to the other side, the hairline was flattened, and now we need to just take our lace. Y'All see this lace, one of my favorite things to use is a lace tint to make sure my lace always matches my skin tone and the lace tint that i like to use is from the legendary kale and derrick, making the stallions wig stylist shout out to Kellon i like to use this lace tint spray, the flawless illusion by kellon deryck lace, tint spray in the color, medium brown. Let'S go ahead and take the wig off and we're just going to go ahead and tint the lace. It will make the wig application seamless what i typically do is i take the wig and then i just spray it inside of the cap. This lace, tint spray, is messy she's messy boots, so i'm just going to go ahead and spray it off to the side. Probably spray her in the sink and then i'll be back and i'm going to dry her with a blow dryer. I you blow dry on a warm temperature to set the color and then we'll be ready to cut this lace and apply the wig. So let me go ahead and spray this off to the side, we're just going to do a little. Let me simulate the experience: let's go ahead and tip this lace off to the side. Okay, so the wig is dry. We can go ahead and plop her back on. Hopefully, the lace is the right color, because i have a tendency to over tint. Now that that is done, we can go ahead and get started with cutting this lace girl we're moving along. We need to go ahead and cut the lace, so i'm getting better at cutting my lace, because i used to be a straight line girl because i was way too lazy to do the little tiny little zigzag thing. But we're going to do the tiny little zigzag and i'm going to commit to it. Okay, first, i'm just gon na go ahead and pull this hair back once again, just to get it just to get it out of the way and next we're gon na get to cutting. So when i cut my lace, i like to get real close to a mirror, real, close and personal hot breath fog all over my mirror start here. Oh, i think a piece of hair girl. What about baby hairs? It'S called an ear and no man there's not a lot of lace so, and i did it okay, so we're just gon na keep going until we're done zigzagging. Okay, so the lace has been cut off and next we need to just apply the wig and then we can get to styling. So when i apply my wigs, i got a new method now and i'm super excited about it. So this is the olive oil fix. It grip gel it's a castor oil, strengthening gel, but it works really really well on applying my wigs and i like to couple that with these two products. So i sprayed this on like the hair just to get it like hardened and more flat, and then i spray this on the lace to like seal it and make it look, flattens the lace and makes it melt into my skin. And i love that it has. This nozzle, because i can just put it on here and just spray, so let's go ahead and get started with applying the wig. So i have this little method now, but i paint on my gel just to make sure it applies evenly instead of using my finger. We'Re going to take the fixit grip gel and i'm just going to use this brush. This brush is actually like a masking brush, or this is for not face masks but like yeah, face masks like for. Is that what you call it a mask? It does a great job of applying the gel to my forehead, so i'm just going to lift the wig up and place the gel all over the hairline. I'M gon na do one more layer just to make sure she is good. Next, we're gon na take our blow dryer and i'm gon na blow dry it on high and cool just to get it sticky, and then we can apply the wig and then start melting, the wig with these products. So let's go ahead and get some melting, yup girl. They look good. It'S a little bit straight, it's a little bit straight of a hairline, but it still look good, though we're gon na let this dry and then melt down the lace. So let's keep going okay. So we have completed, we have flattened the hairline. We'Re gon na reveal what she looks like it's gon na, be the big reveal. Oh, i shouldn't have tied it in a knot. Don'T drool what type of knot did i tie it in? Oh girl scout not come on flat girl that hairline is giving, but at least it's flat, though you see how flat that is. It'S about to get better. Y'All don't worry. Now we need to go ahead and style. This hair y'all know cutting is like my favorite part. This hair is like i said: what is it 24 inches long? So that's the length but we're gon na we're gon na chop. Some of that off. Oh, no, wait. I'M supposed to do baby hairs girl! Next, we're gon na go ahead and do baby hairs. A girl forgot, oh girl. I forgot we're gon na put a baby hair like right here in this area. So let me girl this stuff is like hoard. I'M gon na take some hair, so i'm not gon na. Do i'm just gon na do a baby hair right here we just gon na do one one baby huh! Let'S go ahead and clip this hair right on back and i'm just going to cut this one. Let alone baby hair short and we're going to gel it down using the same olive oil fix it grip gel and i'm just going to go ahead and lay down lie down the baby heads okay, so the baby hair is down. I feel like it's giving like a little bit more of a realistic vibe. You know what i'm saying like it's giving more realistic. I'M only gon na do one baby hair. We'Re done we're done so now we got our little baby hair down ain't. She cute. We can go ahead and get into cutting cutting, not coloring, cutting and layering the hair. This about to be real cute, like i feel like my vision about to come together. Let'S go ahead and start by cutting the wig. So, let's see y'all know how i cut the wig. I'M gon na take a rubber band, since this is curly hair. I take a hair tie. This is how i get it even at the bottom y'all it don't always work, but it get close to it. So i'm just going to cut this much off the bottom yay. So i want bangs. I don't know how to do side bangs. Oh my god, why is my ear ringing? I'M just gon na be i'mma freestyle it like this. Oh, i missed some hair. That'S all right, but i want the bangs. I want the bangs short y'all know how i be doing. I want like shorter bangs, so i'm gon na go in one more again and just get a shorter layer up front and cutting okay y'all. This is like difficult. Oh, what am i doing? I don't think i want that part any shorter, but i do want, like my bangs shorter, so i'm just gon na go in one more time and i have to remember that i'm gon na be um, adding moisture to the hair. So, and as for this hair, we need to layer it out just a tad bit, so i'm gon na pull the hair outwards and just add some layers. This way - and i really need to angle the girls is telling me - i need to do more angling, so wow. Okay, do this back part girl, ain't, no rhyme or reason it is i'm just gon na cut and layer that works it's getting there ain't. It kind of a little bit and let's do the same thing to this side, but i'm not trying to layer this part too much. I just want like light layers on this side. It'S looking good, though okay, so next we need to go ahead and add mousse and get these curls popping. I cannot wait to see what these curls look like, because, typically, when you pull it out of the box, it gives more of like the synthetic hair sort of curl like these are cute curls, but they don't give like like real, like human hair curls and how I get like those natural bouncy full juicy curls is by using the coconut, hibiscus frizz free. I use the coconut and hibiscus what is in my mouth, we're going to use the shea moisture, frizz free, coconut and hibiscus curl mousse. I love this stuff. It is my curly hair, perfect product. I need to have a closet full of this, because this is my stuff i'm using this mousse along with my favorite brush, and this is the evolve 572 brush, it's kind of like a denman brush. It clumps up your curls and makes them real juicy and fluffy. You know what i'm saying: let's go ahead and get started by adding mousse to the hair, so i'm going to start on the right side on this side, i'm just going to pull this hair up up and away. I don't know why this is my favorite part to tuck it away, because then i get to see my work on my edges. That looks good. I mean you would a little bit, but not really like just going to pull this hair away and on this side, pull out a section and we're going to work in sections and add the mousse to the hair and brush it through. So now this is getting closer girl. What add it to the hair? Let me show y'all what i'm talking about. I'M gon na add the mousse. Some people just add water and water doesn't give me that juicy curl. Look, oh girl, my nail just rub it through brush the hair and clump the curl. You see them: curls, yes, ma'am, okay, they're, nice and clumped together and we're just gon na work through the rest of the hair, adding the mousse and clumping the curls. So, let's go, let's run, it grow. Do okay, so we're back. The hair is crispy and crunchy. It'S not fluffed up. Yet we need to fluff it up, but first fluff it up you two, oh, but first we need to define this part. As you can see, it's giving like just no scalp, and i don't like that - we need it to look like there's a part there. So i'm gon na take my pro conceal concealer from la girl in the color fawn and i'm just gon na hit that part. I'M just gon na use the brush. I love using this on. I love using this on my wigs because it has this brush tip and you can just really get in there right here. Oh no ma'am! I don't like that. Okay, so now we need to just fluff out the curls. I hope the hair is dry. I think the bottom. The bottom is always the hardest to get dry, so we're just going to separate the hair and make sure the curls are fluffed out so y'all. This is the finished. Look. What do y'all think the color of this wig allows you to style it in so many ways. The color of this wig allows you to sell it in so many ways. It'S like endless styling, and i love that. I love that you can wear it in so many different ways. You can get like your own sort of look and vibe, and i like this, looking vibe, i love the curls. I love the bang. I love the moment. She lives for the moment. I'M absolutely in love with this wig. Let me actually show y'all what it looks like in the back. You know we got ta fluff it up girl. This is what it looks like in the back these curls. This color is every thing, although it seems like uh lace. Part wigs may not be versatile, they are they're very, very versatile and you can wear them in more ways than middle parts. You can do inside part now, if you cut it like a side part like i did. I can't switch this to a middle part. This is it. This is the end. I like it as a side part so pretty, and it gives very much. This is about to be my springtime. Wig y'all can't stop me now. You can't stop me now and i want to say thank you to in color wig for providing this wig to me and sponsoring this video. Of course, the girl has a coupon code. Y'All know y'all, don't leave here without a coupon in your pocket. So if you would like to get ten dollars off your wig purchase, you can use the coupon code y1tb that is y1tb for ten dollars off girl. Save your money girl. If you're gon na buy something get a coupon i'll leave the information and links for this wig, as well as the coupon code down below check it out and make sure you check out when they have sales too. Sometimes it shows up in the description box as well, so if there's a cell it'll probably be down there too. Thank you all for watching. Thank you for subscribing. Thank you for being here. I cannot thank you enough. I love you all so so so so so much, but i love you all so much. Thank you! So much for watching and i'll see you in my next video bye. You
Comments
cosmic beauty: I love love LOVE the way you lay your hair girl like I can't do it lol I was able to lay Chrissy, but nothing else. You make these looks seem effortless
Khalilah D.: Wow this color looks SO GOOD on you!!
The Original Goddess Network: Goddess, you make styling wigs look so easy peasy! The way that you turned this chocolate brown, skin complimentary toned wig sideways and accented her with natural baby hair, it is Everything!!!! So Dang Gorgeous!!!!
Ashanti Mahdi: Your Grandmother is smiling upon you honey! Back in the day she wore the wig wearing crown, so you know you're making her proud! You're insanely talented and oh so Amazing!
lneal2800: Happy HumpDay boo! Honey this color is so vibrant on you! The curls are very defined and juicy and beautiful! You are ready for the red carpet!❤❤
Incolorwig: So gorgeous as always!!!
Nikki Molly: Girl I love this chocolate wig it looks great on you
Rhonda Williams: Love your videos, very informative and entertaining
Gill Perry: ♀️Girl it's the colour for me Your creativeness is shining through, look at you with a side part finesse on this unit though ❤️
Kie RaShon: Beautiful as ever ❤️. I love this color on you sis
Shanae Ali: Honey this wig is on POINT PERIOD!
Lynn T.: FRIEND!!!!! You are giving me LIFE with somebody else’s hair, this chocolate curly hair is ME..asking you to sell her to me, I need her, I have purchased the same wigs as you and mine are not as curly, it’s always something different Thanks for your channel, love it!!!!
Starroze aka Kawaiicutiebaby: Very cute and I’m loving the makeup look
Tanya Blue: Best Birthday present ever watching a queen do the thing
Linnette Mcneal: Love this wig and the color
Michele Proano Kressin: Girl, its been a minute since I've stopped by and damn gurl, you are looking snatched! Don't know if it's trips to the gym or trips to the injectionist, but whatever, it's working! Best video I've found on cutting a layered, side bang; I practiced first on some old synthetics, but it gives me the best results on all my wigs (it's s not just a face frame, but it actually layers the fringe area): https://youtu.be/Wb5sRykTG6E
Jasmine Copé-Chisolm: LOVE IT!!
Izzy_the_Savage: Ohh my goodness!! I ❤️ that color on you !!!!
Andreya Matthew: This fiya It's gorgeous on you and I'm definitely gonna try it
Ash: I feel like Nadula and most hair companies send these influencers a different hair ( better quality) to advertise to us than the one we actually buy on their website while it’s marketed by influencers as the same type of hair which is not true.
Sandra Sutton: I thought it was to close to your skin color and it might hide your face, But you did your thing and it came out nice...☺️ ✨✨✨✨✨
Shenitra Story: It’s giving “that’s the way love goes” Janet
Penelope: I thought blk was the nicest color on you...i was wrong this chocolate color looks amazing on you..against your skin & curls are def your thing over straight hair, def..but u literally make every wig look good, i mean i can't be doin all that I'm purchasing one of those V-part wigs u sponsored pop on & go
Sarah: Does anyone know what bronzer she uses?
Ivy Monique: Can you review myqualityhair wigs, I’m considering their v part
Nicola Moments: soo pretty
Carlene Clark: Wearing it well❤️
amoryll36: ♀️ I see Bey is back
thebaejazelle: oh you ATE THIS LOOK
Chiyanti: Baby dis hea FIYAAAAA
modelchiic17: Busit down gurl !!!!!!! % ❤️❤️❤️❤️❤️❤️❤️
bejeweledbtq: I so excited for you.I love your Video
pisces031372aj: One monkey don't stop no show....I have never heard anyone else say that. And when I say it, folks look at me like I'm crazy. See, I knew we were friends.