Baby Hairs Galore❤️| Curly Fake Scalp Wig Lace Install | Eva Wigs
- Posted on 29 May, 2020
- Fake Scalp Wig
- By Anonymous
Welcome to IAmBeautifulHustler Channel
Be sure to SUBSCRIBE & TURN ON YOUR ALERTS
CONNECT WITH ME✨
Personal IG: Iambeautifulhustler
Business Instagram:_Beautifulhustler & @thebeautifulhustlerbrand
Twitter:_Beautifulhustl
YouTube: IAmBeautifulHustlerTV
✨SLAY WITH BEAUTIFULHUSTLER✨
TO PURCHASE MY PRODUCTS :
WWW.iBhSlays.com✨
Lace Melt Adhesive,
Melts Belts,
GLAMWAX
and more ❤️
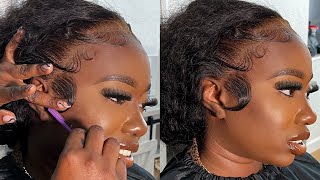
Heavy reason welcome back to discuss some TVs, I'll, be doing a lacewing install with a lot of baby hairs, and today's wig is provided by evil wigs now this is a fake skype wig, which means the there is a cloth underneath there makes it look more realistic, As far as being asked out, and that way you don't have to wear like a stocking stocking cap underneath on your wig, if you don't want to, it, would be more optional versus, oh, like you have to put a cap, but for today I'm gon na. Do a lace with instant install with no no part and just a lot of baby hair. So that's what we will do today now this week, I already did come with the knots pre bleach and everything like that, but even when a non-stop pre bleached, I do like to just bleach them a little bit more cuz. I really want them to be blond. So I can go ahead and tone them and everything like that, which makes the knots completely disappear. So I did go ahead and reboot those knots and now I'm just taking her foundation color from the Ruby, kisses palette and just applying it on in that front area. Where the cloth is not at like so right at the hairline area, I sprayed that foundation on top of the lace right there and just taking a little holding spray and spraying it one that lays the waste on that way. It won't transfer over onto the skin which will prevent the Latian sticking. So that's why I sprayed that holding spray right on in there now, as I mentioned, I will be doing a installation with a lot of baby hair. So right now I'm just measuring the wig on her hair, just making sure it fits I'm what I love most about this week. The lace is again, so it's easy for it to really blend I'm into your skin tone. But right now, I'm just showing on my to lace, mode, adhesives, the smaller size for just a bigger bottle, I'm just showing you the size difference, and today I will be using a bigger bottle and applying the wig. You know using about four layers. I believe I think I'd use about three to four layers, I'm for her installed today. Now, as you can see, I'm applying a nice little a thick layer, I'm starting on the cap, just to make sure that that week sticks in place and the remaining pieces that's lifted up. I will just go on with that on. You know go in and just leave those little pieces down, but my main focus is to get a nice little layer onto the cap. That way, once I pull that lace down, it will have a really nice firm hold from the cap to the hairline. So I like to spread the glue at least about an inch wide, and I'm just going to do that and apply all of my layers on there. Now the glue is mostly on the cap, as you can see, and it's just a little bit past the like a little bit pasty our cap. So it's not so much like all over, like her forehead area, just a little bit on their forehead area and mostly on that cap. But I just want to go ahead and apply all the layers, and I want to use - and you do want to allow the glue to dry clear before adding your next layer. So once I get all of my layers on there I'll begin to pull the lace down into the glue and begin the melting process. So now that the glue has turned completely clear and I've added all of my layers. We want to go ahead and begin to pull that lace down into the glue, I'm just using my fingertips to press that lace right on in now. I am rubbing it on in and, as I get it into place, I will have her hold it down and I will lay the other side as well, and I'm just taking my comb and just combing that lace into that glue and just making sure everything is Attached where it needs to be before I began to cut off the extra lace and do the other part, so I'm going to do the same thing on this side place the wig into place, use my fingers in the comb and apply pressure. Then I will go on with my blow dryer on the heat setting to continue to melt that lace into that glue began to cut that extra lace off in a zigzag motion. So I'm just gon na go ahead and cut piece by piece and just still take my comb and I'm you know push the lace into the glue on the edges, so be sure to just cut the extra lace from around the ears and everything like that. That way, though, we can sit comfortably without ever taking on the person that it is on. So I'm just gon na go ahead and cut like I said, and zigzag motion get all they actually saw and just get everything tat down so done now that everything is tucked on down, I'm just gon na continue to pull down the section for the baby. Here is, I was actually doing that as I was going along the hairline getting everything laid on down, so I'm just going to continue to pull out their section once again and I'm gon na take some holding spray and spray their hairline with holding spray. Then tie it down with the milk bail, so it is super super melted and secured into the skin and I'll Kim. I did go ahead and sew down the back of the cam so down the back of the wig, but I'm gon na start showing you guys more of me slowing down the back because I usually just say it in the video and I don't really show it. But I would do more tutorials on how to properties so that I got the wig to make it nice and secure. So I will do that because I know someone is going through X, but now I'm just taking my bed head holding spray and I'm spreading across the hairline and I'm just preparing and pulling the baby hairs down towards the face. And I'm just going to take that milk belt and go ahead and tie that down and you want that to sit on the hairline and to holding spray or the mousse or whatever you using is completely dry and right. Now, I'm just taking a big wide tooth comb and just kind of do. Tangling the curls and I'm gon na go ahead and add some water and conditioner to the hair to get the curls nice wet and define. So I'm just gon na use that watch of comb detangle, which is not even a really tangled. You just got washed and bleaching everything, so I'm just you know combing it out and then I'm going to begin to what up the curls and everything like that and then I will get into you know doing baby hairs. So I want ahead. Let me move that on the last abandoned. This is what the hairline it's looking like: very melted and very natural. Looking so now, I'm just gon na go ahead and begin to a hot comb, the rooms just a little bit, not too much, because I don't want it to be super flat. I do want it to have you know that fluffiness or whatever, like that, so I'm going to just apply a little bit of glam wax on the hairline and I'm coming up there holding the spray so that everything can you know soften up a bit so yeah Once I do that, I'm going to go ahead and just use a little bit of glam wax like I mentioned, and just how come those roots out before I like styling the baby hairs and everything like that. So I'm just going to apply that glam wax and begin to hot comb, and once I am done hot coming on the roots out, I will go ahead and begin to the baby hair. Now I will use a razor comb and chop the baby hairs down. You know short and everything like that. You want to chop it down to about an inch or less and just do that all across the hairline and I will be using most and holding spurts, do my baby yesterday, I'm I like to either spray the holding spray. First and then apply the mousse and began to super style, or you can apply the mousse first and then, once you get the desired. Look for the baby hairspray with the holding spray. I'M just up to you, whichever you know what you want to do it, but it gives you the same results either way, but today I'm starting off with the mousse first and just applying that moves, and I'm working with this side. That'S not going to really show. First, I'm just because I usually always do the opposite way, and I don't know why. But today I decided to do the baby hairs on the side. That'S not going to show first and then once I get those the desired way that I wanted to go. I will just you know, mold everything down and make sure that it's not going to move or lived, or you know everything like that. So I'm just real quick. I didn't go to a detail with the baby hairs cuz. I show me doing the baby hairs. A lot in my videos, so I just pretty one it you know. I really wanted to get to the point, so I am using holding spray net mousse and blow drying on heat. Once I get the desired look and then I will move on to the other side of the head. So now I have the baby here I won't have. I warned it. I'M just gon na go ahead and begin to add a little holding spray on this push back area. Here we were really not doing a part, but I wanted to really have like a little pushback effects of that spot edit and you know a little holding spray there just to give it that really really push that look like sucka fall behind the ear good and Everything like that, so now, I'm just kind of like teasing and combing, and you know just get me to fall a certain way before I wet the hair up and that's just pretty much like how to start is gon na, be just like a lot of baby Hair with the hair, just kind of like you know, wild in a cute kind of way, but actually gon na wet it to kind of put the curl back into it and give it a more defined. Curl look. So this is where I will go in with that water and conditioner, and just you know, finger combing. I didn't want it to be super super flat. I didn't want to keep the volume and that's why I also did not do too much how coming of the root and I'm just using a big, wide toothed comb, the one I combed out with the first time to just really get that water spreaded throughout the Hair, so don't be super wet and flat, but still you know that wet look, but the fluffier wet look. So I'm just combing and wetting those areas and everything like that, and I'm just want to keep doing this until I have to desire it look um yeah. So pretty much I've got just finished, wetting the hair and just playing with the curls. I am pretty much done until I get the curls of all how I want it, but I thank you guys for tuning in. I will leave a video off the finishing look at the end. You see you guys next time,


Comments
Jamilla Worsley: This is freaking bomb!!!! It’s beautiful..
Carla White: Beautiful as always❤
Lorrie F.: Alwaysssssssssss beautiful!
Kerri Robinson: Hey Sis. I love the look. You didn't list the hair. Did you have to pluck it? Would you recommend hair?
Gabby J: what kind of holding spray and mousse did you use ?
Micah T.: Where did you get your melt belt from??
HairSsans: Hi when will your wax stick be back in stock?
Ashlynn Harrington: Thanks for sharing this beautiful video,you are so helpful,I like your videos, I purchased the best quality product from newigstyle..com two days ago
SadieLady: ❤️❤️❤️
Jaames Higgins: Sickening yassssss
pretty pumpkin: Look stunning
Ty' Mari Thomas: I love you