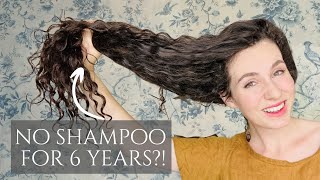
How I Learned To Stop Worrying And Love Wigs || Historical Wig Styling
- Posted on 03 November, 2022
- Fake Scalp Wig
- By Anonymous
Since I cut my hair short I can't do most historical hairstyles without help from fake hair. Unfortunately I'm not great at styling hair or wigs so I'm attempting to tackle three of the easiest wig-styles I can with some cheap hair from Amazon, some wig clips, and lots of pins! I'm doing an 1780s "hedgehog" look, a Grecian inspired Regency up-do, and a mid-victorian bun.
*** SOURCES ***
1780s -
Jenny la Fleur topper: https://www.jennylafleur.com/shop/hedg...
Extension piece: https://www.amazon.com/gp/product/B08R...
Soft Pomade: https://www.etsy.com/listing/239727538...
Regency -
Wig: https://www.amazon.com/gp/product/B09M...
DSA Threads wig-styling video: https://www.youtube.com/watch?v=3_Btnh...
1860s -
Wig: https://www.amazon.com/gp/product/B0B6...
Wig clips: https://www.amazon.com/gp/product/B09H...
*** IMAGE CREDITS ***
1770s tall hair: https://collections.mfa.org/objects/31...
1780s Hair:
https://commons.wikimedia.org/wiki/Fil...
https://commons.wikimedia.org/wiki/Fil...
https://collections.mfa.org/objects/35...
https://collections.mfa.org/objects/35...
https://commons.wikimedia.org/wiki/Fil...
https://www.jennylafleur.com/shop/hedg...
Early Regency hair:
https://janeausten.co.uk/blogs/uncateg...
https://commons.wikimedia.org/wiki/Fil...
https://commons.wikimedia.org/wiki/Fil...
https://commons.wikimedia.org/wiki/Fil...
https://commons.wikimedia.org/wiki/Fil...
https://upload.wikimedia.org/wikipedia...
1860s hair:
https://www.mimimatthews.com/2017/09/1...
https://www.pinterest.com/pin/64036244...
https://clickamericana.com/topics/beau...
https://www.pinterest.com/pin/64036244...
*** MUSIC ***
Courtesy of EpidemicSound.com
*** CONNECT ***
Follow me on Instagram @dixiediy: http://instagram.com/dixiediy
I blog at http://dixiediy.com
If you'd like to support the channel, I have a Ko-Fi account: https://ko-fi.com/dixiediy
I may not always have time to respond to all comments but know that I do read and appreciate them!
Hi, I'm Dixie and this video's projects aren't my usual sewing content, but it's something I really need to do to make my costumes wearable wigs. Now that I have short hair this length only really works for like 1920 Styles. Hair styling is not something I have much experience with in general. The most I ever do to my hair day to day is like use a curling wand and, frankly, hair styling is my least favorite part of this hobby anytime. I can get away with covering up my hair with a cap or a bonnet. I will do that, but I decided to invest in some wigs for Styles, where I need hair. So in this video I'm going to style three different wigs for three different eras, starting with the classic 1780s Hedgehog hairstyle. I have done this style with my natural hair before and I would just add a ponytail piece clipped in the back, but it takes forever to curl my hair. I'Ve tried the little papers that you wrap around the curls and press with a flat iron. I own. The super small curling iron I've done hot rollers, which these are not small enough barrels for this style. I'Ve also done foam curlers as well as wet set my hair, but my hair just will not dry in these types of curlers. So I went to a Costume event and I saw someone there who had a hair piece from Jenny LaFleur. So I liked it so much. I shelled out some cash. This thing was over a hundred dollars because I didn't want to try curling and styling my own wig at that point, because it just seemed like too much work, but this is not a full wig. It is a Topper made to go on top of your head and cover the front and the sides it has plenty of Clips, which is great and a pad on the top for added height. The curls are soft and loose and some are longer than others, and some are pinned down. Jenny LaFleur offers samples to match your hair color, which I'm glad I chose that option, because I had to select a slightly darker color than I originally thought. The idea with using this topper is you'd, pull all your hair back into a low Pony in the back and put the top on top, and then your hair kind of looks like this, and when I bought this thing, that was okay, because I had long hair. But now that I don't it's a problem, so I bought an extension strip, something you'd pin into a layer of your hair across the back of your head. And then I whip stitched that piece into the back of the topper to make a full wig a very expensive. The extension is slightly redder than the topper hair, but I'm hoping that by adding loads of powder it'll blend better, because I am not spending any more money trying to find a better match. I need something for the powder to stick on, so I'm using some soft pomade. Should I be using this on a synthetic wig? Probably not, but I don't want to use any weird synthetic stuff on hair that will be touching my costumes. This powder is basically just baby powder and it takes a lot to color, dark brown, hair, synthetic or natural. I apply it with a chunky makeup brush and, although I'd already added some to the topper, why not add some more? Lastly, I pulled the extensions into a loose Pony and finished it off with a ribbon bow to wear this wig. I pull up most of my hair and pin it in place. I leave a strip of hair free near my hairline, I curl and powder that Loose Hair and, as you can see that takes a while now imagine having to do this for your entire head. No a wig is better. I can't wear a wig cap with this, because the topper is meant to clip into the hair at the top of the head and not at the back once the wig is in place. I can gently pin, in my own front, hair into the wig sorry for the crummy angle. On this I was busy trying to perfect the hair blending. My own hair in front helps to hide the edge of the topper and makes the whole thing look more natural foreign. This wig is gigantic and with the ponytail extension it's very long, even my largest cap is too small to fit all the way around this thing, but it does work as a good support for my big cake hat though it's also pretty heavy. I might trim the ponytail section to make it a couple inches shorter in the future, but for now I think it works for that classic. Mid 1780s look. My next wig is going to be an early Regency style modeled after the ancient Greek Trend. So lots of soft curls and a big heavy bun in the back, usually what I've done for Regency style since cutting my hair is either a bonnet or wrapping my head in a scarf with curly bangs picking out problem is even if I use my tiny barrel, Curling iron, my front hair is still pretty long, so I can't get those short curly bangs that were so popular at the time. This is a cheapo wig from Amazon, because after that last hair piece, I can't justify spending so much on wigs and actually I bought this one because I saw DSA threads. Do a YouTube video styling, this specific wig for an Edwardian look. But I liked it because it had those short bangs and also had a central part which I figured would be good for early Regency. I pulled the bulk of the hair into a bun and started adding pins, trying to keep the look loose and voluminous next. I added some ribbon. This is vintage ribbon. I got for a steal off eBay and there are like 10 yards here, so I can do a lot with it. I wrapped the ribbon around the hair, and this is inspired by art from the period which was in turn inspired by again ancient Grecian Styles. I kept it pretty Loose as it's not here to hold the hair down. It'S just there to look pretty and at this point I decided the front curls were too saggy and not well defined. So I got out my tiny curling iron and some clips and curled the bangs on the low setting for synthetic hair. You can curl it, but you have to keep the curled hair in the curled position until it fully cools or else it'll lose the shape. So after gently sliding the hair off the barrel, I would clip it in place. While I worked on the other sections, I admit I did not do a great job of this at first, I wasn't sure which direction I should do. The curls some curls were tighter than others, so I did have to repeat the process in a few sections: foreign skeptical - that I would like this style, but once it's on, I think it's my favorite of these wigs. I think it easily captures that late 1790s Vibe of a Jane Austen character wandering along the seashore I'd love to style this wig with some fancy, jeweled, diadems or Combs - that were popular at this time. I don't have any of those yet, but maybe that's a project for the future. My last wig is one I figure I can restyle for multiple early to mid Victorian Styles, but for now I'm going with late 1860s for next month's big project. This is actually the second wig that I bought for this particular style. The first one had a hard plastic top for the center part, which I felt looked pretty unnatural and again for this style. I need to blend my own hair in with the wig, and it's pretty obvious where the wig ended and my hair began. This one was also a little too red to properly match my natural hair color. The new one is a much better color match and has a softer lace, front center part which will hopefully blend in better with my own hair, but first there are only two Combs on the inner sides of this wig and the fit is a little wonky. I honestly can't tell if it's too big or too small on my head. In any case, I added four extra clips two in the front near the part and two in the back, and I also tacked down the lace bit to the inside for this one. I again use some Pomade to try to control the hair. This wig requires much more brushing than the others which really challenged my setup here see my little Mount is adjustable, but that means it tilts anytime. I pull the hair. The hole in the base of the styrofoam head is too big for the mount, so it rolls around and the sewing pins I use to keep the wig cap attached to the styrofoam would just easily slide out. I separated the fronts and side sections away from the rest of the wig. This is going to get Incorporated with my own hair later on. As for the rest of the hair, the tiny hair elastics I used were too small to fit all of the hair through more than twice so I couldn't get a tight wrap around the pony. I tried a couple different bun ideas like this one from a period magazine, but the hair was just too bulky in the end, I settled on slitting the back hair into three sections, making a ponytail with the middle, twisting it around itself and making a tight bun. Then I took the hair from the middle side. Sections Twisted that and wrapped it around the main bun and struggled to get all these pins in another problem with this wig is that it's not cut all in one level, which means there are always little end pieces. All over that need to get tucked in place like with the Hedgehog style. I pulled out a section all along the front of my scalp and palmated it. Then I brushed it out and teased it a bit just to help with volume. Then I brushed my own hair in with the front wig, hair and rolled it back and under itself and again pinned it in place. Lastly, just to try to blend the part in the wig better, with my own hair, I brushed some mascara along the roots to make them a little bit darker. You can do something similar with sharpies and a bit of alcohol and a Q-tip to blend the color in on the roots, but this will work in a pinch. I think this one actually turned out the best in terms of styling. I really like how the bun looks. I don't love that you can still tell where the front of the wig ends in my hair begins at the part. I think next time I'll work on blending that in better overall, but I think it's okay and it'll. Look good under a bonnet. I made this wig to go with next month's super secret project reveal. So if you want to see that be sure to subscribe and follow me on Instagram at Dixie DIY for when that comes out, let me know in the comments all of your tips for Wig styling. I still don't feel super confident with my skills, but at least I now have three workable wigs until next time, happy wig, making

Comments
gildedgitta: That's a lot of work and it looks great! I have similar length hair to yours and have collected a lot of photos of women with short hair in the past and sort of... just decided to embrace the fact there have always been women with shorter hair, even if it was not celebrated. I have, however, worn a lot of wigs in my life as a cosplayer so here are some tips: 1. detangling synthetic hair is frankly easiest done with silicone spray. 2. A bath in fabric softener can take off the unnatural sheen from cheaper wigs. 3. If the original curl of the wig does not fit what you need, pouring very hot water over it repeatedly works for wearing off the curl pattern. You need to prop it up so the weight of the wet hair keeps pulling the hair straight. 4. You can buy refills for alcohol markers and use the refill ink to fully dye a synthetic wig (test patch recommended) and it's easier than colouring it in with the marker itself. You probably will end up dyeing the inside cap of the wig so it that matters, refill ink for the lengths and markers for the roots. 5. Pin your wig on all sides, more than you think you need, to avoid uneven tension. Especially pin around a bun/another heavy backpiece to spread the weight of it to avoid tension headaches. 6. Especially cheaper wigs are quite easy to "edit" if you own two of the same colour. The hair strips are super easy to take off and attach to a different base. 7. This works best for parts that won't touch your clothes but the holy grail hairspray for wigs that actually keeps the style is Schwarzkopf's "Got2b Glued Blasting Freeze Hairspray For Screaming Hold". That stuff will never touch my real hair, but it has the best hold for wigs. 8. Companies like coscraft (UK based) sell ponytail clip-ons, wig weft, lace sections etc as well for a multitude of wig colours to make editing your wigs easier. I especially recommend the ponytail clip-on because they can be much easier to use as a base for a big bun than the wigs own hair alone. I really did not know what to say exactly but those are the first wig things that came to my mind. I think your wigs turned out wonderful Dixie, and i hope you will enjoy your wigs for a long time!
Ash Extraordinaire: That was amazing to watch. I'm so intimidated by anything beyond that mid-Victorian style (which I learned how to do when I was about 13 because I've always been a nerd), so I'm just super-impressed by your efforts and your results.
Sarah Walsh: You did a wonderful job with all of them!! I feel so hopeless when it comes to hair. I have made one 18th century hairpiece from the American Duchess Guide to 18th Century Beauty, and I keep meaning to make buckles (curls) but they fall to the bottom of the to-do pile every time. You're inspiring me to try more styling!!
yobespierre: so to blend the wig with the hair you leave out, get a chisel brush, like an artist's brush, and put a little concealer JUST on the parting of the wig and onto YOUR part, and then use a finger to blend it by just dabbing it onto the part so that it blends in. it'll be a bit of a better meeting that way.
Miss Sis: I have hair a similar length to you, but I LOVE historical hairstyling. My main era is the 1930s, so I wet set with sponge rollers and setting lotion, then sleep with them in, as heat styling won't hold on me. It does take practice but I've been doing it for years so I've got it down now. Otherwise it's wigs or mainly several hairpieces/rats. I can do my own hair in pincurls for a hedgehog with a pin in 'tail', and a fake bun, clip in curls, and a plait on a headband for Regency (I have a vintage one that looks far better than anything modern and synthetic). My main problem is that my undyed hair is a very un-modern colour, just a type of lightish brown. I have had better luck matching it with those vintage hairpieces than anything easily available, unfortunately! I like to use dry shampoo for an easy dusting as it's much easier to brush it out afterwards.
Flynn's Feats of Finery: Perfect timing! I am going to Dickens on the Strand in December and my current pixie hair cut will not look terribly appropriate with my late 1880s dress. This gives me hope that I can manage to wrangle a wig into a manageable style.
SpeedAkinom: Great job! I just styled my first wig for Halloween this year and it was great fun!
Girl of Different Era: This was super helpful, thank you! I plan to make a 18th century wig this coming spring!
Jennifer Stocker: Wow! Historical hair styling really intimidates me….thanks for the inspiration and tutorials!
Vee Dragon: These all looked great on camera
The Plus Size Costumer: You give me hope because I know I'll need to do some wig styling at some point and, honestly, it scares the bejeesus out of me. I can barely style my own hair. LOL
Deb Carroll: My favorite is the hedgehog one! It looks amazing!
Steve Zytveld: These wigs are fantastic. Well done. I saw a thing on Adam Savage where he talked to two women about how they style their award winning wigs. Their big trick was to use a clothing steamer to 'set' the plastic hair. - Cathy (&, accidently, Steve), Ottawa/Bytown/Pimisi
Sarah Rudd: These are all amazing. You should be super proud. I have hair envy!
P V: Those wigs look pretty good. I am sure the wigs will save you lots of time.
Katherine Morelle: My issue is never being able to find hair pieces or wigs that match my somewhat ginger hair colour, and especially not for a decent price.
Corey Gilles: They all looked great. I always feel like I am overheated when I wear wigs
Autumn: I like them all. Maybe with the last one add a ribbon over the transition. You did a great job.
Sara R: I never believe 1780's hair is as giant as it is.
Alicia B.: the hedgehog style looks a bit stiff, especiallt the ponytail part. I think its sticks out at a strange angle which betrays its 'fakeness'. the 1860s style on the other hand is very gracious and convincing, despite the visible join. You could try hiding it with some sort of delicate headband or a ribbon
Dee-Anne Gordon: Thany you for this. I actually have waist length hair, but it's thin hair. Styling it is always a challenge and my first foray into hair pieces didn't really work out. Perhaps it's time to try again.
Jackie James: They all look nice. Number is my favorite as well.
Athena The Great and Powerful: Dixie Dear, the only way I've ever been able to get a nice, fairly long lasting curl is perm rollers and a firm hold setting gel. Roll your hair very thinly before bedtime. Think +/- 30 for your length of hair. Cover with silk scarf tied snugly to your head. Then go to bed and wake up to riotous curls.
Iris Heising: I've seen people put concealer on the parting of the wig to make it look more natural
Petra Blijleven: I put a piece of scrap fabric around the wig stand to make the hole fit
Elieli style 엘리엘리 스타일: 오!!!!!!!! 멋져요.
Uli 834: How warm are those wigs?