New Method!!! Faux Leave Out - Detailed Tutorial | No Leave Out, No Closure, U/V- Part Wig Sew-In
- Posted on 13 November, 2022
- Fake Scalp Wig
- By Anonymous
Hey guys,
Today I'm doing a repeat of my Faux leave out Method in this detailed tutorial.
If you've been thinking about taking a break from closures/frontals but still protecting your hair, check out this video where I create a natural looking closure which you can wear instead of leaving out your own hair.
I also achieved thsi look with a U part wig which makes the process much easier
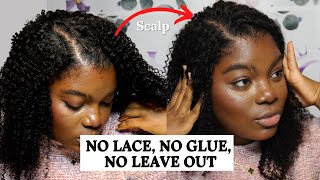
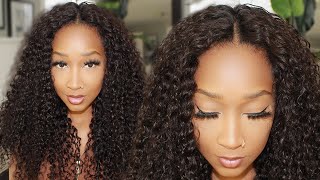
Hey guys welcome back to my channel and I hope, you're having a wonderful day if this is your first time watching. My video Welcome join the family remember to subscribe and like this video, if you found it helpful and if you come back to watch more videos. Thank you guys so much. I really appreciate all your support um. So today guys I am coming back with a highly recommended, redo video. This is um a repeat of my fake leave out or faux leave out method. I'M still trying to figure out the best name for it. Let me know what you prefer: fake leave out or full leave out method. I I feel like that video did really well. Thank you to everyone who watched who commented um. I got a lot of really interesting questions and I got a lot of new subscribers, however guys I think that video I said today had maybe like 15 000 um views, but guys I feel, like majority of those people then subscribe to this channel. So if you're, one of those guys who watch that video and didn't subscribe and you're watching this one um, please subscribe all right guys. So one question I got um a lot of was um. I know that video wasn't very clear how I was able to achieve this look, so I promised to come back to do a Clara video, which is kind of what this video is going to be a tutorial that is hopefully in more detail a bit slower and Clearer, so you can understand exactly what I did. Also people wanted to know what it looked like on straight hair. Originally this hair wasn't straight, but I straightened it out so that you guys can see what the hair would look like if it were to be with straight hair, and I think it looks amazing still. I think it looks great and then the last question I had was if we could do this with with a V part or U part or an i part, wig instead of doing in a sewing like I did the last time and the answer is absolutely so. What I did was, I went ahead to make this bundles. I had into a u-part wig and then I I saw the U part wig onto this hair instead of doing a regular sewing and I think that's much easier for me. You know I'm gon na just stop talking right now jump into into the tutorial and when we come back we'll have a we'll have a little chat so enjoy this tutorial to start off. I have a freshly washed hair, just um sectioning, where I want my pattern to be. I went for a side, seapot and once you've had that done. What I'm doing next is I'm taking out a little bit of hair beside the parts in space to make my boundary braid. Now the boundary braids um, they should be as thin as possible. They wear your fake leave out is gon na be um made. So you know if you can make them very thin, it helps to make the hair lie a lot flatter. So I'm just going to convert that all the way to the back, depending on how you know how far back about my part to go and I'm gon na do the same thing on the other side, take out the very small piece of hair, and then you Know cornrow it all the way back by the time you're done cornering. You will notice, however, that the um the boundary grades appear to be a bit too close to each other. Almost like it's covering the parting. The Parting is actually right in the middle of the boundary braids, but don't worry about that because the rest of the braiding pattern would help um. You know make your parting a lot more visible, so for the rest of the hair, I'm just gon na do cornrow all the way back. However, what is different here is I'm going to attach the cornrow to the boundary, braids and I'll. Show you how I do that first section of um, your ankle braids and then, rather than just sewing it down. I'M gon na take a piece of braiding hair extension and using a crochet needle attach this braiding hair extension um onto my boundary way, just as I've done like so and with that piece of hair, I will go ahead to cornrow my ankle braid, all the way To the back, so what this does is that braiding, hair kind of helps to you know, pull the um boundary braids apart from each other and mix The Parsley a lot more visible. I think if your hair is not as dense as mine, maybe you don't need to do this, but for me I find that this helps to keep um my parts nicely separated and I'm gon na do this for the rest of the cornrow. As I go back to the hair, so the second part again sectioning, you know all the way to the back and again, I'm gon na attach um braiding hair to the boundary braid, just as I've done like this and then braid it all the way down or Convert all the way down, so this is you know, kind of how I you know proceed to cornrow the rest of my hair. It doesn't have to look so neat. You know I really did a crazy job with the neatness here, but it's okay. It'S not gon na show, so just do it all the way down um. I went off camera and asked for help from my sister to get the rest of my hair done because my hands were hurting and I was really doing a terrible job. But it's same thing: you know she attached the um, the braiding hair on the boundary braids, and you know I was able to get the rest of the hair done. So that's what it looks like at the back. Nothing fancy behind the front is really what matters, and if you see right now, it makes my parting a lot clearer. So the next step now guys is to actually get the fake leave out done for this. I'M gon na need some loose hair, I'm using some hair from the same extensions that I used for the U part week, so the hair textures is going to be very the same, which is good. I like to spray some water on it, just because it helps to make the hair easy to work with and what I did. Of course, I cut out the weft, and then you know began to take a little piece of the hair foreign you want to take. Just little pieces - and I know it looks like funny and clumpier, but that's because, like I said I wet it, it just helps to like you know, help you pick the hair and makes it a lot you'll need it when you're doing it, but eventually, when you're Done with the hair, when it gets dried um, it's not it's gon na look a lot better and a lot separated. So don't panic yet we're still in the process, so I'm gon na just continue doing that. Um taking a small piece of the hair that I had cut out and then doing a typical um crochet on my boundary braids, depending on how um Sleek your hair is um, you may want to like knot it twice or once you know just depending on what You think holds - and you want to you - want to do this um this crochet hair as close to each other as possible, and don't worry, if maybe, if you miss a spot or if something is not close enough, you can always come back and you know fill It up again, you know and just have it looking much better. So I went ahead and I you know, put this crochet hair all the way um to the end of The Parting on the boundary. Braids foreign. Don'T worry if it's not like really full right now, because you have a chance to like make it as full as you need to um by the time. You'Re done it's a it's a process you can easily play with so guys once that's done. The second step is to begin to flip the crochet underneath to come from underneath your um boundary braids, and this is what makes you look very natural right right now. You can see the knot sitting on the hair, but the moment you start flipping your um, the crochet hair, to come from underneath your braids or underneath your cornrow. It makes all the difference and um just to explain what I'm doing here and putting the crochet needle under the braid. I'M taking a little piece of this hair that I have just crocheted and you know attachment to the pin I'm pulling it from under. So when it comes from underneath, that's kind of what you know creates the magic here, because those hairs that's coming from underneath your braid starts to look as if it's growing from your scalp. So again, I'm just gon na keep doing this and you see the hair. Now is sort of flipped right because now it's coming from underneath the hair. So this is the second step I'm going to go ahead and do this for all um the hair that I have just crocheted all the way to the end um. This is an easy step. You don't have to tie it or do anything you just have to flip it. So you know putting your crochet take a piece of hair that you just crocheted: um put it in the crochet needle and pull it out from under the hair by the time you're doing you've done that you can see now that underneath it starts, you know it Hides all of that knots and what you need to do next is to use a blow dryer, which is what I have there. My blow drying brush from Revlon um use a blow dryer and kind of redirect the hair, so it falls on your boundary birds. So now this hair is what kind of covers the knots it covers. You know all of the imperfections happening underneath and again, like I said you can always go in to fill this up um. If it's a bit too scanty, you just need to put enough hair to cover your weft um when you make the rest of your hair um when you get the rest of your hair done so that's it guys um all flipped on one side. So what I'm? Showing here guys is just what this hair looks like before you flip it and after you flip it, so you can see the difference. You can easily see the knots before you flip the hair, but then, once you flip it like, I did there. On the other side, you can see that the knots are just completely removed, so I went ahead to flip the other side as well the blow dryer again to redirect this hair. Sorry I was really out of frame in this picture and I didn't realize that so after that's done, I'm just gon na. You know tuck away this, my fake leave out so that I can put get the rest of the hair done. I have already done this. You part week in a different video and right now, all I'm doing is just attaching the u-part wig to my hair. This makes the process a lot easier guys because you know I didn't have to stay there. Trying to you know, sew the weft on my hair. I just had to sew the perimeters of this u-part wig. You can have a typical year per week that has clippings. You can go ahead and use the clips or the Combs um to attach it to your parting. But in my case I didn't want to take this off. I wanted it so down. So I just sewed around my boundary braids, which is now around my leave outs, and then I sewed around the perimeter of my hair um. Once you get to the Pyramid of your hair, you don't really have to do too much. You can make like very big stitches just enough to hold it hold it in place. Um. It'S really a very simple process sewing this around and I think the wonderful thing is. I can always take out the super wig wash my hair, wash the you part, wig and use it again without having to you know, do regular sew-ins, so guys yeah. I'M just sewing this all the way around and I'm bringing it to the front um, just making sure that you know I attach it properly. So I have this video sped up about three times his original speed. So if you prefer, you can always slow it down and take your time to watch the process in detail. So that's it pretty much guys. It'S you know all attached. This was the original text of the hair. I really liked it, but I just wanted to show you guys what it looked like straight, so I need to straighten it anywho now I can take out my you know, unravel my fake leave out and you can see how nicely it covers. You know the wefts. I'M just gon na use a blow dryer a proper blow dryer the Revlon wasn't getting the job done. Um use the proper blow dryer to redirect um my hair properly. I got a piece in the wrong place and just you know get that down. This helps the hair to be flat and then, if you look closer at this hair, it looks like it's going for my scalp and I'm gon na put in a zoomed in um video. So you guys can see how how seamlessly blended with my hair. So that's it guys um all done and um what I just did was. I went off camera and I you know flat ironed. It you know, got the the bottom, also straight ened out this hair off camera. Just so you guys can see what it looks like. I you know, I I put some Edge controls on my for my edges, uh just to make that slip down um. This is a u-part wig and I think it just made the installation a lot easier. The moment I had finished the fake leave out, it just took me like what 10 minutes to just sew the parameters of this hair and if you have like a typical um, u-part wig that has like, I guess, um, the cones or the clippings, you could use That instead, but I wanted to sew this down, so I just sewed down the perimeters, but whenever I'm ready to take this out, all I have to do is take out the parameters and I can reuse it over and over again um. I have another video that showed how I created this new part wig, so that video should have come out before this one. So if you haven't watched it - and you have questions about how I made the you part week - make sure you go back and watch that video and then you should have all the information you need about this hair. So with that being said guys, I think this is. I think this is genius like I I love it. I love the fact that I don't need to wear closures um. What I'm gon na do next is um after I've worn this hair for a while. I'M gon na take down the hair and I'm gon na record that so you can see how easy it is or difficult to take down the style. Well, it's not bad at all. Don'T don't be worried about that. So yes, I'm gon na show that in detail as well. If you have any questions that I haven't addressed in this video um, let me know remember to subscribe, remember to subscribe and thank you to everyone who has subscribed previously. I really really appreciate, and I think the channel is growing, so that's exciting stuff all right guys. Thank you for watching, and I will see you in my next video bye, guys, foreign

Comments
Nnaemeka Ezeanowi: Awesome details and teaching
Pink Kay: GIRL YASSSS! You need to patent this ASAP and start teaching classes. You will make a lot of money.
FixedFlame: Love It❤
CT O: Love the videos! This is awesome content!!! Rate, Review and Subscribe!
Single Ladies Tent: Can I get a link to the previous video? I love thid one