The Ultimate Melt From Start To Finish |No Baby Hair| Wig Install
- Posted on 16 November, 2022
- Fake Scalp Wig
- By Anonymous
Hey babes welcome back to my channel
Hair Info
Shop Now➤https://bit.ly/3Dka4Oh
Hair Info: 24 inch body wave 13*4HD lace frontal wig 180%density
❤#AlipearlHair Official Store:➤https://bit.ly/3DhsYW6
Up To 50% Off, Lace Frontal Wigs!➤https://bit.ly/3sAzLnL
In FB Group, EXCLUSIVE DISCOUNT! ➤https://bit.ly/3O1I8ku
1. 24h Flash Sale!
2. Free Hair and Cash Back!
3. Unlimited Coupons!
products used
salon care powder lightner
Ion creme developer number 30
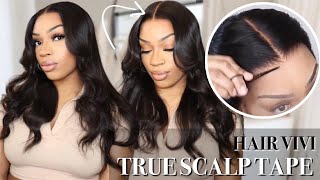
Foreign, it's Rochelle and her kids here welcome back to my channel in today's video I'm going to show you guys how to install your wig like a pro, what lace never heard of her no baby hair needed no filter needed and we're filming in 4k. Okay, if you want to learn how to achieve this, then please keep on watching. Now, I'm going to show you everything you need for a Flawless install you're going to need a wig cap or you can use stockings. I prefer to use the stockings pantyhose because with HD lace the stocking is super super thin and the wig cap is a little bit thicker. So I find that with the HD lace, wig you're going to see the wig cap under it, so I prefer to use the pantyhose and you're also going to need a melting band. So it's basically just an elastic band and you tie it around your wig. Just to have it melted down, you want the lace to melt down perfectly, so you cannot see it. You can also use a satin scarf instead of an elastic band. Now the next thing you're going to need you're going to need a wig, so we're going to be using a pre-made wig. This one is from Ally, Pearl and I am loving the hairline on this way because I know once I go in and make it look more realistic. This one's gon na look really really good. So, as you can see, the knots are very, very small in the wig, which is good, because when I go into bleach them it's going to bleach easily and it's not going to be a problem to bleach. Now, let's move on to bleaching, I'm going to take these Salon: Cara, blue blue flash powder lightener, and I'm also going to be using the ion number 30 developer. So I'm going to add the powder to my mixing bowl and add the developer to my mixing bowl as well. Honestly, I don't really measure anything out, I'm just going by the fact that I need it to be a thick, constant consistency almost like toothpaste. We don't want it to be too runny, because the goal is not to bleach the hair. It'S to bleach, just a knot. So now, as you can see, I'm going in with my got to be free spray, and I'm just doing this to get rid of any FlyAway hairs. I don't want any hair to be sticking out because I don't want it to get bleached at all. The only thing that I want to get bleach is the lace, and now I'm bleaching the lace. So I just put the bleach all over the lace and I'm going to go ahead and put a aluminum foil inside of the wig and then I'm gon na. Let this sit for about 20 minutes now, once the knots are done, bleaching, I'm going to wash this out and I'm doing this off camera. Okay. So this is how it's looking since I washed it out it's looking orange and brassy. So I'm going to use my Matrix brass off shampoo. This is supposed to be blue shampoo, but it looks more like purple anyways. I applied this all over the lace and I'm gon na. Let it sit for about five minutes and then once I wash it out, voila no more orange knots. She looks nice and neutral, and I'm here for it and after bleaching, the knots I like to shampoo and conditioner just to make sure I get all that bleach out. You can use any shampoo and conditioner of your choice. I personally prefer to use a Pantene Pro V: that's what I've been using for years and all of my wigs now, I'm back in my studio and as you can see, I'm gon na go in with my hot comb just to flatten down this wig and comb. The sides, because I'm prepping this week for tweezing the hairline I know tweezing - is not everybody's favorite thing to do, but you know what this wig already came with a really good hairline, so it doesn't require required me to do a lot of tweezing. I must have tweezed it for about five minutes and I'm just going in on the sides like and tweezing. Honestly, it's like a preference thing. Some people like that full-on, like scalp, look and some people like a bit more hair on the sides. So it's up to you in what you like. I do have a very detailed video on tweezing. I will link that video down below, so you guys can follow that video if you're not sure what to do we're gon na move on to Tintin DeLay. So if you're my skin tone or deeper skin tone uh, you need to tint the lace, because the HD lace is kind of like a transparent, like you need to tint it to match your skin tone. So I use liquid foundation to do that. They do have Tintin products on the market, but I prefer to use Foundation now. I just popped the stocking cap onto my head and I'm just going to tie that off and cut off the extra piece of stocking. Now I'm going to go ahead and create some holes by the ear and then I'm gon na go in with my bolt hole Liquid Gold just to apply the stocking cap to create the ball cap method. I do not like using glue to do this because I don't want the glue to pull on my edges and this stuff. It doesn't pull on your edges and you can take it off easily with water. So now I'm going to go ahead and cut off all that extra piece of stocking that we are not going to be using now, as I mentioned before, I prefer to use the pantyhose because it is super thin, especially when you're doing itchy lace. If I'm doing a transparent lace and it's not HD, then I wouldn't use a pantyhose. Now, I'm going in with my Foundation as well just to cover my hair, because I don't want my hair to peep through the lace. I wanted to kind of have a scalp look. So when I pop my wig on it, looks like you're seeing scalp and not my hair peeping through underneath and the hairline is looking pretty good, I'm here for it, so I'm just creating a center part. We'Re doing a center part today and you guys know I love side part, but you know what I think the center part is starting to grow on me. Anyways, I'm going to cut off that extra piece of lace at the side. It'S usually my least favorite part to do on camera, probably because my mirror is so small, but that's how much I cut off at these sides now I will say that this wig was just a tad bit bigger than my head. My head size is about 21 and I think this wig was a 22.. Now I'm going in my little scissors and I'm cutting sections, some people don't cut sections when they apply their wigs. I just find that this is easier for me and I feel like, if you're a beginner to wig, it's a lot easier to do this as well. I just feel like this method works for me now, I'm just gon na pull it down a bit, make sure everything is looking good and as for the hairline, I want it to look a little bit more realistic. I don't want it to look like it's just going straight across my head, so I kind of want to have like a V almost like a Widow's Peak, because I naturally do have a widow speak. So I feel like my wigs need to have a little widow's peak now, I'm just cutting off that extra piece of hair and pulling everything down just to make sure I'm happy with how it's looking all right. So now I'm gon na go in with some lace glue. I use my skin protector already and I'm just gon na apply this to my forehead area and I'm using my rat tail comb just to apply the lace glue. You can apply up to two layers or seven layers. It depends on how long you want to wear your weight. I know I'm going to be wearing this for probably a day or two, so I usually just apply two layers of glue and the glue that I'm using it's actually my very own glue and she will be coming out very, very very soon you guys. So I'm just going to pop this onto my head and then I'm going to go in with the blow dryer on a cool setting and then I'm going to go ahead and take my Razor. My little eyebrow razor and cut away the extra lace and, as you can see, I'm cutting off those pieces of hair as well, so I'm customizing the wig hairline for my hairline. So I don't like cutting it straight across, like I mentioned, because I do have a Widow's Peak, I'm trying to create the most realistic hairline for myself. So now I'm going to go ahead and apply the glue on these sides as well. Now, personally, I love doing the ball cap method because I feel like that's really what protects my edges. If I wasn't wearing the ball cap method, my hair would be peeping out at the side. I'D be getting glue all over the side of my hair Trust me. I'Ve done that before and I just think this works best. It'S a bit more work, but I find that it protects my hairline a lot better. So now I'm going to go ahead and Pop That lace down once again and go in with the blow dryer on the cool setting. So now I'm going to go ahead and just part the hair and go in with my got to be free spray spray. I like to use the got to be free spray spray as well, and the reason why I actually had to go in with it, because you guys my wig cap, even though I use a very thin wig cap, I should have melted down the edges and I Didn'T I was being kind of lazy so when I put the spray on it, it's actually going to help to melt down that wig cap. So that way, you cannot see the wig cap under my wig, because that's just not the look we're going for so, as you can see, I'm just going in with that scissors and cutting away all the extra lace, and I like to use my eyebrow razor to Cut both as well and I'm kind of very Jagged, so not straight lines, and I just added some more glue to the ear part. So that part, I usually add two to three layers of glue, because I find that whenever my wig is about to lift, especially if I've been wearing it for a minute, then that's the part I'd add more glue to so it doesn't lift very easily and honey. She'S already looking good - and I was like you know what I don't think, I'm gon na be doing any baby hairs, none whatsoever, I'm here for it. This hairline is giving me life now, I'm gon na go ahead and repeat the same steps on the other side. I'M literally doing the same exact thing that I did on the other side, so we're kind of gon na speed this part up. So now I'm gon na go in with my hot comb flatten this wig down, because I don't want this to be sitting on my head, like it's a hat, okay, we need to get it as flat as possible. That is what the hot comb is for. It makes a huge difference. I'M gon na go in with some mousse, and I'm gon na apply this to like the edges of the wig. This is what's really gon na get that wig to look super super melted. It'S gon na give the lace that really melted. Look and I put some mousse on the little Edge brush. I don't use a lot of mousse because I don't want the hair to be hard and stiff and I'm just cutting away the little edges on the side. So we're not going to be doing any big baby hairs, so we don't do that. But if that's the look you're going for that's perfectly fine, I'm gon na be using the Melt band and tying down my wig and leaning this on about five to ten minutes and voila. Are you seeing that I mean I got my makeup on now, but are you seeing that hairline it looks amazing and as for our makeup, you guys, I just tried a new Foundation routine. Let me know if you guys want to see a video on that and I'll definitely film it for for you so yeah. This is pretty much the completed. Look. I love how this wig is looking. This install is probably my favorite. It'S super flawless. I love it. Let me know what you guys think and I'll see you guys in another video very very soon. I love you guys. Bye,


Comments
Emoretta Robinson: The video started off with the adorableness that are your daughters. And that wig was laid to perfection. Also I'd like to see the new foundation routine.
LashLovesBeauty: You make every wig look perfect! <3
a: never worn a wig in my life but i enjoy your wig videos. i just love how you don’t do baby hairs
Shy City: Ok wigs are always laid & face serving for days
Diara Campbell: please continue to post more content like this.!!! The culture needs it! By the way, your two girl… beautiful! Beautiful family
Lia Nora: As someone experiencing hair loss i find your videos so helpful as I want to start wearing wigs. I was wondering if you’d ever be able to make a video on how to style hair toppers? I imagine you probably don’t wear them but I feel like you’d know how to style them best to make them look realistic!
Maria Joy Abdul: You should start making wigs again. That was fun to watch ❤
B: Yess I love it!!! Your gorgeous I’ll be waiting on that foundation routine
Sasha Adaams: I absolutely love it here!! ❤️❤️
Raphael Satish: love you boo your hair is on game and always complements your snatched face xx
Created By Nori Elan: Very beautiful work! Love your channel.
Felicia Barrett: Absolutely gorgeous ❤️ ❤️ ❤️ ❤️
mindsong81: Excellent! and yes to the foundation video!
Ali Pearl Hair: So gorgeous! Thanks for sharing our hair
Angel Face: The baby got so big fast ❤️
Just Kash: ouuuuuu what density is your wig?! this looks sooo good
LM: I have learned so much from you… Thank you. My question I have is how to get the back flat? What do you do with that? When I use the straps to make it tight to fit ….it bunches up .. is that just how all wigs do? So my question is everyone shows how the front looks, They even show when they flip it on but. are you using the comb and the straps? I never understood how the back is secured. In one of your next videos can you show how to completely put on the wig from front to back? Using the comb or straps… PS I can’t wait for you to make your glue available!!! ❤
K8 Lar: looks amazing. Hair and makeup video next please
Adrii_Dream: Yes please hurry with that hair glue I need a wig this winter to protect my hair
Dezi Monae: Your makeup looks great I miss your makeup tutorials
L S Lange: I worship you! You are a GODDESS!
Grace Blackmon: ❤❤❤ kill it!
Юлия Каштанова: Благодарю, привет из России.
Jacob Reed: Can we get a pixie wig?
BMediaHQ: Queen of wigs
Nikki Harrison:
Elizabeth Oripeloye: Makeup video please
Bushy Bashy: ❤❤❤
Chinasa: Please where is your top from?? ❤️❤️ and your kidssss
Robin W: Yes, please!
ANDREA: ALIPEARL wigs are worth it?
PandaFood: Early!