Chocolate Bombshell | Bodywave Frontal Install | Tinashe Hair
- Posted on 12 November, 2022
- Fake Scalp Wig
- By Anonymous
Hair info: #4 Brown Body Wave 13x4 Lace Frontal Wig 22 Inch
Shop The Same Hair➤ https://bit.ly/3tbf41R
#TinasheHair Official Store➤ https://bit.ly/3UTw60r
Use Code "TSIG" to get 15% off!
1.Join in FB Group, Win Free Hair➤ https://bit.ly/3cZdiMD
2.Undetectable HD Lace Wigs➤ https://bit.ly/3FX0N0u
3.Wear & Go Glueless Lace Wig➤ https://bit.ly/3TfLPW3
4.Colored Wig for Fall➤ https://bit.ly/3WFbMkW
#lacefrontwig #gluelesswig
Instagram @tinashehair: http://bit.ly/2Isud9X
Facebook@Tinashe Hair: http://bit.ly/34FxUAm
Tiktok @Tinashe_Hair: https://bit.ly/3zeeRPs
WhatsApp: +86 16649781957 Wholesale: +86 17537405381
Email: [email protected]
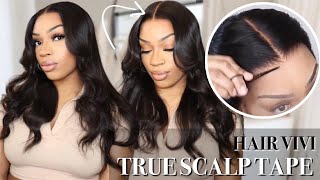
Hi guys it's Zoe welcome back to my Channel today, I'm going to show you how I installed cut and styled this unit um I'll, get into all the details on where this is from. So if you want to see how I got this look, make sure you keep on watching. Are you ready so jumping right into the unboxing? This is the books that the wig came in. It also came with a separate satin bag, which was filled with loads of goodies. As you can see, it came with a black bonnet, a comb. It also came with a headband and a wig band as well. It came with a wig cap and just a whole bunch of accessories, which I really appreciate, um opening the books. Now this is the wig. It'S a body wave 22 inch, 13x6 brown chocolate brown unit and, as you can see, the body wave is really body waving and here's a little close-up of what the lace look like as well. I don't believe this is HD lace. It was slightly thicker, but because it's transparent, it's quite easy to Tin. I decided to bleach the knots because I did see a little black um just at the base of where the car that has been dyed. So I just used my Jerome Russell bleach and I literally let this process for about 25 minutes washed it out, and this was the result it made such a difference. I then went ahead and plucked it straightened it and styled it on my mannequin head. Moving on to the install um here is the wig again on the mannequin head, so you can really get into that hairline. The only thing with this lace is that um, you don't really have a lot of space for a side part. So this is definitely more of a middle part, wig um. So I would just bear that in mind, especially if you prefer side Parts but anyways. I went ahead and tinted the lace with my foundation and just use a dense, kabiki brush. As I always d i put the wig on and then just adjusted it to my hairline and yeah. This would fit really well um. Once I've brushed the hair, I'm grabbing a little claw clip and just sectioning off the front. So I can really focus on cutting that lace as precise as possible. I always start with the ear tabs, as you know, and then once I've cut those two pieces off, I'm making a little slit in the rest of the excess lace um to help make gluing down a lot easier for me now, as you can see here, the Hairline kind of like dips inwards, so I actually feel like this would be a really good wig if you have a low, hairline, um, so yeah. This is something I haven't seen before with the wigs that little like curve in the hairline, but it was, it was nice, it's different. I will full glue and down my hair, I'm just grabbing a pencil and just marking out where I want to put the glue, because again I wasn't used to this hairline type. So I wanted to make sure that I glued it in the correct places for the wig glue, I'm using my better the melts with glue, and I applied about three to four layers of this and worked per section from the slits that I cut. You always want to make sure that you use super thin layers, and I like to let my glue air dry as well rather than blow dry. I don't know why I just feel like it dries a lot more clear when I just let it air dry now, once I've applied the glue to each section, I place the lace back over the top and grab a rat tail comb and really comb that glue Through the hairline, this is going to solidify and really like melt everything together, and I'm now just going to repeat that to either side of the head as well. Now to make sure that the sides don't lift, because they always lift for me. And I literally have no clue why I grab a little bit of my got to be hairspray and I just spray that on that little like corner by my ear and once this is done, I'm grabbing my Tinashe headband, the one they sent me in the little Satin bag and I'm gon na tightly secure that around my head for about 10-15 minutes. While this is resting on my head, I'm gon na cut some layers because I wanted this to be a super layered and bouncy um wig. As you can see, I don't really have a technique on how I'm cutting it. I'M literally just combing the hair down grabbing some sharp scissors and just hacking away at my hair. Like I always say this guys, I have no clue how to cut hair, but you just want to Freestyle it and sort of just go in a diagonal line. I also clean up the ends a little bit. Essentially, what I was trying to achieve was the hair to be shorter at the front and longer, as it goes towards the back of the head. So that's basically what I did so yeah. I let down the top section and repeated the exact same thing as I did to the bottom section. I just feel like this technique makes the hair super Airy and like light as well, and not as heavy once, I've cut the layers in. As you can see, it's really flowy, I'm gon na remove my Tinashe headband and I'm going to start cutting away at the lace. Now for this I use my eyebrow raises. I think the way you cut your lace is so important in making your wig look as seamless as possible once I've cut all the lace, I'm grabbing some foundation and a little bit of a darker face powder and just blending in the hairline a little bit more Because, as you can see, that was a bit of a white cast and I wanted to make sure I got rid of that. I'M also hot combing, my hair again before sectioning off, where I want the baby hairs, I'm starting with the little Sideburn pieces and then passing from half my eyebrow to the end of my eyebrow for the two side, baby hairs um. I always just twist them out the way, so I can focus on one section at a time grabbing my eyebrow razor, I'm just cutting the baby hairs once all of these are cut. I'M grabbing my lular bells hair straightener and I'm just curling the baby hairs inwards towards my face now guys get into that hairline. I feel like bleaching. This unit was a really good decision, because it just really made a difference on how this hairline looks and how it plucked as well. So if you're getting this wig, I definitely definitely recommend doing so. Yeah to set the baby has, as you can see, all I did was grab a medium hold hairspray and I'm just spraying a bit on my Edge brush and sweeping the baby hairs to my desired. Look once I've done each little baby hair. I grab the hairspray again and I just spray it over the top to make sure that they won't go anywhere once this is done. I'M sectioning off my hair again and I'm grabbing a one and a half inch color and I'm gon na curl each and every section, as you can see I'm doing here once each section is colored. I let it cool down in my hand a little bit before grabbing a crocodile clip and just clipping them in place and spraying them with Hairspray. I found this is the best way to make sure your colors last all day, because you're really allowing them to cool and set in the position that you want them to once. They'Ve all cooled down. I take them out, and that is the final look. I'M just joking, no we're gon na shake our head and Shake our hair, especially focusing on the roots to really make sure we get the volume going um and you just basically want to play around with it. I also comb it out a little bit with a wide tooth comb and just look at that color guys. It'S like melted, hot chocolate and I'm obsessed, it's so flowy, it's so shiny and I feel like the cut that I did really helped on making this look as bouncy and light as possible so yeah. I I'm gon na leave all the pros and cons of this wig in the description box if you're interested and the links to the hair as well. I hope you guys enjoyed the video. Let me know what you think of this hair um, make sure you like comment and subscribe, and I will see you in my next video guys, bye,

Comments
Nickie Roberts: That hair is fire it's like it was made for you, you look beautiful
lady profile: Beautiful
Kadoyeehumanhair: great