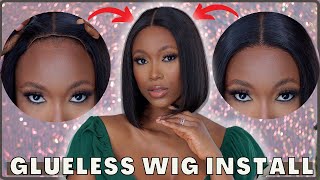
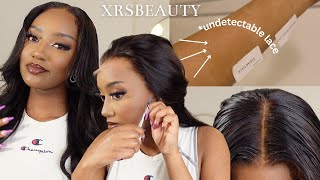
Omg!New Clean Hairline Pre Plucked & All Scalp Xrsbeauty New Clear Lace Wig | Hypnoticlaadyy
- Posted on 25 October, 2022
- Fake Scalp Wig
- By Anonymous
●▬▬▬▬▬▬▬▬▬♛ Xrsbeauty Hair ♛▬▬▬▬▬▬▬▬▬●
❤Click the Purchase Link to Buy the Same Wig Here:https://bit.ly/3dlC6yT
►Highest Discount Code(Always Valid):XRS555
❤Buy Link Here:https://bit.ly/3dlC6yT
☛SKU:LFW13
☛Length:22in
☛Density:200%
☛13x6 New Clear Lace & Clean Hairline
*New* CLEAR LACE is real clear lace, it’s undetectable on your head.
*New* CLEAN HAIRLINE is much more natural than regular pre-plucked hairline, we customized this natural hairline to make it melt skin much perfectly.
Other Hot Sale
High-quality & Invisible Clear Lace Wigs➡https://bit.ly/3nLEUGO
Affordable & quick install Bob Wigs➡https://bit.ly/3cgPOSu
Affordable Single Knots Wigs➡https://bit.ly/3aal6K7
Top Recommendation
Best Body Wave Wig➡https://bit.ly/3MEIrRI
Best Kinky Curly Wig➡https://bit.ly/3Jnw8r2
Best Water Wave Wig➡https://bit.ly/3O4zSkW
❤Follow xrsbeautyhair.com
❤Be Sure to Follow Official YouTube:http://bit.ly/2M3KQLS
Instagram: https://www.instagram.com/xrsbeautyhai...
Facebook: https://www.facebook.com/Xrsbeauty
Pinterest: http://bit.ly/38VFY3a
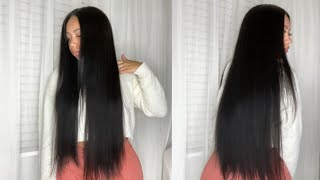
What'S up ladies happy New Year happy New Year, if you guys want to see how to achieve this, look please keep watching, don't forget to like comment and subscribe and I'll see you guys in my next video. So the company I will be working with today is XRS beauty hair. This is their new, clear lace and I just wanted to show you guys the difference. This is the clear lace here and the next one that I show you guys will be the regular, transparent lace. As you guys can see. It is so much more ashier and gray and does not match my skin tone, whereas the clear lace match perfectly and then this is their regular brown lace, and you can obviously see that. That'S like a dark grayish tone compared to the light gray, transparent and the clear lace that I was given now jumping right into the video. This is the box that I received with all my goodies. I did get an adjustable elastic band. Two wig clips um a edge control brush with a little spoolie on the end, a wide tooth comb and some wig caps, and also some flexi rods. This is the wig. This is their 13x6 new, clear lace, skew number lfw13. It is a 13 by 6 lace and it did come pre-plucked. All I had to do was bleach the knots um. It did come with adjustable straps and Combs and yeah. So jumping right in you guys already know. I'M going to clean the perimeter of my hairline with some 99 alcohol once I do that, I am going to go in with some spray, we'll be using our handy dandy even and going right in now. Those of you who've been following me know that are always use even spray, or sometimes I'll go in with some adhesive. But this time I was just feeling a little temporary, so I went in with my even but once that's clean. This is what the perimeter of your hairline should look like. I am going to go ahead and put the adjustable um elastic band that that they provided with me inside the wig once that on. You want to go ahead and Slide the wig on look at the lace. Make sure you like everything and get ready to cut that excess off and y'all? This lace is already given what it's supposed to give period. Next, I'm going to be taking my nutrients wax stick and I'm just going to put that on the perimeter of my hairline and then go in with my hot comb and press everything out. Just before I cut the lace off. I want everything. Looking all nice and neat, you don't want no straight hairs all in the way getting stuck in the glue or anything like that. So once we do that, I am going to go in and um hi comb, as you guys can see, and it's really really hot. So take your time make sure you don't burn your lace or yourself, because um I've done both but yeah. Now that that is all nice and smooth, I am going to um pull back my lace and use my even wonder spray. I'M going to do about two to three layers using the blow dryer in between until it's a nice tacky texture once you like the tack, the tackiness of it um. If it's sticky enough for you, you can go ahead and gently place it down like so and we'll just finish on with the install foreign. Thank you, foreign Pro girl, concealer in the shade, medium beige, and I'm just putting some of that. On the back of my hand, and I'm going to go in with a makeup brush and put that into my lace once you do that um, you want to make sure everything's, nice and clean and we're going to go ahead and place the lace down and get Ready to cut off the excess to finish up this install, like so foreign with some scissors and cut down the middle, and then I will be taking my eyebrow razor to cut down each side. Take your time with this. You don't want to cut yourself or cut too much lace off and I've done both so yeah. Once I cut that off any excess lace that you guys see, you can cut off with your cuticle scissors or your eyebrow razor, whichever one you prefer um. If it's not excess lace and it just didn't - adhere down, you can go right back in with the even spray like. I did and read here the lace until it's laid down and then once that's done, I'm going to go ahead and do a part and pull out my baby hairs and then we'll get ready for styling foreign foreign part. And here I just want to show you guys, you do get deep parting space um and I'm going to pull out my baby hairs now and get ready to mold those down. And while that is setting, we will get into The Styling portion and I will curl my hair, but as you guys can see, that lace is definitely given what it's supposed to give. I don't really have to put any makeup or anything in the part like I usually have to like everything is laid and matching. How I wanted to all I have to do is pull out my baby hairs, mold those down and then slay it honey. Take your time um since I'm doing the side part I'm going to do like two baby hairs by my temple area and then, of course, my sideburns on the side. So yeah take your time um! I am going to use my Nairobi setting foam and the even lace spray to lay everything down before wrapping it up with the elastic band and some wrap strips, but yeah foreign foreign everything down. I am going to go in with my tweezers and just thin them out just a little bit. This part is optional. You don't have to do this, but I just like to go in and make it look as natural as possible. So I went in and just plucked my baby hairs just a little bit to make them a little more thinner than what they are before. I lay them down with my Nairobi setting foam and the even lace spray. Now I'm taking my Nairobi setting foam and I'm just going to lightly put that on top of the hairs that I pulled out once that lay down I'm gon na go back in with my even lay spray, give it a final spray. This is what melts the lace, and then you want to tie that down with a wrap strip. It can be black or white um and I got those from my local Beauty Supply Store, sorry guys and um your elastic band only let that sit for like five ten minutes, usually if I'm not styling my hair but um. Since I do this during the install. I keep that elastic band on the whole time. I am styling it, whether I'm curling or whatever, and once I'm done that's when I'll take that off just so, I can have the ultimate lace laid melted baby. We ain't playing no games. Next, I will be going in with my BaByliss Pro titanium, curler or straightener slash curler, and I will be doing some soft body wave. Curls um. I am going to show you guys the one side I believe, and then I'm gon na come back with the other side, um straightened or curled already, but you already got you guys already know just curl away from your face. Um I did okay. No, I lied. I sped this up um and you guys are gon na see both sides um and all I did was curl away from my face, starting from the bottom and then working my way up to the top. I did not cut any layers or anything in this hair. So um the curls lay nicely with this hair already being a loose wave texture, but yeah take your time um. I know this is going super fast like I said I sped this up just for the purpose of the video, but it took me about like 10. I say 20 minutes to curl my whole head, but it was worth it um and the curls lasted so take your time um, as you guys can see like I said, curl away from your face: small slash, medium sections. Until you get all the way up to the top, and then you want to repeat the same process on the other side until it is completed foreign okay, so this is what the lace is looking like once we cut the wrap strip off and I just cut A little slit in the middle and then it'll start tearing, and then you can just rip it off um as it goes, don't pull too hard because you know you don't want to mess up anything that you just laid down. But y'all cannot tell me that lace is not laid baby. That is looking just like my hair. Don'T play with me now I'm going to go in with my Kamoze um mini straightener, and I got this off of Amazon and I'm just going to curl my baby hairs upwards like so. It just helps so when you do get ready to lay your baby hairs down, they're already pre-curled and you not hustling and bustling to make them work um, once I'm done with that, I'm going to set them with some more Nairobi set in foam and a little Bit of got to be glue gel and that will complete the finished Loop foreign foreign. Thank you. Thank you. Next, I'm going to go in with my Maybelline Fit Me pressed powder and I'm just putting that in my part just to clean it up, make it look all nice and neat, and once I do that, I'm going to go in with my hot comb flatten. Anything out and then we are going to comb it out and that will be the finished look foreign okay, ladies. This is the finished, look get into it get into it again. This is beauty XRS hair. This is their 13 by 6 HD, clear lace. I'M sorry! Y'All, it's not HD, it's clear, clear lace: um! This is their loose wave, wig and uh. I believe it was 22 inches and it is 200 density. If you guys like this video, please give it a thumbs up, don't forget to like comment and subscribe girls. I will see you guys in my next video bye and thank you so much foreign foreign
Comments
Angele Asbell: I’ve been looking at this wig and here you are! Tfs!! It looks great!
Barbiegirl: Beautiful sis love it