Caramel/Brown Highlights Ft. Alipearl Bodywave 28 Inch Lacefront Wig - Arielle Anne
- Posted on 29 March, 2020
- Fake Scalp Wig
- By Anonymous
Hello Loves!
Glad to see you back on my channel. Here is some new new for y’all featuring this 28" Bodywave Lace Frontal Wig by Alipearl. Check it out:
- https://www.alipearlhair.com/alipearl-...
Details
HUMAN HAIR TYPE : Virgin Human Hair Lace Wig
HAIR TEXTURE : Body Wave Hair Lace Front Wigs
HAIR COLOR : Natural Black
LENGTH : 8-30 Inch, Attention: Wigs Over 22 inches, Frontal Part is 20 inch
CAP SIZE : Average Size, Universal Cap Adjustable Size for most People
LACE MATERIAL : Swiss Lace in Medium Brown Color/Transparent Color
HAIR QUALITY : High Quality 100% Human Hair Lace Front Wigs, Best Lace Wigs
FEATURES : Baby Hair Around, Slight Bleached Knots, Glueless
Using Garnier Belle Color Hair Dye in shade 43 Dark Golden Brown
Wella Color Charm Toner in shade T18
Clairol Professional BW2 Powder Lightener
Wella 40 VOL. Developper
#ALIPEARL #ALIPEARLHAIR #ALIPEARLHAIRWIG #ALIPEARLBODYWAVE #BODYWAVE #LACEFRONTWIG #HIGHLIGHTS
Check out my previous videos that you may like based on this one:
UNICE HAIR 8 INCH STRAIGHT 13X4 LACE FRONTAL BOB WIG - https://www.youtube.com/watch?v=rJC5Ge...
HAIR SALON TIME: SLAYED SILK PRESS AND TRIM ON NATURAL HAIR - https://www.youtube.com/watch?v=_RZtSX...
WASH DAY ROUTINE FOR NATURAL HAIR - https://www.youtube.com/watch?v=L_npli...
Don’t forget to subscribe to my channel, like, turn on post notifications and share. I appreciate each and everyone of you. Thank you for watching and I can’t wait to see you all in my next one.
-
Follow me on social media - Suivez-moi sur les réseaux:
IG: byarielleanne - https://www.instagram.com/byarielleann...
Twitter: byarielleanne - https://twitter.com/byarielleanne
Snapchat: arielle-anne - https://www.snapchat.com/add/arielle-a...
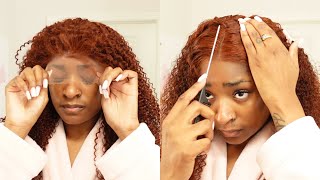
Hey welcome back to my youtube channel today is all about the hair girl. It'S literally all about the hair on this video is to show you how I got this look everything I had to go through to get to this result. If you like, what you see keep watching, and I will guide you through the whole process - show you and explain to you everything that I used and did in order for you to recreate this without further ado. Let'S get right into it! For this video I will be using a Lee pearl hair. Am I ordered directly from their website. It actually took forever for me to receive it, but thank God it finally came. It is their body wave 28 inch lace, frontal unit. I will definitely link down in the description box the direct link to this wig. It comes with three combs one on each side and one in the back. The lace is transparent, it is a hundred and eighty percent density. It comes with an elastic band, a beautiful ally, pearl pink bag. It also comes with two beige, wig caps and some instructions on how to maintain and wash your hair. So first I started by separating the hair in sections. I took the part that is in the front, so basically the frontal part of the wig and separated in two I'm using the middle as a guideline, then I did the same thing for the back of the hair, so I separated in a few sections just to Make sure that it will be easier once I actually colored the hair, I like to use a foam mannequin head when I'm coloring hair, just because it makes it easier if there is any stains or you know if you still have some color on your gloves, and You touch it it's easier to clean. I am using three box of this granny bel color hair dye. It'S a hair dye that you could find at any drugstore, pretty much everywhere. It'S in the shade 43, which is dark golden brown, I'm using three box of that. This was my first time using this hair dye, so it was truly an experiment, but if I would have to do it again, I wouldn't apply it with a brush. I would use the bottle that actually comes in the box. It'S really easier to use and easier to manage in order for you not to put some all over the place side notes. You will also see that during this video, my mannequin head will be moving left and right. I was having a lot of issues and they don't have the proper stand. My usual stand that I used to color my wigs, but you know I had to make it work, so we had to tape it down a bit. My apologies for that now, as you can see, I'm placing the wig on the opposite side. In order for me to bleach the knots I am using Claro professional powder Lightner with some 40 volume developer. As you can see, I'm being very gentle because I don't want the bleach to go through the lace so yeah. After doing that, I washed that area with some blue shampoo just to get rid of the orange by the way. I also washed the hair. After applying the tent, I left it on for 30 minutes and then washed it with some shampoo. You can use any shampoo, as you can see. The Garnier hair dye didn't do much to the hair. It didn't make really a difference. If I was you and I would have to redo it, I wouldn't use that hair dye. I would recommend that you pick another one with that being said: let's get to the good stuff, as you can see, I started bleaching the hair I'm using the same bleach with some 40 volume developer, the Claro bleach and some for paper. This is the moment where the artist and new kicks in. So it's completely up to you to decide where you want to have your highlights where you want it to be lighter. Personally, I decided to leave two or three rows of brown hair in the bag, just because I wanted it to be darker in that area. As you can see, I'm also not going all the way to the root of the hair, because I want the highlights to be at the bottom a little bit like a balayage type of thing. So for my wig, I'm gon na try and explain to you what I did the best that I can so like I said I left the bottom 2/3 Rose. Dark brown then took three rows added some bleach. Then I also left in between two or three rows of dark brown. Hair again took the other next three rows added bleach. That'S exactly what I'm doing right now! So basically, two three rows: Brown to three rows: bleach to three roles: Brown, to three rows: bleach to three rows: Brown to P rows. Bleach. Am I being clear. I hope that this is clear to y'all, because obviously I can show you better than I can explain so excuse me for that, but I am repeating those steps right now, so you can see how I'm doing it so now that all the back is done on To the lace front, part of the wig, so I took the same line that I had created before in the middle the middle part, basically and created a triangle to make sure that in the front, both sides are completely equal when it comes to the highlights. I'M also going higher with the bleach in the front because I really wanted it to be. You know I want the highlights to be obvious and present I wanted to pop, and I wanted to contour my face as you can see, I'm also using a comb when it comes to bleaching the hair, because I want to make sure that there's bleach all over The hair and that I'm not missing any spots by the way I decided to not use gloves for that part just because I'm not really touching or being in contact with the bleach. But if you feel you know like you will touch the beach or you rather work with your hands feel free to use some gloves now. Moving on to the sides, I'm pretty much doing the same thing as I was doing in the back. Basically, I'm leaving some areas, dark brown and some other areas I decided to add some highlights. I'M also going a little bit higher with the bleach just because I wanted to blend with the parting area that I just bleached. Now, moving on to the toner, I'm using a Wella color charm toner in shade c18, I am using the bottle that came in the hair dye box, but you could use any bottle to apply this toner, just making sure that all the areas that were previously bleached Are soaked in the Wella toner once that is done, wait 15 to 20 minutes, then I wash the hair with some blue shampoo. Now that the hair is dry, I let the unit air dry overnight, and now I am styling it with some styling foam. Some styling mousse and cutting it real, quick making sure that my layers are on point now on to the curls. I threw some curls in there just to make sure that you know the hair is looking cute. Everything that I'm using will be listed down below. So don't worry about that everything is in the description box if you're wondering what I'm using or, if you have any questions, just drop it in the comments and I'll answer using this OGX coconut water oil to finger comb D hair. This is what the hair looks. Like after finger combing it, I also added some setting spray just to make sure that it all stays together that the curls stay intact, I'm also using a wide tooth comb, so you could do that also in order for you to make everything blend here, you go. This is the final result. If you liked this video, don't forget to give it a thumbs up, don't forget to subscribe to my channel that way, you won't miss any other of my uploads, my new videos, and I will definitely see you guys in my next one love you all. You


Comments
slim-sheydie: looks amazing, you’re gorgeous
Anna Flawlesss: Imma try and highlight my wig now, keep it up with these videos
Bonita Sledge: GREAT JOB. LOVE IT
Planet Parris: Love that color you got
Sharida M: How long did you leave the T18? My hair is similair to yours but it’s a little darker. I want it toned a little bit darker than yours is the T18 a good option or are there any others ? My hairstylist didn’t say which toner she used & i want to save some cash! Doing my next toner myself
fouzotv: waw!