Beginner Friendly Lace Install | Feat. Ashimary Hair
- Posted on 24 May, 2022
- Full Lace Wig
- By Anonymous
Hey Boujie Fam. In this video I will be doing a beginner friendly hair install tutorial. This is a 6x6 lace unit from Ashimary. I have their information and links listed below. This install is very quick, simple and easy. I will Also be showing you all how I achieve perfect beach waves with an inexpensive curling iron. Feel free to ask any questions in the comments below. All of the information for the hair as well as a link is listed below. Thank you so much for watching and don't forget to LIKE & SUBSCRIBE!!!
FOLLOW ME:
●▬▬▬▬▬▬▬▬▬❤Ashimary Hair❤▬▬▬▬▬▬▬▬●
get 11% Off, Code: FB11
Hair Details:Highlight Body wave 6x6 Transparent Lace Wig,22inch, 180% density
Direct Link ➤https://bit.ly/3wtxk7U
HD Lace Wigs:➤ https://www.ashimaryhair.com/collectio...
360 HD Transparent Lace Wigs:https://www.ashimaryhair.com/collectio...
Highlight & Cololful Lace Wig :https://www.ashimaryhair.com/collectio...
Full Lace Wigs :➤ https://www.ashimaryhair.com/collectio...
Color Hair➤ https://www.ashimaryhair.com/collectio...
★ Ashimary Official Website ➤ https://www.ashimaryhair.com/
Find Ashimary on Social: Facebook: http://bit.ly/2Em6mo2
Instagram: http://bit.ly/2RUTBst
Youtube: http://bit.ly/38ArYea
E-mail: [email protected]
WhatsApp: +8613273746020 (Provide Wholesale)
WANNA COLLAB?
For brand promotions, public relations & appearances, please email: [email protected]
FAUX BOUJIE
P.O. Box 496554
CHICAGO, IL 60649
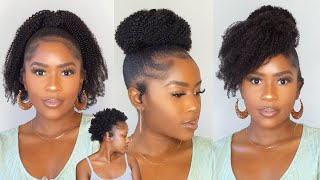
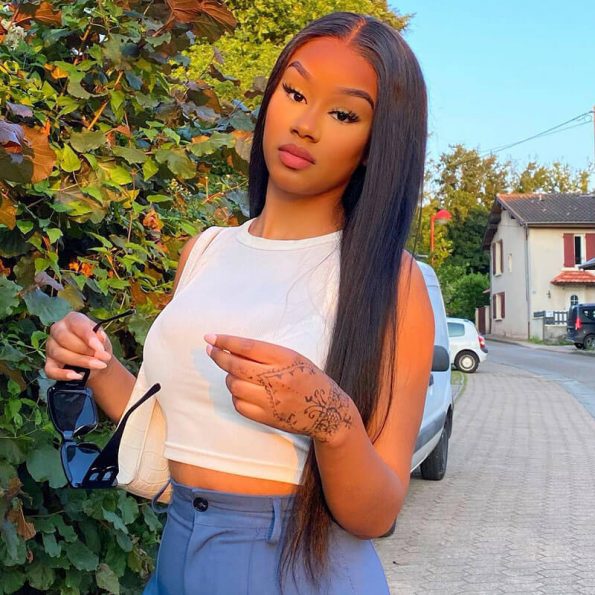
What'S up, everyone welcome back to fake bougie in today's video i'm going to be going through an install process with ashley mary hair. If you are new to my channel, welcome, don't forget to like and subscribe, let's get right into it all right. So this is the package that it came in as she married. I love their color too. This is really pretty um like teal blue color. They sent me some cute eyelashes. They also included an edge comb and brush combo. I actually love these some wig caps that actually match my skin. This time. Y'All know they be usually sending me the super dark ones, a band to secure the wig, and this is the wig that they sent me. It is a 24 inch body wave, wig um, the closure is 6 by 6 and the color combination is a 4 and 27. So the length of this wig on the website goes from 10 inches to 34 inches. It does come with four different combs. You also have the elastic bands on it, which definitely came in handy for me just in case. You know you need to size the wig to your head and one thing that i also wanted to point out to you all that i absolutely love is that they make sure to put hair on the inside of the weft of the part of the hairline. That doesn't include the closure and the reason that it's so important is because it helps to conceal it. It makes it look less like a wig if you don't have a full 13x4 going across the side, so super super important and, as you can see, it is just constructed very, very well absolutely love this wig. So i'm just going to go ahead and put on my stocking cap. Next, i'm going to just go ahead and cut some little holes in the ears and you want to make sure the hole is as small as possible and more towards the back of your ear. So that when you put it behind your ear, you don't have a space in between the front of your ear and your high line. You want that to be as close as possible so that when you go for your install, it doesn't come up, especially if you're doing a 13x4. But since this is a six by six, i'm going to mostly just focus on the area. That'S going to be covered with the lace, so the rest of it really won't matter um after i hit it with my got to be extra heavy, i'm going to go ahead and blow dry it and make sure that you all spray onto your braids too. That'S going to help it to keep from slipping back next, i'm just going to make sure that it is completely completely dry like not damp. It has to be 100 dry and then you're gon na go in and start cutting, and i always cut it from around. My ears and then just work my way around through my hairline and just little by little cutting it more and more. Until i get you know as close to the scalp as i need to be, and always leave at least half an inch between your real hairline and where you want the wig to start, you never want to have any type of install specific like right. On your hairline, you never want to do that, so always have it a little more forward, especially if you're going to be using glue. So next, i'm just going to put the wig on just to see like how it fits onto the cap to see. If i need to cut it a little bit more and also if you want to at this point, you can go ahead and put some um makeup on your cat, which i'm not going to be doing that. So i'm going to go ahead right in with the glue and i'm just putting it at the edge of the wig cap as well as a little bit onto my skin on my forehead and i'm just smoothing that down with the comb just making sure it's all Spread out because my um bold hold glue is acting crazy. Actually, this is ghost bond yeah, i'm using ghost wine in this video and so yeah. I wait for it to dry and then i go in with another coat. So i would say one coat per three days, so if you wanted to last a week, do two coats: if you wanted to last longer do more coats, and so the reason i didn't use makeup is because i'm going in with my even tinted lace, spray and I'M just going to hit the lace with it doing small coats just like. If you were, you know, painting something you do a nice coat and then you dry it and then you go in with another coat. If you want it to be a little bit darker, the color that i'm using is warm light brown and with this is really important to get your right color because it looks horrible like if you go too light or too dark. It looks absolutely horrible. So make sure you test it before you spray the whole wig with it. If you do mess up, you can definitely uh wash it off and re-spray with the right color. So next i'm going to sit the wig like lightly very loosely onto my head and i'm just i'm adjusting it and just to see like where i need it, where it lines up at so that i can go ahead and start pressing it in, but definitely make Sure it is lined up where you want it before you start that stuff. I ended up tying my hair back just so i could um get a little more coverage and so just to explain this part to you all a little bit better. When you put the wig on you want to make sure that it is a little bit in front of the wheel cap. So you see where the hairline starts on the wig, where it looks like baby hairs. That is a little bit in front of the wig cap, and the wig cap is a little bit in front of my hairline, and so once i do that, i'm going to go in with my freeze spray again and use my actionary wig band to just tie. My hair down make sure everything stays secure. While i go ahead and flat iron, the wig and, as you all know, i always wash my wigs when i get them, especially if i have to bleach the knots so i'm just used to washing them anyway. So yeah. This wig, when they shipped it and the shipping, was pretty quickly. It came within a couple days, maybe like three or four days, and that's another thing like when you wash your wig. That really tells you the quality of it. So i didn't have any issues with this, so this is a good quality wig. Usually, when i do installs, i don't like to comment too much on the quality of the hair, just because sometimes when i'm posting the install video, i've only had like two weeks experience with the hair, but with this wii. So i have worn it a couple times and it's really really good quality. Like i said you can tell like when you first wash it, the quality is really good um, it didn't tangle and stuff. When i washed it, i had very, very minimal, shedding um, just the entire flood iron process was super, easy, didn't have any tangling issues or anything like that anytime, i brushed it it just. It was perfectly fine, so yeah 100 recommend this hair and this company, and so at this point i'm just going in after i finish flat, ironing it and using my electric hot comb any if you plan on doing installs, especially lace installs, you need a hot comb. An electric icon, like it's vital, so i went and did my part behind the scenes just too hard and i used some a wax stick to just lay the hair to the side. You all. So that's why it looks like that and next i'm going to use a razor. You do not want to use scissors if you don't know what you're doing so, i'm just going to pin my hair back to keep it out of my way and i'm just going in with the razor it's hard for me to do it on camera. So at this point i'm just getting as close to the scalp as possible, but um yeah. I have to look in the mirror when i do it, because this is like you have to be super super precise. It'S like really important. So at this point, i'm just going along the hairline just making sure you know that everything looks good, and this is definitely a step that you 100 want to. Take your time with. You do not want to jack up the hairline and the reason you want to use a razor is because you don't want a blunt straight cut, so a razor, no matter how you use it. It'S going to jack the hairline for you at the lace and that way nobody can like see like straight lines, and you know it just looks more wiggy when you have straight lines. So next after i shaped it up a little bit off camera, i'm going to go in and pull some little baby hairs, and i love that this one already had the baby hairline out. So i didn't have to um, pluck the hairline or anything and for these baby hairs i'm going to use my got to be and just swoop it through. So sometimes i use the freeze spray. Like majority of the time, i also use eco styler, sometimes gel, but for this one i wanted to use the got to be gel just because it's a little more humid and hot outside is getting close to summer, and this is great for edges, the more humid It gets that's when you can go in and use the freeze spray on top of it too, just a little tip and trick for you all and, as you do, your um baby hairs don't be afraid to go back in and cut them more. If you need to like this part right here, i noticed, as i was swooping them. They were a little bit too long, so i just went back in with my scissors and did some more cuts until you know the right length for what i wanted it for you know, and so yeah never be afraid to go back in and cut it. A little more - and this was also a step that you really want to take your time with, because if you are going to do baby hairs, you do not want them to be jacked up um this wig, i also wore like without baby hairs, and it was Even more gorgeous, so definitely um don't need it, but if you do mess up like the hairline of your wig, this is a good way to hide it too. If you do baby hairs, so this wig, like i said it, was a body wave. So when i flat ironed it, i didn't really try to make it like bone straight, even though it can't get bone straight um, i'm just going to go ahead and do some beach, aka body waves back into the hair, and so a tip to doing this is Instead of using so i use a curling iron instead of using um. That other thing i forgot what it's called, but you know what i'm talking about the little stick thing, but i like to use a curling iron and just do each side to the back. So, on the left side, i do it to the back and then on the right side. I do it to the back and i let it meet in the middle of the back of my head and so yeah at this point. I'M just going around my whole head holding it for about 20 seconds on the curling iron and then dropping the curl into my hand for about five seconds just so we can set, because if you just let the curl fall, it's going to cause the ends. To be a little more droopy than the rest of the curl and so yeah, like i said, i'm just going around doing my whole head and with this the more curls you do like the more sections the fuller your hair will be. So i wanted medium fullness. So i could get the hair back to the way they sent it to me and after i'm done curling all of it, i'm just pulling all the curls out with my fingers and it turned out absolutely beautiful. I did not have to use any hairspray or anything. The curls definitely stayed for maybe like a week before i had to um touch them up and yeah. It just turned out really beautiful, and this is the final result and also to make the curls last longer you want to twist. It do like two twists, one on each side of your hair, go into the back and then roll it back and pin it up with a ponytail holder and put on a bonnet and yeah. It stays like this and the hair is super super beautiful. You all 100 recommend this hair. I will have their website as well as the link to this specific wig in the description box below so make sure you all check that out, as well as any coupon codes that they give me for. You guys, like i said, a thousand percent recommend this this hair and this color combo is really really perfect for the summer time. So definitely consider this look, absolutely love. This look at that y'all, i'm just so hyped and i have been wearing this. Like still. Thank you guys so much for watching, don't forget to like and subscribe and as always stay bougie. You

Comments
Joe Murray: I wasn't confident about what I was doing, so I'm sitting here looking crazy with the wig cap on and making sure I'm doing it right. This is by far the easiest tutorial I think I watched so thank you!
Trigo Alline: It came out so pretty. I definitely need to start doing my own lace wigs.
Virgil Lopez: I ordered three wigs with no one to install them. I looked in the mirror after watching this video and said oh yes ma’am I got this...! Thanks Hun!
Deleatha rawls: Your wig’s look natural and beautiful on you. I love the color and curl’s
Mr. Handsome: Great video and well put together.
Mattie Sanders: You did THAT!!!!
imbheat: Your consistancy is inspiring
Darrell Russell: This was very detailed, i mean i knew how to put on a wig but baby now i KNOWW
Anthony Hayes:
WOW Yummyyy: