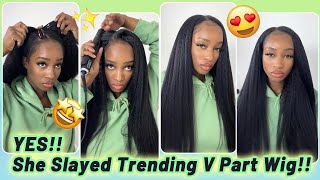
Besttttt Water Wave Unit Ever! *Must Have *4*4 Hd Affortable Unit#Reshinehair
- Posted on 14 October, 2022
- HD Lace Wig
- By Anonymous
●▬▬▬▬▬▬▬▬▬♛Reshine Hair♛ ▬▬▬▬▬▬▬▬▬ ●
& Klarna, 4 Installments Zero Interest.
Video Hair Direct Link ➤https://bit.ly/3CcSpHL
Hair Info: Mongolian 30 inches 250% 4*4 HD Water wave wig
Use Code Get Extra 15% OFF(SAME DISCOUNT AS BLACK FRIDAY) :Reshine15
Hot-Selling wigs ➤https://bit.ly/3ffOYH7
https://www.youtube.com/watch?v=C3lM8B...
https://www.youtube.com/watch?v=wfmEWP...
https://www.youtube.com/watch?v=csb7gA...
https://www.youtube.com/watch?v=7L0x76...
New Arrival Affordable Wigs➤https://bit.ly/3r7IeOv
☛32"-40"Different Style Wigs Available ➤ https://bit.ly/3SzEgtt
☛5*5 & 13*4 HD LACE ALL IN THE STOCK!! ➤https://bit.ly/3Scy1vU
☛Best Price Glueless Wigs ➤https://bit.ly/3BN6HNU
☛Affordable Short Bob Wigs ➤https://bit.ly/3Ra4Yry
Top-selling Bundles With Closure& Frontal ➤https://bit.ly/3fjXFAk
Want To Promote Reshine Hair?
Contact With➤[email protected] & Whatsapp➤ +8615136839480
Facebook @reshine https://bit.ly/3eFdnRR
Instagram @reshinehairbeauty https://bit.ly/39u9qLS
Tiktok @reshinehair https://bit.ly/3sA66Mq
Youtube @reshinehair https://bit.ly/3axajoh
#reshinehair #reshine #loosedeepwavewig #lacefrontwig#skunkstripe#waterwave#humanhair
Connect With Me: @iammissfaye on all social platforms
Music Credit: Royalty Free music provided by HookSounds via http://www.hooksounds.com. I get all my background music from them. They have great quality and an amazing selection!
For Business Inquiries ONLY: [email protected]
Faye In The City
PO Box 33
Hazelwood MO 63042
Equipment:
-Vlog camera: https://amzn.to/3BM6WYE
-Filming camera: https://amzn.to/3BFZ6Qe
Hair FAQ:
-Texture: Fine with excessive shrinkage that gives the optical illusion of coarse hair
-Density: medium density
-Porosity: Normal/Medium porosity with a patch of low porosity in the front
That’s all that matters because the curl typing chart is divisive and toxic. What matters most is if your hair likes a product or it doesn’t.
Disclaimer-My channel is my avenue to share my personal experiences as well as product reviews. It is to be used for informational and entertainment purposely only. I am not a licensed cosmetologist. For questions pertaining to YOUR personal hair experiences, please book a consultation with a trusted professional stylist. A trained stylist is able to provide tips on at home maintenance as well as product recommendations based on their professional assessment of the current condition of your hair and scalp. Because I am not licensed (nor can I see your hair/scalp), I ask that you direct all questions about your personal journey to a professional
FTC: A portion of this video is sponsored by Reshine Hair. Links within the description box may be affiliate links which allows me a small commission
Additional tags: protective style, curly hair wig
Hey child and welcome back to my channel honey. This video is about the cutest wig I have ever installed and it's from my boots every shine hair. This is a Mongolian, a 30 inch, 250 density, 4x4 HD water, wave, wig and right now you can get it for 15 off using the code reshine 15. in this video, I'm going to show you how I put it in and when I tell you this was One of the best experiences ever so: let's go ahead and get this thing started. So again it's from reshine hair. It'S a water wave unit. There we go. You know the curls is popping or whatever. So this is what it looks like straight out of the package, and there goes you know the frontal situation um. It doesn't come pre-plus or anything like that. So I did do a little bit of customization for myself. It does have a strap some Combs on the side, all that good stuff. So first things first watch your wig honey, listen to me, wash a wig, so I did use the as I am coconut co-wash, and this is what it looks like after it is co-wash honey. It is hair, so soft, silky and free, shiny and all that other stuff. Just for me, you can rub your fingers through it. Then I just fit some boards yeah baby. So anyway, you can rub. Your fingers away is amazing, and so this is how it looks. After it dries, but again, this is human hair with no product so expect a little bit of frizz, but we're gon na tame that later so here's what I did I semi did the ball cap method. This is after me, bleaching it just a little bit and then I'm gon na go in with some lace, tinning spray, uh, listen! I watched the install video by Eric and Tay and that's why I got all my tips from so y'all gon na see me in me like that, so he said to spray the inside of the cap. So that's what I did. I sprayed the cap in my head and then you know we're gon na get ready to install this okay. Keep on watching and I'm gon na show you the next step all right. So once it's completely sprayed down - and I have a matching tone - I'm kind of just testing the placement of the wig and again it looks a little frizzy, but that is because I did that during the washing process is going to be straight later. So anyway um. I go ahead and pull it down just to make sure it's a good placement and then I put a light layer of glue in the front of my head. I'M only going to show you me doing it one time in the video, but I do two layers. I put some glue and then I spread it out with a comb just to make sure it's like evenly distributed and then I'm gon na dry it until it's clear and tacky, but not until it's like 100 dry and then I add another layer. So here is me drying it and then, after the second layer, I'm going to show you how I go ahead and install it, but again y'all use two layers of glue. Please so then here I am once the glue is dried. I do go ahead and press it in to uh press the wig Lace or whatever, into the glue um just to make sure it's really really good, and then I take my comb and just like really really push it in there. Just to make sure I got a really good Vine and then, after that, I'm going to kind of just like play with a little bit. Just you can kind of even see the tone of the uh, the spray and the bleach and all that stuff that I did. But after I make sure I got a really really good bind. I'M gon na get me um the Combs from the side too, because, like you, can only glue it down in the front, so I'm gon na add like apply this weave by putting the combs in on the side and then I'm gon na put on my band. So I can give me a good old milk, now y'all keep watching and I'm Gon na Catch. My Breath foreign so now we're dry, and so I go ahead and remove the band and that's just the melting process. And then I take a little bit of lace. Some people use hairspray, but because this is curly hair and I wanted to use it as curly State, I did use mousse instead of hairspray and then I got an eyebrow shaper to go ahead and cut the lace after it has been adhered. So don't worry if you see a little bit of lifting we're going to clean it up later, but I just want you to see in real time what it looks like once I go in and cut my lace. Okay, all right, so the lace has been cut and I noticed a little bit of lifting, and so I'm going to fix that you might see my hair go off camera because listen! This is me really putting this where you're going honey. So I might go off camera a little bit, but I'll be right back um, but I did go ahead and apply a little bit more adhesive just because I did not want any lifting. So I just carefully use this spray. You won't see me do it on camera, but I did go ahead and use a hair dryer as well just to make sure it was dry, but I go around any loose areas where I see any lifting add a little bit more adhesive. I dried it. A little bit off camera um and then I used the band just to make sure I got me a good melt because honey, I don't have enough time, for you, know the little lace lift and all that y'all can call me screen doors and all the good Stuff, so we're going to go ahead and make sure it's Blended, okay, so once you're done with the actual melting process or while it's doing the melting, I wanted to go ahead and get my part situated and you can kind of see a little bit of brassiness. Just from where I bleached it a little bit, but I'm going to tone it with some concealer so anyway, I was making sure my part was in a place that I really really like it and then I'm leaving this here in real time, honey. That band was getting on my nerves, so I had to adjust. It was hurting my ears, but I did go ahead and part it, and this is me attempting baby hairs in the end. I chose not to use it, but I wanted to leave it in the video just in case. Somebody was interested in that, and so what I do for the baby hair process is. I do a little bit of parting, like a jagged section of parting in the very front in the areas where I would want my baby hairs to be, and then I'm going to go ahead and separate that out. So I did use a little bit of mousse. Just to kind of keep it separated, and then I put the band in the place just to keep it there, while I'm doing The Styling. Now, if you do choose to use your baby hair at the end, you do want to use a very small flat iron and do a curl and then use the mousse just to kind of slick it down. I chose not to use it, so you won't see that in the video. But again I learned from Eric and say honey, I'm still learning, but that's why I got the tip from so go. Follow him and he'll tell you how to make sure your baby hurts right. You know, listen, I'm just trying to get right and you know you'd be cute or whatever, but anyway. So once I have my band in place of where the baby hair was going to be, this is what I am looking like, so I am going to actually put in some concealer in that part. Wait a minute I'm going to make sure I get a flat flat first honey. I had to make sure listen. I forgot what I did first, but anyway, I'm using my hot comb just to make sure the area where that part is it's really flat, not super flat that you know it's looking crazy, but I did want a little bit of flatness now, of course, I'm not Going to take the hot comb all the way through, but I'm just going to go down a little bit right around the part just to make sure I got a flat area now, I'm looking like a cone head or whatever and then once the flat ironing well Hot combing is done, I'm going to take a little bit a lot of body moves and just smooth it down, so I can keep it flat now. It is time for me to tone um that part right there. So I'm going to take my torque concealer and just go in that part just to add some concealer just so it could be a more natural look now, while this whole melting process is being done, it's time to style the actual hair honey. This is human hair. Mongolian like they said - and this was some of the most beautiful hair I've ever experienced, so I just drenched it in water. I don't even think it's translated on camera. I drenched this mug in water now, if you want more of a voluminous curl use, mousse um, if you want more of a defined look use gel um in this video you'll, see me using mousse. I'Ve actually used gel offline because I've installed this more than once and both methods work really really good. So if you want just go ahead and add some mousse or gel, whichever one works for you and you're going to add it onto the wet hair, now again make sure the hair is wet. When you put the styling product of your choice on it and it's going to make the curls pop and be super duper defined, so I'm very heavy-handed with the mousse or the gel either way just to make make sure I get the definition that I want, and So here you see me, keep applying it and then pretty soon you're going to see me pop up with the final results, and let me tell you something: this hair was some of the most beautiful hair I have ever experienced. The lace was easy to work with. There was very minimal, shedding the definition of the curls popped right back like seriously even after co-washing, I had a great experience. This unit is beautiful and they have more to offer make sure you use the coat reshine 15 to get 15 off. That'S about 60 off this particular unit honey. I can't say enough good about it. This has been my favorite wig of the year. I'Ve been rocking. This thing, like crazy y'all, make sure y'all check out reach on hair, get this unit and just listen, get your life honey. So I love yamakidada and I'm out this piece I'll see: y'all bye,
Comments
Annyetta: Somebody's internet Sis/D.J.'s wife/Champ's Mama got on here being FINE!!! My patience is not set up to be styling/customizing a wig, but you did that!
OneFlyLadi Smith: I loved the results. Oh how I wish I had the patients to install a wig. It turned out great sis. She got inches..
Patricia Walkine: This wig looks amazing
Healy Means: hi faye thanks for this step by step video. lottabody og still doing the job. final results are fabulous.
Jermaine Au Natural: You know you fine! This hair is really pretty and Long hunny! Giving mermaid realness!
Ashley Allen: I can’t do no body’s 30in, but I LOVE it!!
Zina Mckenzie: Stunning ❤
kaystarlo: #1 rule, wash all your human hair wigs. PERIODT. For multiple reasons and benefits
Kimla O'Connor: Love all your videos. Never stop
Dawann Williams: Beautiful ❤thanks for sharing
Queen La: I’m gonna need you to stop getting on Janet Jackson’s internet looking GORGEOUS!!!
ReminisceNaturals: Beautiful ❤❤❤
Whitney Brown: This is Gonna b so Good Fayen Happy Friday….
Jacci Adams:
Tee W: Look beautiful on you faye
Emily Oliver: That’s beautiful Faye wow!!!⭐️⭐️⭐️❤️
Lizzylou2727: Ok Miss Faye this is giving a brunette areil it's giving goddess it's giving don't you wear that around DJ
Starroze aka Kawaiicutiebaby: ❤lovely ❤
Jeannine Gorden:
Oreo: Girl I peeped that flat stomach ❤
Diamond Onyx: Yep I certainly wash my wigz like u WASH the LIL MAN'$ new clothing @Faye in tha City U gooooooo itz 2CUTE on U
D R-K: Rapunzel has left the chat!!