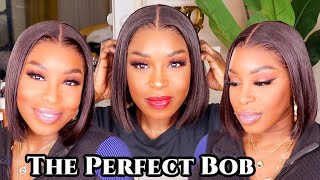
32" Inches Of Curls| Deep Wave Wig Install With Baby Hairs & 2Braids | Allove Hair
- Posted on 02 January, 2023
- HD Lace Wig
- By Anonymous
Unlimited 15% off with my special code: IAM
Allove hair official store: https://bit.ly/3WCR05c
Same Allove deep wave 13X4 HD Lace frontal Wig link: https://bit.ly/3C8cQW0
Allove hair hot sale wigs***
Long 30-40Inch Human hair wigs 16% OFF, Code: Long: https://bit.ly/3I7vuB3
Hot Glueless Wig 15% OFF,Code: GL15: https://bit.ly/3Gu8UkO
613 Blonde HD Transparent Lace Wig 16% OFF, Code: Blonde: https://bit.ly/3WuYMOi
Highlight Human Hair Wig 15% OFF, Code: highlight: https://bit.ly/3WzeesO
Flash Sale Low To $19.99: https://bit.ly/3WwXcf1
Popular colored lace wig: https://bit.ly/3jEgMay
Allove hot sale hair bundles***
Allove hair 3 bundles with closure: https://bit.ly/3G7vbDs
Allove hair 3 bundles with frontal: https://bit.ly/3G6bfBa
Contact Allove hair: [Email] [email protected]
[Whatsapp] + 86 18337410986
Follow #Allovehair on social media:
YouTube (@Allovehair): https://bit.ly/3Gu7yGX
Instagram (@Allovehair): https://bit.ly/3WRd6Al
Facebook (@Allovehairofficial): https://bit.ly/3WQqDZ5
TikTok (@allovehair): https://bit.ly/3jFL9gx
Welcome Beauties to IambeautifulhustlerTv ✨
Be sure to THUMBS UP THIS VIDEO✨
Leave a COMMENT BELOW✨
And most importantly SUBSCRIBE TO OUR CHANNEL✨
To Purchase Hair & Products Www.ibhslays.com
Allow 3-14 Business Days For All Orders!
CONTACT & BUSINESS INFORMATION ✨
Instagram:_Beautifulhustler
@thebhslay
YouTube :IAmBeautifulHustlerTV
✨For Sponsorships ,Reviews,& QuestionsEmail:[email protected]
786-571-1313
#miamihairstylist,#miamihair,
#browardhair,#browardhairstylist, #Atlanta #atlantahair,#atlantahairstylist #reels, #explore #trending #tiktok #viral #miamimakeup #miamimua #miaminails
Thank you, hey Beauties and welcome back to. I am beautiful, hustle TV today we are back with a new video in today's hair is provided by all love hair. Now over today, they sent me um. Well today, they sent me over this 32 inch uh deep, wave wig. It is super super, pretty um, absolutely loving, okay, and this is what it looks like Fresh Off The Packaging, and it also gave me a stocking cap inside my packaging. It is a regular lace, front wig, so it's a regular 13x4 lace front wig and today we'll be doing an install on Mama Hustler. Today, okay, so your girl is going to the Funk Fest. I don't know if y'all heard about it, but you know what I'm saying it's down here in Miami at the fairgrounds or whatever so Mom called me up like on Funk Fest tomorrow I need my hair done so I say you know what just sometimes I got This little long, curly wig that came in and we gon na, do it for you for YouTube. So here we all here we are y'all into this video. So today, I'm going to show you guys this little uh, this little technique that I want y'all to do when y'all have you know when you're dealing with a client with the low hairline plugged in I kind of like pre-parted the wig down the middle and y'all Know mama got that um Hollow hairline had the top longer size. So this is what we're going to do today to make the wigs install so much easier. You see how I put all that hair down in the front we're going to pull all of that hair out right from the root and now that we did that the wig hairline matches Mama hairline perfectly. So this is a little hack that I did y'all try. This out, I'm telling y'all y'all gon na love it, but what you want to do is put the wig on your client first and then part off everything, that's not needed on a hairline or whatever makes the hairline look too far down and just pull it right. On out another method you can use - and I learned this from um - the hair diagram y'all - know the boho, lady okay. She actually does the same thing, but she Narrows those hairs off. So if you want to narrow it off, you can do it just put that near on the hair that you pulled down, so it could just slide off easily. But if you like me and just let it gets run to the point baby, you can just section that thing out and just pull it right on down from the root and because the neat the knots was bleached, it made it easier to pull out okay. So that's why I just did it like that on camera and showed y'all so now all we have to do is just go on with that. Ruby kisses Foundation apply that foundation on the inside of that lace and then, of course, going in with the um laceman adhesive, applying the layers and then we're going to start to lay down a wig. So I hope you guys enjoyed that little new little hack that you can do to make um your installing process a little bit easier as far as dealing with that high low hairline, okay, so um, let's get right into you, know applying that lace and getting ready To get into the sleigh period, foreign foreign ahead and added three layers of the adhesive, and I just kind of smooth it out with my finger and now I'm just going to go ahead and take that lace and place it down now you see how much easier It is for me to match her hairline, because I pulled all of that extra hair out, and I just made this process so much easier, because I can just lay the wig exactly where I need to lay it and it would be much you know convenient for Me when I'm cutting off the extra lace, and now it doesn't look like how it was looking before when I first put that wig on, because you know when I first put it on the hair, was way down on her forehead. But now that I pulled it out, you see how it literally matches her hairline perfectly. So make sure you guys actually do that hack that I just showed y'all, I'm telling you it makes life so much easier and, if need to be, you can just go back in. You know after gluing a wig down and you can go back and pluck more on the hairline while the wig is installed on their heads. So if you do have to pluck more, you can go in and just do the plucking while it's on their head, but um. Nevertheless, I place that wig down and I'm just taking that comb and just combing that lace and I'm also going to take that blow. Dryer blow dry that lace in and then take the hot comb and hot comb that hairline back before time down the Melt, those foreign. So I went ahead and sewed down the back of that wig and now we're going to go ahead and remove the Melt belt and just raise off the extra lays. So you already know I like to take my scissors and slit the wig down the center. As far as the lace part - and I go in with the eyebrow razor and I razor it off and then actually went in with my scissors today as well to cut as close to that hairline as possible to really get those extra little pieces off. And this uh lace was a little you know on the brighter side, so I am going to have to add Foundation about two or three times just to make sure it's like really Blended in good. So I did use that darker shade in that level. 16 palette. Well, I kind of use like a combination of both colors but, like I said I am gon na, have to go in some more because right now, I'm saying like a little white cast and y'all know if that that's not what we like so y'all, know, I'm Gon na have to blend that lace into the best of our ability so um. I will go back in and add some more Foundation shortly, but right now, I'm just cutting off the extra lace and tucking down any edges that I need to tack down and just cutting off whatever I need to cut off and I will repeat you know the Same steps to both sides and, of course, add more Foundation to that hairline. Once I pull down the baby hairs foreign foreign, foreign, foreign, foreign foreign, everything down, I just went in and double checked to make sure that my part was down the middle and I pretty you know I did pretty good on a mannequin. It already was tacked down. So I was alright, that's perfect! So now we're just going to clean it up and add some wax stick and just really you know hot comb and smooth that one down. So I'm going to go in and take the hot comb and just kind of flatten it out. So we can pull down the section for the baby hairs. Now what ended up happening was. I did section off where it was two baby hairs on one side, but I was like you know: well we're gon na end up adding that third baby hair in there just to give it like a nice little full hairline of baby hairs. I didn't do no baby hair in the middle, though so, like I mentioned, I did start off with just sectioning off the two baby hairs, the you know the temple area and then the Sideburn, but once I actually got into actually doing the baby hair, I was Like we could fit one more right in between so we got it right in between swings, so it ended up being three baby hairs on both sides: okay, so um, but for now I'm just going to section that you know those two baby hairs off and you Know we're gon na add foundation and spread the hairline and then tie it down of course. So you know that's just what I do on both sides, but once we come back on after um, you know sectioning spraying and tying it down. We will uh get straight into doing the baby hairs foreign foreign, thank you foreign, so I went ahead and removed that melt belt and cut the baby hair. So now we're going to go ahead and take the little curler and just curl it up really quickly and then I'm going to use some got to be gel and uh swoop. The baby hairs I'm gon na cut The Sideburns longer. So I can really go around and swoop around you know, but I'm just curling it all up and then we're going to go in with that gel and like I mentioned, I am going to start out by doing those two baby hairs on the first side and Then I'm going to decide to add in that third baby hair in between. So I will show you guys that as well and then I'm going to do one braid um, you know basically like complete for the most part complete the style on one side and then I'm gon na show you guys um how I braided it down and then Do the other baby hairs off camera, but then I'm going to show you guys how I braided it so um from the thumbnail. As you can see, I will be doing in the beginning of this video. I will be doing a part down the middle um with the baby hairs and the two like Edge braids. I guess you can call it because you know you can do two braids, but in different looks. But I wanted to do like the small braids at the front of the hairline and then you know slick it down and then how the braids come around and connect. So basically, what you see in the beginning of the video is going to be the finishing look of the style, so so this will be. This will be something simple, but something cute at the same time. Okay, so I went ahead. Did that first baby hair. Now I'm swooping that second one, which is the Sideburn area and then we're gon na add a baby hair right in between those two foreign foreign foreign. So I just put another section right in the middle of them too, and I'm going to cut that slightly shorter than the rest of the baby hairs that I did, because I really wanted to be just enough to swoop it in that area. Usually, when you do that baby hair in that middle section between a temple and a Sideburn, you have to cut that hair slightly shorter, because you don't really have as much room to really swoop it like you want to. So that's why I cut it shorter than I cut the um other two baby hairs, so it could just literally just squeeze right on in the middle and not be like too too much hair, but I did those it was kind of a little patchy in the Middle - and I ain't like that, so I end up pulling another piece down and I'm swooping it in with the rest of the hair, because y'all see that little Gap right there me personally, I don't like my baby. Hairs have gaps in it because it gives me patchy in my opinion, but had to each his own. So that's why I pulled that little piece, I'm going to cut it and make it feel in that little cap right up in there and just swoop. That thing all together and then once we have that swoop that I like down to the T, then you know we're going to take that blow dryer and I am using like a combination of heat and cool air. Well hot and cool air to dry. My baby hair into place foreign foreign, but for the style today I want to do the baby hair first, so I could braid the baby hair into the braid. So it'll be nice and neat, so I'm just sectioning off a smaller section and yes, you will notice. You will see some of the track when I do this braid, but when we slick everything down um, you won't see that track, but because it is a regular lace front, it's only about four inches parting space in the middle and only like two inches on the Side and because I'm actually braiding like an inch of that hair in the front, you will slightly see the track in the back of that braid. But, like I said um, we are going to Slick that hair downward. So you will not see that track. At the end of the um install and The Styling, so I'm just taking the hair and I'm just braiding it up really quickly and I'm going to do the same thing to the other side, I'm going to do the baby, hair um off camera, but I'm going To show you uh me doing the braid, then after we do the braid um, I will go ahead and um. You know, make a part in the back part of the wig. So we could cover the tracks in the back and then I'm going to show you guys how I sneak everything down and how I connect the braids foreign foreign foreign foreign foreign. As you can see, I'm taking that wax stick in a hot comb and making that area really really Sleek. You want to sleep the sides and sleep down the back as well, because, like I said, everything is going to lay flat and smooth and we're going to connect the braids around the whole thing. So that's why I'm using that wax? Stick in a hot comb and I'm taking that guy to be spraying and spraying the hairs down, because I want it to be nice and flat and neat. So we can hook the braids around. You know for the look, okay and so taking that guy to beam blow drying it, because I wanted to kind of be in place because I don't want it to be frizzy or anything like that. And then I'm gon na kind of pull the hair back into a ponytail a little bit just so it's easier to um bring the braids around top of the hair, but I'm also going to have um. My uh, you know, hold the size of the braids, so I can be able to connect it and make sure it's laying down nice and flat so make sure you prep it first and then like, as you see, I'm grabbing it and I'm pulling it backwards. I'M gon na have her hold that side and do the same thing to the other side and I'm going to take a rubber band and connect it on the sides and then we're going to continue to smooth and pull the hair down and forward. And you know, of course, saturate the hair with some water and some moves to the finer curls foreign foreign. I just went ahead and connected the braids. Now y'all see I'm pulling that hair down but still sleeking it, because when you pull it down, it kind of like tightens the hair underneath the braid, so it's nice flat and smooth and now I'm just pulling it down and pulling the hair forward. So we can add some mousse and everything like that, but I did take a little more um got to be sprayed and smoothed down real nice and neat and um. Now we're just going to wet it up and add some of my beautiful Hustlers moves to the hair to define the curls some more so shouldn't could just being weird and just being nasty yeah, but um I'm taking some of that Foundation. Putting apart I'm going to black spray it apart or whatever like that so um once I finish doing that um, you know concealer part sprayed or whatever I will show you guys, the finishing look just taking that high beams black spray to clean up The Parting area And spray and hold and spray to secure it and blow drying that on cool air and um, I'm gon na show you guys, basically the finishing look. Okay, I took my mousse and I tightened the curls up. So this is the finishing look we're getting into it. Yeah yeah yeah angles. Y'All know this is 32 inches. I did leave it a natural color. I did not make it jet black today. I just want to keep it nice, natural and not the pad. I did bleach the knots. I did do a little plug-in. Okay, y'all see Shanika filling herself this right ma this week was super super, pretty nice and full, and I'm just giving you guys different angles and different clips of the finishing look. But then I'm gon na have her stand up, so you guys can see the full length of this wig. Like I mentioned, it's a 32 inch super pretty nice and full the hair stylist, giving the perfect hairstyle for this wig. Here is the finishing look. I hope you guys enjoyed this video okay, thank y'all for watching, don't forget to like comment and subscribe. Y'All. Okay especially share this video, but thank you guys for watching see y'all next time.

Comments
Tenisha Stair Praise God: Hey everyone, happy New Year, those deep beach waves looks beautiful!
Pretty Kimmy: Got momma hustler right together turned out so pretty ❤
Divine Esthetics Skin & Hair: This style is bomb !
Allove Hair: Thanks honey, so beautiful
SimplyAtia91: So pretty ❤
Sammy Da Goat: Bomb Wave Wig Pretty Face Amazing Thumbnail
Divine Esthetics Skin & Hair: Happy New Year! ✨✨
Fredericka Cooley: Happy new year everyone
strawberryvines: Is the funk fest just a Florida thing?We have it every year here in Jacksonville too. You know I love me some Mama hustler ❣️
Kimberly Smith: Another slay for momma slay I know hair on point I know that face finna be beat also
Rene Hill: Did it seem like it was actually HD..? great job btw!!!
Shelbbbsss: Yes so cute
Li Alexandria: Happy New Year
Heidi Vanpelt: Happy New year 2023
deseraymiles87: