Easy & Very Detailed Bald Cap Method + Frontal Wig Install For Beginners | Step By Step | West Kiss
- Posted on 03 January, 2023
- HD Lace Wig
- By Anonymous
▬▬▬▬▬▬▬▬▬♛#westkiss♛▬▬▬▬▬▬▬▬
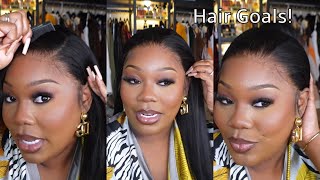
Hair details: 200% density HD curly wave 13*4 lace wig 24 inches
Video Hair Direct Link➤https://bit.ly/3Gf1W1R
★westkiss official hair store➤https://bit.ly/3ick6cE
$135 Coupon for Join Our VIP FB group➤https://bit.ly/3obsYPb
Hot selling HD lace wigs➤https://bit.ly/3GB35SI
Affordable 37% Off Curly lace wig➤https://bit.ly/3Gf1W1R
Up to 43% off Lace Wigs➤https://bit.ly/3vwJkoT
Hot curly lace wigs➤https://bit.ly/3Z3GuFv
#westkisshdlacewig #westkisswig #westkisslacewig
#WestKissHair Official Site Huge sale Big Discount
❤Follow West Kiss hair on social media :
Instagram @westkiss_hair_store: https://bit.ly/2OlKstu
YouTube @West Kiss Hair: https://bit.ly/2Ol5U1m
Wholesale WhatsApp: +86 13323741050
What is up Africana fam in today's video I'll, be showing you guys how to get the ultimate melt, how to make your lace frontal, look like scalp, so if you're, tired of walking around with lifting lace in 2023, this video is for you. So if you want to see in depth from start to finish how I achieve this look then keep on watching alright everyone, so starting off with this install we're going to start off with the ball cap method. This is a bunch of wig caps. I got off of Amazon I'll leave the link down below, but I got it in dark brown and I'll be using my hair diagram both hold liquid gold, and I like to use this to lay down my edges. So I like to work in sections. I'M going to go ahead and work on one section and use my baby hair brush just to brush that gel into my hair and hold it into place and use my blow drying on medium heat, and I'm going to do that for the following other sections. Now you want to make sure when you're brushing it you're, also smearing it with your fingers and holding it into place so that your hair doesn't shrivel up, especially if you are 4C texture like me and I'm using it on medium heat and holding it into place. Just so that it can dry properly and I'm going to do this all over my hairline foreign and overall. This is how your hairline should look like just pulled away and clean for your install now, once we are done with that, we're going to go ahead and pull the wig cap forward, I like to pull it as much as you can just so that it could Thin out the material of the wig cap, the more you stretch, the more thinner that the wig cap will look, giving you that scalp-like effect now taking my shears. I'M going to go ahead and cut a little small cut into the earpiece of my wig cap and I like to just go ahead and use my finger just to go around the hole to fit my air into the hole and that's how I make sure that The hole isn't too big or too small for me again: you're just going to go ahead and cut a small hole, and once you see that your earlobe could fit it, then you go ahead and just kind of use your finger to roll around it and that's How I make sure that it is nice and flat? You want to make sure that those ear Tabs are nice and flat against your skin. As you guys see, right here and now, I'm going back in with the both hold look of gold and I'm going in sections and I'm going to go ahead and outline my hairline just to adhere the wig cap onto my skin and the both of the gold Is not a glue, it is a gel which is perfectly safe for your edges. One thing you do not want to do is to do the ball cap method with actual glue, because you're going to end up putting it on your edges, causing possible breakage to your hairline, and you do not want that. So when I'm doing this, I like to use the nozzle as like my guide and then my fingers just to smear it down, just so that it's nice and flat and there's no bubbles in the gel now to make the drying process quicker. I'M going to go in with my blow dryer on medium heat and I'm just going to go ahead and go around my hairline for about a minute or so, and then let it air dry. And you want to make sure that your wig cap dries completely dry. Before you start cutting it off, so I waited about 15 minutes or until it's completely dry, to cut it now, once I'm cutting it, I like to cut in sections, I start in the middle first, then I go into the temples and then my ears last and When I'm cutting the ears, I make sure that I don't cut it all the way, because when you cut it all the way off, you cause um it to actually come up, and you do not want that saw life. Just let it sit, and I like to save and cut that for last so now that I cut into sections I'm using my eyebrow razor and I'm lifting up the excess wig cap up all the way up until where the gel ends at and I'm just lifting It up gently and then using my Razor just to razor It Off, and this would just help you ensure that there is no Fray ends and there's no extra wig cap laying around, because sometimes the wig cap tends to fray when you're cutting it. So lifting it up and then cutting it where the gel is and where it's adhered at, ensures that it's laying nice and flat so again lift it up all the way up to where the gel is at. You don't want to tug it just lift it up lightly and cut it off. Now I'm cutting off those little ear pieces just so that it doesn't Ravel upwards and now on to the last section, which is the ears I'm going to go ahead and do the same thing. You want to make sure that you're using a pretty new razor. Just so, it cuts nicely against your skin because I'm kind of like grazing it against my skin and it won't graze. If it's dull, you want to make sure that it's pretty Sharp foreign off the excess gel I'm using my isopropyl alcohol and 91 and I'm just using a piece of Bounty paper and I'm going to go ahead and just clean off my forehead. You want to make sure that any residue or any dirt or any gel, that you have left over on your forehead, it's nice and removed before we start with the adhesive and after we are done. These are the finished results of the ball cap method. Now, on to our hair, sponsor this hair is sponsored from West kiss hair. I have their HD lace, curly wave and a 13x4 lace and a 24 inches, and this is a 200 density. As you guys can see, this wig is super thick. I went ahead and tinted the lace and also bleached the knots off camera, and this hairline does come pre-plucked. I barely plucked it and it's nice and beautifully plucked. So once I have the wig on my head, I like to go ahead and cut in the temple areas of the lace all the way up to near the hairline, and I like to do this just so. It could give me wiggle room of when I'm pulling onto the lace now on to cutting off the excess lace around the ear area. I like to go ahead and use my comb just to cover where my ear is at and then use my shears just to cut around where I carved out any excess lace or hair, and once I've done that on both sides, I'm going to go ahead and Roll up the hair and now I'll be using my Erica J hold me down adhesive system. This is the adhesive skin guard that I'm using I'm going to spray that, on my hairline, just to protect my skin with the glue and then I'll be using. The rkj hold me down adhesive, and this is the watermelon flavor. Now, when it comes to the glue, I like to go in zigzag, motions and like to go on the cap and also a bit on my skin, and I'm going in with my rat tail comb. I'M using the metal piece just to smear down the glue. And I actually like to work in sections now, because this glue tends to dry fast and you do not want your glue to dry clumpy. So you want to go ahead and go in sections again. I'M just getting some of the glue onto the wig cap and onto my actual skin, but more on the wig cap than actually my skin and then I'm using the metal piece of my rat tail comb just to smear it out. And you want to make sure that it is nice and flat, and one thing that I do notice about people with their installs as to why it doesn't last is that the width of the glue is thin. As you can see, the width of my glue is about probably like a half an inch, so probably an inch wide, and this will just helps your wig to have more to grab onto when it comes to the glue. So again, you want to make sure that your width is about that wide. Now, for the sake of the video, I am only doing two layers, but if you want to have a super lasting hold for about two to three weeks, I would suggest you to do three to four layers, but two layers work for me and honestly can last Me a week to two weeks as well too and again, I'm just gon na go ahead and repeat that on the other side, and you want to make sure that your glue dries completely clear before you apply another layer, please for the life of you, do not Apply your lace onto white glue or wet glue. You want to make sure that it's dry completely clear before you apply the lace on there and again, I'm just making sure that everything is spread out. You want to make sure that there is no bubbles or bumps in the glue foreign you're able to smear everything down without it getting bubbly, and then this is my second layer foreign now once that layer has dried clear, as you guys can see, I'm now going To go ahead and use the middle section of my section and I'm going to go ahead and place the hairline in front of the glue. You don't want it behind it or right on top of it, but in front of it, and you can simply just tell where, like it's shiny at you, want to make sure that it is in front of where it is shiny at and that's just how. I use like my guidelines, so I start with the middle first and then I'm going to go ahead and start with the sides. So, as you guys can see, I'm kind of tacking it down once I have where I needed to be pushed at, and then I go on to the next section. So I do the middle, the temple and then the air in a sense. So, as you guys can see, I'm gon na go ahead and Tack down the temple when it's once it's right in front of the glue and then I'm gon na go ahead and tackle the ear part, and this will just also help you to make sure that Um, the lace is not Rippling as well. You don't want to apply it too fast or just all at once, because you could possibly have your lace Ripple on you, and that is a no-go. You want to make sure that it's nice and spread out and it's nice and even and once I have it placed where I want it to be placed at I'm, going to go ahead and use my hands just to press it down to secure it down. And it doesn't move now once that is done, I'm going to go in with my eyebrow razor and I'm going to cut right in front of the hairline I'm going to use my eyebrow razor to cut in a jagged motion. You want to make sure that you're not cutting straight across so just you know in a straight line, because you do not want that hairline or like a shape up type effect. You want it to look like scalp and want it to mesh in so cutting in a zigzag or Jagged motion will help uh disguise the lace even more, and I'm just going to go ahead and do that on each side. Now, since we placed the lace in front of the glue, we do have some lifting lace around the hairline, which is perfectly fine. I wanted that and to solve this, I like to use a bit of the glue and put it on my hand and then use the tip of my Ratt tail comb and I'm going to go ahead and to glue down the rest of the lace. And I like this method, because I really get into the Nitty Gritty details of the lace and make sure that everything is tacked down. And you want to make sure that everything is tacked on. Because if you do have lifting lace, it is very visible. And when you put on makeup, you can see that it's actually lifting and it's not like you know cohesive or adhesive. So again, I go in with two layers and I'm using the metal tip of my rat tail comb and I'm using it to kind of outline where my lace ends at and I'm just using that to outline it and I'm going to do two layers. Let it dry completely before I smear it down and like to use my comb just to kind of press it into the glue foreign foreign and follow that same Trend all over the hairline or where I have any lifting lace and I'm just using the tip. Just to outline it again, like I said smear it out, make sure that those layers dry completely clear before you add another one and then smear it down with the back of your comb. Now that that's done, as you guys can see, I have like a white cast, I'm going in with my foundation and I'm just pressing it in I'm not putting too much, because you don't want too much but yeah, I'm just put putting it in just so. It could blend in better my skin before you melt it even more so now on to the styling, I'm just using my character wax stick. I already have my hair parted into a middle part, and I'm just you know you know just pressing it down making sure it's nice and flat, but onto the baby hairs. Now, I'm carving out some baby hairs, I'm carving out four baby hairs. So it's two near the temple areas and two near the air, slash tendril areas and I'm just using the hot comb just to kind of press out that hairline. So it's nice and flat, and this hairstyle I have been seeing it's been trending on Tick, Tock, social media. All over the place. I wanted to try it out, so I'm going to go ahead and cut the hair in a diagonal when I diagonal a horizontal. Actually, I'm going to cut it horizontally just so I can do like these um slick down bangus type Vibes. I don't know how to explain that but yeah, but I just prepped my hair for that and on to further melting, my hair, I'm using my Spritz Mega, hold spray, I'm going to spray that all around my hairline. This just helps further the Melt. You want to make sure that you are melting, your lace and I'm going to go ahead and use an elastic band, and I let this sit for actually an hour. You want to make sure that you at least do this for 20 plus minutes, but I actually let it sit for an hour, because I was busy doing things and yeah um. But now back into the styling. I'M just going to go ahead and just make sure everything is nice and flat and those little bangish areas and then use my gots to be spray just to make sure that's nice and flat. And now I'm going to go ahead and put it in a ponytail. In the back of my hair, I tucked it behind my ear and then put in a ponytail, but now on to working with the baby hairs, I'm just pressing it out with my hot comb to make sure it's nice and straight and pluck out any excess hair. That I have on the baby hairs now for the baby hairs. What I like to do is I like to kind of carve out where I'm gon na how I'm gon na soup my baby hairs actually and then hold it to where it ends at and then use my Razor just to cut it off. So, as you guys can see, I swooped it you're gon na hold it where it's at and literally cut where in front of your hand. That is how you can tell how long your baby hairs are or how it should be, and as for the airport, I just like to cut right below where the earlobe is at and now I'm using my tvx flat iron. This flat iron is available on Amazon. I got it off of Amazon. This is the 3 8 inch one and I'm just going to go ahead and curl it upwards. This just helps form the baby hair and gives it form, especially for my beginners, if you have trouble doing baby hairs freehandedly. This is a perfect way of doing your baby hairs and I'm going in with the Spritz and my baby hair brush, and what I like to do is I like to comb and then hold and comb and hold and kind of swoop it into place. So when I'm combing I'm holding the root of it just so that it doesn't lift up and then brush the rest of it and just swoop it into the hairline, and it's pretty simple, it's all on the wrist. So again, when you're, you know brushing it you're. Holding it as well too, so it's nice and flat, I'm just brushing it into their hairline, so it looks nice and um together and I'm gon na do the same thing for the ones at the air. Now this is optional, but this actually helps further the Melt, though I'm using my Nairobi setting lotion and I'm just going to go ahead and just re um, you know curl those baby hairs. I just like to use a setting lotion because um it just makes it more flatter for me, sometimes just to Spritz alone. It still kind of lifts up a little bit for the baby hairs I mean so I just like to use my Nairobi setting lotion just to really set those baby hairs into place and also apply around my hairline as well too, and this also helps further the Melt foreign, I'm just applying some of it in front where, like the rest of my laces, expose that just to help further I'll melt. This just gives you the ultimate melt: okay and then I'm using the headband again and I'm letting that sit for 20 minutes, and once that is done, as you guys can see, the lace is melted, okay and to fix up my um part. I just like to go in with my Clairol root touch up, and this is in the color um dark brown and, as you all can see, y'all like this lace is laid West kiss. Did they thing with the AC lace? West kiss is also known for a good HC lace. I'Ve they haven't failed me yet when it comes to their HD lace, all right, but now on to finishing off this hairstyle to my makeup off camera, I'm gon na go ahead and just um part out some of the hair to put into a fake Little ponytail. So um before I put in a ponytail, I kind of like leave the little ball so almost as if like you're pulling the ponytail but halfway through and just leave it there and then I'm gon na go ahead and just leave some of the hair. That'S standing out in front and then I'm gon na go ahead and use some of my mousse just to Define My Curls and then once we are done, I'm going to go ahead and comb out my baby hairs and then just form them and after we are Done with that, these are the finished results. I hope you guys enjoyed this video like comment subscribe to my channel if you have not go ahead and click that Bell to get notified. When I drop videos - and I hope to see you guys in the next one later, thank you
Comments
G3na D: Beautiful as always I watch you when I do mine. But sometimes I mess it up loll. love the nails
Jessica Kay: That hair is amazing. Awesome Job❤️. Thank you for sharing
cam patterson: As always! We need that makeup vid toooo!!!
Sammy Da Goat: Glorious Makeup Spectacular Hair Loving This Stay Safe Happy New Year To You As Well
Queen Queen: Amazing work
SweetMatta Rella: So beautiful
Zainab Jimoh: You’re so gorgeous
Dee Luther: Love This Video As Always KutE thumbNail Tho Africana Fam Forever U DEFINITELY Slay This Look Natural Beauty Love iT Beyond Gorgeous you are Ur Makeup Always Look Good Happy New year To you Have a Fantastic Week Too Stay Bless N Be Safe Always
ermanaaa.: love love love it!
Krishna Joseph: Love from antigua gurl ur amazing ❤
JustBlameLové: I love ittt
Zainab Jimoh:
Brooklyn Gabriel: this look is eveything
Nikki Harrison: You definitely ATE
Kita Boo 2: Why is this hairstyle so popular? Did a celebrity wear this? I use to couldn’t stand this style but the way you did it looks really cute with the thicker hair texture.
Moe Okoye: I'm overwhelmed. SHEEEEEEEEEEEEESHHH!
Nehyo: Really love u....from Nigeria
Frankela Blizzard:
Zainab Jimoh: This face beat