Detailed 13X4 Glueless Wig Install For Beginners | No Baby Hair + Low Hairline
- Posted on 15 January, 2023
- HD Lace Wig
- By Anonymous
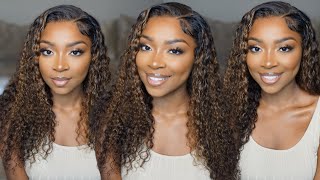
my detailed wig install that’s easy for beginners . the unit featured is a 13x4 lace front wig that is a *body wave texture and 200% density with a HD transparent lace ! company : Sewzzuan on amazon [not sponsored]
thanks for watching #KiaraDanielle
∴
b u s i n e s s
∴
s o c i a l • m e d i a
♡ instagram https://www.instagram.com/ikiaradaniel...
♡ tiktok https://vm.tiktok.com/TTPdBq6d9K/
♡ twitter https://www.twitter.com/ikiaradanielle...
∴
BINGE WATCH ▶️
∴
b e h i n d • t h e • s c e n e s
➫ camera : iPhone 13 Pro MAX , Canon EOS M50
➫ editing : iMovie
➫ lighting : (amazon) neewer 18” ring light + my review : https://youtu.be/Ee-PxlVg_48
∴
a b o u t • m e
➫ age : 25
➫ zodiac : scorpio | 11/7
➫ height : 5’4
➫ location : georgia
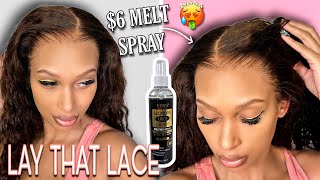
Playing back I'm saying baby, hey guys, welcome or welcome back to my channel, it's Kiara and in this video I'm bringing you all a detailed 13 by 4 Way install. I was so excited for how this wig turned out after I plucked the hairline, and this is my third ever wig install, I believe, on my channel, but I did bleach this hair and this is the cap construction. It is tinted and it did come with four Combs, but I cut those out, as you guys can see, I did cut a hole in the back of the wig cap, so yeah a few hairs came out, but this hair is very thick and coarse. It was supposed to be body wave but, as you can tell it's very straight and just very thick, so I'm just putting a wig cap over my braids to protect my natural hair and I do have a low hairline, which I actually have been learning to work With which is how this Wiggins fall came about, and now I'm just going to go in with my even tinted: lace, spray and light warm Brown. This is my favorite because it just makes it quick and easy to color your wig cap or your wig Lace. So now I'm just placing my wig and making sure that it is lined up with my hairline, and that is also straight. For example, if you want a middle part, you want to make sure your wig is in the middle, so yeah I was so in love. I plucked this, so I had to show you how a camera, but now I'm taking my shears and I'm just going to cut off those ear tabs and I did zoom in because I know some people struggle with this part. I struggled with this part, but you literally just go up and around your ear and cut that lace off super easy, and I'm just going to do that on the other side as well. Now I'm going to section my lace by cutting it into three different parts. That way, I can work with one section at a time that way, I don't have to rush myself when I apply my adhesive and I'm going to prep my hairline by rubbing it with some 90 alcohol. You don't need one, that's strong, you use 70, but this is what I have so I'm just going to clean off my hairline as well as my forehead, just to get all the oil off my skin, because your skin does produce natural oils, and this will just Help the adhesive stick better, so it actually applies, starting with my even wonder, lace Bond spray. This is the red active one, I'm going to go in with one layer first right above my hairline, and you don't want to put too much spray because it will drip down your face and it's very sticky so just be careful with that. Taking my blow dryer on the cool setting, I'm just going to dry this just a little bit. It doesn't take long at all and then I'm going to go in with the second layer, and I believe I did three layers total. But you just want to go in a layer at a time and let it dry down tacky, and I will show you guys what that looks like in just a second and just easy way to clean up. If you spray too much is just to take some alcohol on a cotton pad and just wipe it off, and this is about how tacky your spray should be. You wouldn't be able to touch it and feel that it's still sticky and not dry, I'm going to go in with that third layer and go right in with my middle part of my section, lace and press it in with the comb. This is just going to help melt it all in Because by the third layer, still being a little bit wet on the top. It'S going to melt right down into those first, two layers that we did and that's what's going to help it stick all the way going in with my blow dryer on the cool setting. Again, I'm just doing this to make sure that this part is dry. Before I move on to the next two sections, you don't want your lace to be lifted, while you're trying to relay the rest of it down, because then it just gets messy and we don't want that. So I'm going to take my time finish off one side and then I'm going to finish off the other side I wanna. Now I got my cute little melt band. I was gifted this through Amazon and they come in different colors, but yeah. This made it very easy to just put this on versus having to tie it and everything the velcro definitely comes in handy. So I absolutely love this and I just want to make sure my ears are not flipped under my melt band. That way, it actually secures those side pieces, because that's what I struggle with taking my shoes from wax stick. This is a crucial part to me. I feel of a wigging stall, because this works with the hawk home to help lay the hair down and also press it out. I like for my hairline to look as natural and Sleek as possible, so taking my hot comb on the hottest setting. I am just going to press this wig out, I'm going to make it super flat, and I'm literally going over this so many times, especially near my part, because you want it to look flat to your head. That way. It looks like it's growing out of your scalp as much as possible and the back is just as important as the front, so don't press the front out without doing the back, because it will literally not do anything for you. But it looks like a helmet. So yeah you want the hair to be as flat as possible. This looks so Sleek. I am so in love. Compared to how the wig first looks down in the corner. You can see the big difference that it makes to literally press out your wig, because you want it to look so natural and so pretty and going into styling. I am taking my Suave extreme hold hairspray and this is cheap. It'S like three or four dollars, but it did hold this hair. I'M going to be doing some simple curls using my flat iron, slash, curling iron, and I was so excited to use this. I'Ve never seen an iron like this that has the plates on the outside. As well so I was like why not curl it. That is what this is made for. So oh, this is what the left side is looking like, or your right side rather but yeah. I messed up the curls on this side. Actually so this is not a curly tutorial, but I am about to take this lace off with this razor picking a fresh eyebrow razor. I'M going to use this to cut off the extra lace and you want to get as close to the hairline as possible. That way, you don't have just lace sitting on your forehead. This also helps your wig look more natural too, and please be careful with this because, as I did show you guys, I did scrape my face a little bit and I was kind of pissed but um. I did just end up cleaning that up with some alcohol, but it's cool. I was just probably rushing myself but yeah. I was so pissed. These sideburns came up, but y'all seen I'm gon na fix it. So I'm gon na show you how to do that, but I'm just going to take the rest of this extra lace off and then we'll get to how to melt your lace after you've already taken the extra lace off, and I think it was right here that I noticed I started bleeding. I was like girl, but yeah. I just I was so sad because I was like girl. Why? Why? But that's why I'm telling y'all to be careful so preparing my melt band, I'm going to go ahead and put that around my neck. That way, when I spray this next layer of even spray, I can go ahead and put that right on top now. I should have dried this a little bit before. I did this, but it's fine, that's what the curls are looking like and I'm going to take this off and, as you can see, there's a little bit of adhesive. It doesn't look that bad, but it wasn't up to my standard how I knew it was supposed to look when it came off so yeah we're gon na touch that up a little bit and I'm going to fix my part so yeah, I'm showing all the lace. How it looks it doesn't look bad, but there is still a cast over it. So I'm just going to take my Black Radiance, true complexion, Contour palette with the sculpt color. That is, I believe, the middle color and I'm just going to touch up the lace with a little bit of makeup and also the part you can put concealer. I just didn't do it for this video, because I was filming late and I was gon na - take this right back off, but um yeah. That is how I cleaned up the lace to make it look way better. You can tell it Blends right in I'm brushing those curls out because I like big fluffy hairs, so that is what this looks like. I love how it turned out. I am experimenting, so I will be telling you guys. You know I will be developing new techniques as I've learned. Oh there's a lot of wig videos coming, so I'm excited for that. If you guys enjoyed this video, please don't forget to hit like button and thank you so much for watching. I was so happy with the how this turned out, even though there was a few little. You know minor mishaps, but we always make it happen. So I love you guys so much and I will see you next: video peace,


Comments
Kiara Danielle: it feels so good to be getting back into the beauty content ! i have so many things lined up for you guys let me know your thoughts on this install or what you’d like to see next IG | twitter @ikiaradanielle
Mona Vonshay: Thank you for the breakdown, this is a great video for folks like me who need to know who, what, when, where, & why
Ruthie's vlog World: You did that sis
LaToya Marie: You ate this right on up boo!!!!
Jamilah Hendricks: Kiaraaaaa Hey gworllll Looking fine fine