Amazon Burgundy Wig | Lulasess 13X4 Wig Install & Review
- Posted on 16 March, 2023
- HD Lace Wig
- By Anonymous
Hit the gear button and make sure you’re watching in the highest quality possible ✨
Sub me
This how I’m able to change my wigs often, and remove them at night if I want to.
Let me know in the comments if it’s something you guys need a better explanation on or anything else
Find this wig here:
https://www.amazon.com/shop/influencer...
Products used:
-eco styling gel
-ebin adhesive spray
-ebin lace tint
-elastic band
Follow my SM:
IG: cosmic5star (personal)
IG: shopcosmicstar (business)
FB: Cosmic Star & Co.
Twitter: 101starburstt
TikTok: Cosmic5star
Cash App: $shopcosmicstar
For business inquiries: [email protected]
#amazonwigs #wiginstall #amazonwigreview
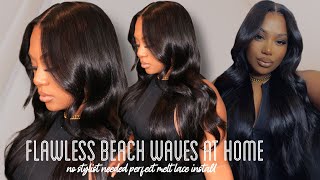
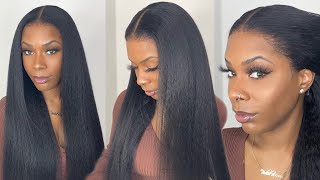
Foreign, hey y'all, what's going on and welcome to my channel we're back to my Channel today, what I've got um is I'm gon na be installing and reviewing this burgundy wig that I got from Amazon, so first things first y'all can see they got the wig to Me overnight, so here I am just unboxing it so y'all can see how it looks straight out the packaging and it came with this elastic band and a wig cap. So this is it without me: combing it or anything right out the packaging um. The hair is decent, I will say it's pretty thin, so I'll probably get a extra bundle and put it in, especially since it's space in between the tracks, but what I will say is in the top that a frontal there are several hairs in the top or Frontal part that are not 20 inches and I'm gon na show y'all closer what I mean. So this is what I mean um. If I wasn't me in this wig, I probably would have sent it back, but I knew I could make it work. So the good thing about this wig is that it does come already pre-plugged and the lace is really decent. So if you don't really like plugging your wigs, you don't have to but I'ma pluck it a little bit more just for my own liking and to pluck it. I avoid plucking the hairs near the middle part, um front hairline, but everywhere else I just go in and pull a few hairs at a time until it looks a little bit natural, but not too bored because that sure ends the life of the wig and every Time that I wear my wigs I go in and I pluck it even more so that's the reason why I try not to overdo it um on my first wear or my second wear, and if you are gon na pluck the hairline, then I suggest this method, Which is where you just thinly part across the entire frontal and do tiny sections at a time, so I actually plug here from the front. If I could explain it right from the part that is going to the front I put from there and then I also plug the hair that is going to the back as well, and I just keep doing that until I flip the hair back and it looks As natural as I wanted to look across the hairline and you'll end up having balls of hair like this, if you pluck it right now on to the install, I made sure that my natural hair is slick back and I don't use the ball cap method anymore. I just apply the wig straight onto my natural hairline and I cut my lace by separating it into three sections like so, and when you go to cut you want to like zigzag, don't cut it straight across just please don't it makes the lace look. So much more apparent and I don't care how much you melt, how much you put makeup on it most of the time the lace is still going to show, so this just helps hide the lace. Look a little bit better or a little bit more than it would. If you just cut it straight, and I didn't have time to bleach the knot. So I went in with my tinted lace, spray and just spray the lace. So now I'm gon na go in with my wet stick and lay everything down as flat as possible, especially those little spiky hairs that um is standing up and then I'm gon na start hitting it with the um straightening comb. So no ball cap no glue. I use even holding spray, which is similar to the gossipee, and I apply three coats of that and let it dry and get a little tacky to, whereas when I lay the lace, it's gon na melt right into everything or melt into my skin. Should I say, and then I take the lace - and I lay it onto the area that I just prepped and I try to do this as slow and as carefully as possible. So that way it's no gaps when everything lays as flat as possible. Put my elastic band on to melt the lace, and now I can work on it fully styling it. Some people are really good at styling, the hair, while it's on a mannequin head, but I'll get a better feel for it, with it being on my actual head and actually being installed. So I'm just pardon my middle part and making sure that it's as clean and as neat as possible and then I'm gon na go in with my straightening comb and my flat iron like take my time and slowly flat iron and straighten it out. So I ended up putting some loose flat iron curls in it to hide any imperfections for me not being able to properly flat iron it foreign. Let me know if y'all like how it turned out anyways if y'all also want to see more wig content drop that in the comments I'll leave all of the products that I used down in the description box, make sure y'all don't roll up off this video without Hitting that subscribe button and until next time, thank you guys so much for watching. Thank you, foreign

Comments
Pat Miller: That turned out so good!
Samantha X: You did a great job because the unit looks so natural. I would say when you did dye your hair ❤❤❤❤