Flawless Lace Melt Using 3D Swiss Lace Criss Cross Rubberbands And Braids Style | Afsisterwig
- Posted on 20 March, 2023
- HD Lace Wig
- By Anonymous
this hairstyle came out soo cute and girly..i been trying new things lately with my hair and Im feeling it..
i luv you for watching .. ♥︎
0:00 prepping my wig and skin for install
1:37 laying down glue
3:01 melting & blending lace into my skin
7:28 bby hair
10:12 styling/ braids and criss cross rubberbands
13:18 details that make my install next level
__________________________________________________________________________________
H A I R D E T A I L S & C O U P O N C O D E ♥︎
Wig in the Video: http://bit.ly/3q3KLsa
Coupon Code: CHA to save money
Swiss Lace Full Lace Wig Collection: https://bit.ly/3A7U00K
Delicate Hairline Skin Melt Wig Collection: https://bit.ly/2WQ7Hjy
Wholesale Whatsapp: +8613173200985
Share looks on facebook, instagram , youtube and tag @ # afsisterwig, customers will get 15 dollar for next order.
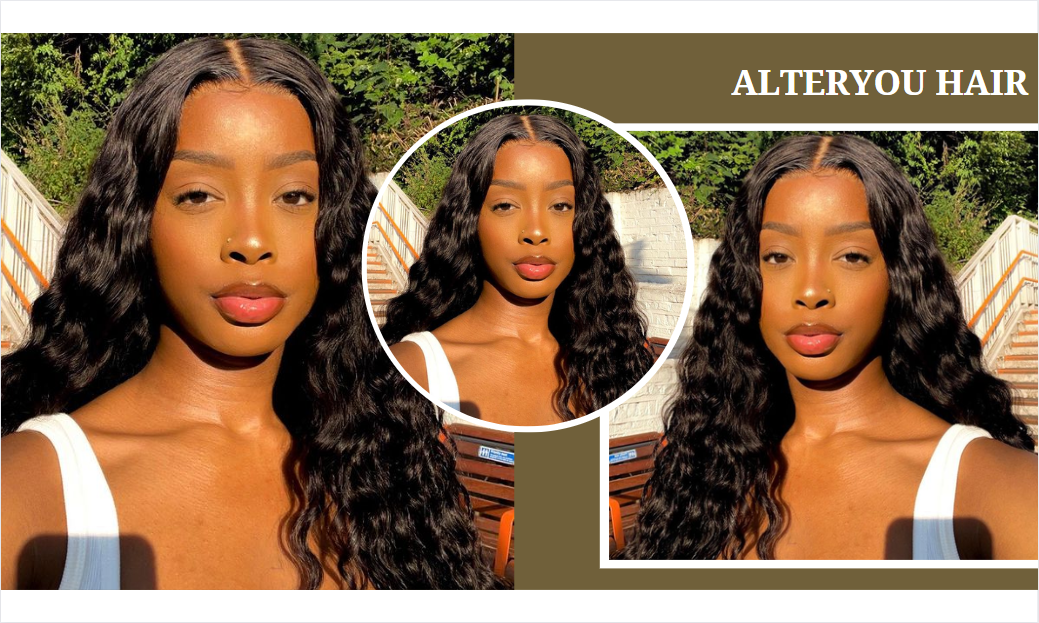
Afsisterwig’s *NEW* Delicate Hairline Skin Melt Lace Wig
♥ All hand tied hairline, clean, delicate and natural, giving real SCALP vibe!
♥ No extra plucking needed, totally beginner friendly!
♥ Upgraded real skin melt swiss lace well blended with different skin tone!
The Skin Melt Wig is totally beginner-friendly, in the past three months, we have been making our best efforts to adding more density options, perfecting the plucking the hairline, adding the removable elastic band and optimizing the bleach technique to provide the perfect products.
INVISIBLE SWISS LACE: We upgrade our lace into Raschel net and bobbinet made of polyamide.The reason why we choose high-end swiss lace is that even with much higher price, it can be more invisible and undetectable especially when melting with glue. No matter what skin color you have, this skin melt lace will definitely match.
Wig SKU: AF0087
Wig length: 20 inch
Hair density: 150%
Cap size: Medium 22.5
Cap construction: 13x6 3D Frontal
Contact Us:
➞ website: https://afsisterwig.com/
➞Email: [email protected]
Follow US:
➞Instagram: afsisterwig
➞Youtube: http://bit.ly/3L57qQQ
__________________________________________________________________________________
HAIR PRODUCTS ♥︎
alcohol (91%)
beige cap https://amzn.to/3rpB74j
maybelline matte and poreless foundation Toffee 330 https://amzn.to/3lgvjuj
chi iron guard https://amzn.to/3K4en4d
hot comb https://amzn.to/3CI4tyn
bold hold active reloaded https://amzn.to/42nQRpA
ruby kisses powder #11 mocha https://amzn.to/3Tr2pUK
got2 be freeze spray https://amzn.to/3j8bGmC
tweezers https://amzn.to/3RNOveB
Pencil flat iron .3" https://amzn.to/3kbxYC1
lotta body mousse https://amzn.to/3XLoSNL
razors https://amzn.to/3WNNhke
shine n jam yellow bottle https://amzn.to/3Za4gid
la girl concealer medium beige https://amzn.to/3TrdtBs
flat iron https://amzn.to/3DlvWso
___________________________________________________________________________________
___________________________________________________________________________________
Collabs♥︎
_____________________________________________________
Stalk Me
Instagram - @Thechachimarie
hair page - @HouseofVainOfficial
makeup page - @Houseofvainbeauty
Website: www.Houseofvainofficial.com
Tik Tok- @lilbratbrat444
Hey y'all, welcome or welcome back to my channel, this video was sponsored by AF sister wig and I'm really happy to be working with them, because I love how my hair turned out. This hairstyle was now hard. It'S not difficult, but it's detailed. So it takes time and patience. I really love it, though, so, if you're interested in seeing how I accomplish this look from start to finish, then just keep watching again. This wig was sent to me by elf sister wig and it's a 13 by 6 20 inch. 3D, Swiss straight lace frontal a mouthful I know, especially if you don't know anything about wigs but I'll, explain what all that means throughout the video. So just chill. I bleached the knots off camera because I have a very detailed, not bleaching, video on my channel, but before I install a wig, I love to hot comb, the hairline back using a heat protectant, so that I can have a clean and clear view of what I'm Doing once I start going the lace down, this prevents straight hair from getting stuck to the glue. So I just push it all back. The wig came pre-plucked pretty well as you can see here, but I did go back and do some more light. Looking until the hairline was gradient to my liking after I plucked it, I put it on my head just to see how everything was looking and already. The lace was looking nice against my skin without adding any tint or makeup to it. So that was a good sign. I got excited. This is a 13 by 6 lace, frontal. I hate when companies promote their wigs being 13 by 4 or 13x6, only to receive a wig that has two inches of parting space on the sides, and it only goes deep in the center. That should be an abomination in the Bible, because how dare you bamboos with people like that? But I like this wig, because this is a full frontal and I have the option of having a more versatile hairstyle. I'M applying the bow, hold active lace, glue and working in sections dotting glue along the edges of the ball cap and to make sure it all dries clear and evenly. I smooth it out with my rat tail comb. I apply glue to my ball cap and to my skin, because I found that it helps the wig last longer the thicker. Your layers of glue are in width. I'Ve never lost my edges after doing this, so I don't find this to be a big deal. To put it on my ball cap, it's no secret! I have a big forehead, you see her and I hope Glory. I don't like to bring glue too far onto my forehead, though, to try and make it look small, because I feel, like I start looking stupid. So I add glue to my skin as well as the ball cap, but my goal is to make sure my wig is sticking not so much to make sure my forehead isn't big I'd hate to feel shocked at the size of my forehead after this wig come Off so I rather keep it how it is for the most part, but for this particular hairstyle I applied two layers of glue, and I kept it on for about four to five days could have lasted longer, of course, but I just don't wear my wigs that Long 45 days is actually a very long time for me after I applied my first layer of glue, I started over back at the first section that I started at and I just applied my second layer when the glue was clear. I started applying my wig in the center to prevent my lace from bunching up and causing ripples along the hairline. I always stretch the lace as I'm laying it down in the glue. I don't stretch it trying to rip it, but I stretch it enough to have a good amount of tension on the lace so that it lays flat and doesn't feel like curling up on me. I also bring the hairline of the lace a little past. The edges of the glue to make sure I don't glue down lace that don't even have no hair on it to tack it down. I lightly press it in with the tips of my fingers, and I use my comb to help melt the lace into the glue. It'S easier for me to apply wigs in sections. I start off in the middle, then pull down the sides and press down the temples, then pull the edges and press down The Sideburns. You see how, once I came to this side in the center I started seeing that the wig started folding up, it was not laying flat, so I actually just unstuck it. If that's a word unstucky, I don't know, I picked it up off the glue in the center and I repositioned, and I had to like tug going towards this side so that the center could lay flat. And then I just went ahead and I pressed it back in it's no mess. It'S not going to create No Mess as long as you allow your glue to dry before you start tacking your legs down and so long as your layers of glue are not that thick. You could pick the lace back up and reposition it if you have to before things are, like you know, set in stone foreign ly, tack this down and start cutting off extra lace. I just know my wig is going to start lifting so I'll go ahead and I tie it down. Lately I've been using a cut up stocking as my male band, because some milk bands be like a real thick material that can cause your lace to look white as you're taking it off, because the texture is so rough that it gets stuck to the glue through The lace and it just it makes a mess sometimes so I use a stocking. Wigs still be laid. I blow dried that for 10 minutes on heat and then I cut off the excess lace. When I took it off, I told y'all, I bring the hairline a little past the edges of the glue, so it's normal that some pieces of hair will get cut off. I cut off everything that isn't tacked down to anything that helps me create natural hairlines that can even mimic someone's exact hairline. I have a video on that technique that I'll link up here. If you care foreign, you ever had a wig that made the top of your ears so sore. That'S because not enough lace was cut off in this area, so I'm just handling that real quick before I be crying tomorrow from agony, okay. So this is what Swiss lace looks like with no tint or no makeup added to the lace. It is melting into my skin very well, but there are pieces of Ash popping out to greet you. I'M gon na make them say their goodbyes. In a minute. I saw a girl on Tick Tock, using a powder from Ruby kisses on her lace, so I wanted to try it and the one I got is my exact skin tone, but sometimes when applying makeup to a wig, especially powders, it's best to go just a little Darker, this ended up melting in just fine after I sprayed got to be along the edges, tied it down again and let it blow dry, but next time I want to try a darker shade to see if it looks even better than this after I took the Stocking off, you know, got to be to make the hair crunchy, so I'm just combing the hairline out to make it soft and movable again. The lace looks great, though I'm happy with how it's turning out so far. Tell me what you think and notice how my forehead is still big. That'S what I, like God, made everything small that he wanted to be small on me like my waist, but my forehead wasn't one of them. It'S fine. She could do a middle part. She could do a side part. She could do a deep side part. I said you could have whatever you like, but she gon na start off with baby hair. I parted out some hair on my temple areas and I parted out sideburns. I hot comb, the rest of the hair going back to keep it neat and out the way, and I hot comb, the hair that I'm using as baby hair forward to get it flat and keep it forward. I love neatness so to get this as neat and as clean as possible. I like to spray the brushes of a baby hair brush where it got to be and brush the hair that I'm not using is baby hair backwards to mold them down. And then I curl my baby hair all across foreign by the way off topic. But did you drink water today? Did you drink enough? Next, I cut all my baby hair in a diagonal cut and I used mousse and a comb to shape them using my fingers to help guide the direction of the baby hair, as you saw in the beginning. My baby hair is real soft and fluffy at the end of this, so using mousse makes it easier to comb it out later to fluff them out without losing the shape, and it won't turn white or flaky, as some gels would do. If you try to comb that out, I have a full video all about baby hair. If you want even more details on how I Like to Lay mine, I didn't do fluffy baby hair in that video, so I mentioned different techniques and different products. If you care. Thank you anywhere. The baby hair looked thicker than I wanted it. I plucked it and, as I was shaping them, if I saw that it wasn't curving right or it just looked too long, I cut them, and I did this until I was satisfied. This isn't. The final baby hair look, though, so you have to keep watching to see how I make them fluffy foreign to start styling, my hair, I parted out two sections on the left side of my middle part. I used braiding gel to help make my lines as clean as possible. I also use the same gel on the roots of the sections I was working on at the time for a stronger hold, especially since I was going to have this on for a few days, and I didn't want my braids to start frizzing. I love a good press with the hot comb, but it wasn't as necessary with this style. I only used it on the sections that were braided to help flatten out the roots a little bit. Then I braided this section going back and tied a rubber band at the back to keep it from unraveling foreign. I said this hairstyle isn't hard, it's just tedious, especially if you're doing it on yourself. You can see why I made the parts. That'S all you really need to know to like imitate it, but for the crisscross, the rubber band design. All I did was put boxed Parts in a rubber band, and when I got to the row behind the row in front of it, I tied the rubber band. Attaching it to the box that was across from it to create like a crisscross situation, going on when doing a style like this, especially on a wig. I just had to make sure I wasn't wrapping the rubber bands too tight, especially in the sections along the hairline, because too much tension will snatch this laser right up so light hands. The gel helped made it look tighter than it actually was. Thank you a girl. I was too tired at this point. I was too Red. I almost tried to tell myself a lie and say actually looks good, just like this. No need to do the other side, but no, I pushed through. I got a comment completely unrelated, but I feel like my face, has a sweet side and the evil side, like this side of my face, is clear. Like glass, even my eyebrow, has a softer Arch on this side. Meanwhile, the other side of my face is at war with itself just breaking out, and even my eyebrow got a me Arch made me look like a villain. I don't want it like a villain. I want to look very sweet angel Vibes because I am meanwhile this eyebrow on the. What side of my face is that the eyebrow on the left side of my face looks suspicious thanks, be to Jesus. I'M finally done styling this now, I'm gon na finish off. My baby hair by combing them out to make them fluffy if I felt like some sections were thicker than it was on the other side I put some that out, but that didn't mess up the shape or nothing. This was also the time when I was paying attention to Minor Details like this piece of hair. Don'T need to be here so I got her out of here. I also felt like my hook was hooking a little too hard, so I used a razor to trim. It until it looked more effortless, as opposed to out of place one of the last things I did was clean up my parts and make them pop out more with some concealer anywhere. I saw my over bleached Roots. I used a mascara wand to touch them up. I'M gon na go. Do my makeup and I'll be back to flat iron, my hair. This is a straight wig. They sent me. It only got a little wave to it because I washed it, but you know I'm gon na do my little one too, with the flat iron. I pay attention to details, so I'm making sure I'm flat ironing the hair hanging from the rubber bands too, because why would somebody neglect those little pieces? That'S all see not hard just tease. Let me know what y'all think about this style. Oh matter of fact, let me put up my inspo pig because I definitely was trying to recreate something I saw this girl Instagram. Her work is fire. Would you do this style? I feel like it's cute and girly, which is right up my alley. It doesn't get. Sexy, though, definitely gives cute, but just remember that the frontals that have two inches on the side - ain't gon na cut it for a style like this AF sister knew what's up, unlike others, check my description box for a link to everything I use. If you don't feel like searching it up yourself check out my other hair makeup and lifestyle content. If you don't love me yet I know you will soon, and I love you back. I promise thank you.


Comments
Khrys-Ann Josephs: Thank you so much for sharing this detailed tutorial. The final install results are beautiful. Thank you for sharing your technique and talking us through the process the entire time. This tutorial was super helpful for me. You did an amazing job! ❤️❤️❤️