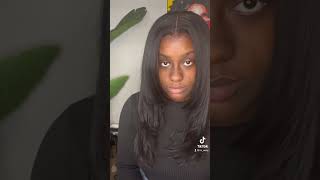
*Detailed* Hd Lace Frontal Wig Install Ft. Luvme Hair
- Posted on 15 February, 2023
- HD Lace Wig
- By Anonymous
Hey my babies. I hope you enjoy :) Thank you LuvMe Hair for sponsoring this video.
Direct link to unit in the video: https://bit.ly/3lz10Pa
Length: 20 inches
Use code Tyreyanna to get 25% OFF!
Things mentioned in this video:
◦ bio silk
◦ erickaj hold me down adhesive
◦ babyliss pro nano titanium flat iron
◦ ic fantasia heat spray & spritz
◦ ericka j liquid melt
My social profiles:
◦ instagram: tyreyannairby + talentedtye
◦ tiktok: tyreyanna_
◦ business contact: [email protected]
SHOP MY AMAZON STOREFRONT https://www.amazon.com/shop/talentedty...
FAQ’s:
◦ Age: 21
◦ Location: Houston, but from New Orleans
◦ Camera: Sony ZV-1 + iPhone 13 Pro Max
◦ Editing Software: Final Cut Pro X
Chapters:
0:00 hey my babies
0:46 install
3:43 baby hairs
7:20 styling
9:15 final look
10:00 thank you luvme for sponsoring this video
Hey my babies, welcome back to my channel it's secret Thai, if you're new here, if you're returning, hey girl, hey in today's video, I'm going to be showing you guys how to install this really pretty wig that was sent to me by love me hair. Thank you! So love me here for sponsoring today's video, so the way that they sent to me is a 13x4 HD lace, frontal wig and it is in a texture body wave as well as 20 inches. I did do a prepping process off camera, so you're not going to see me release the knots into my bottle cap method. So if y'all want to see that just refer to our previous video of me installing a wig, I do the same thing every single time. So we did it off camera and we're just gon na have straightened to me installing the wig and just stay to the end. So here my final thoughts on the wig so yeah, let's just hop straight into the video okay. So, first off, Let's ignore the quality it'll get better. Second off we're using the Erica J hold me down adhesive. This is in the watermelon scent and I'm going to do about three or four layers and I'm using the edge of my Combs to smooth it out and then once it's clear, dries clear. We'Re going to stick our lace into the glue and press it down with our hands. So then, I'm gon na take my elastic band and wrap it around the lace we're gon na. Let this sit for about two minutes and then we're gon na. Take it off, the wig was a bit small on my head, so I did have to secure the front of the wig down first and then go in and do the sides separately. So now we're going to take the band off and we're going to focus on gluing down the sides that are not glued down, and you see all the extra Lace by my ear we're going to also cut that off. So I just use my glue again. I'M gon na do two three or four layers depending on if they have glue there or not. But if you have glue there already I'ma just add two more layers and if not we're going to do the whole three or four layers. So we want to smooth that in until it's clear and then we're just gon na pull the lace into the glue and then we're going to cut that extra lace off and then we're going to do the same. Exact thing to the other side and whatever y'all see going on in the back of my head. We'Re just going to ignore that. So now we're just going to put our band back on for another five minutes and then we're going to take it off and do some plucking. So I'm just going to pluck it until it looks natural to me and then in the front. We'Re gon na part out a little section that I don't want and we're going to plug behind it, because I don't want my like my wigs too far down my face. So we're going to part that out and that's what we're going to cut off so we're partnered out we're going to braid it up and then we're going to pluck behind it. So now I'm just adjusting a band in a bag to make sure it's fitting. My hair and I'm gon na use that little comb in half and, like you know, put my comb in so now. It'S time to cut this extra lace off, so I'm gon na take the hair and pin it up in a little cloak clip and then we're gon na cut this extra lace. So I'm gon na use these little eyebrow scissors. When I cut my gloves to lid right there and then I'm using my eyebrow razor to like you know, raise off the rest of the lace that way it has like a regular Edge, and it's not straight so it doesn't look like a line and then more Like a natural, you know hairline, okay, so now that all of the lace is cut, I'm gon na comb, the hair back to see where the lace is lifting at and we're going to add some more glue there. I'M still going to do three layers of glue right there and once it's clear, I'm gon na use the back of my comb to press it in I'm gon na comb, the hair back and then use the bag to like press it in okay. So the next clip is the next day, which is why the quality is a lot better. But now we're going to do our baby hairs. Um imma just part out the baby hairs and make sure I'm not putting out too much hair because I don't want them to be thick. I want it to look. You know not necessarily natural but like soft, so we're doing pulling out our hairs on the sideburns and then in the front and we're doing a side part with some curls, so um, okay, so for baby hair y'all, see me part out with my baby hairs and I'M using some Spritz around the lace part just so that it's melted all the way, and that way my baby hair is to like stay down and don't keep flying up. So then I take the comb dust on my Edge brush because it's smaller and I comb the baby hairs down and then I take my elastic band and wrap it down that way. They can stay laid and when I go to curl it and stuff and smooth like swoop them they're already like flat, so we're going to use our scissors to cut it. We have a mini flat iron, that's we're going to use to curl and then the products. I used to lay it down. Is the Spritz first for like a temporary hose to see like where I want it to lay and then once it's perfect, I use the Erica J liquid milk too. You know like mold it and they don't move at all. So we're gon na go back to my massage mood and you're gon na see me do my baby hairs and then we're going to come back and curve so much I want to talk about, but I ain't got no one to talk. I don't I'm always trying to work it out, sometimes time when it came away morning. Okay, so now that my baby hair is done, we're going to start styling, so I'm taking my icy Fantasia Heat spray and spraying it all over my hair in the front and then we're going to use my high comb to press it out. Like I said, I'm going some curls today, so that's the only products we're really going to use - and I do have some by yourself that I ran through my hair before I curled it and after I curled it so I'ma, just let y'all watch this really self-explanatory. Still don't know my words foreign, so this is how the wig turned out super. Pretty I love it. I added some curls as well as the side part with some little baby hairs and I just feel like it looks really cute. So, if you're interested in purchasing this wig, I do have it linked Down Below in the description box. Just click, it add it to your cart check it out. They do have several payment options. I love the 20 inch. I love the length of this wig, I'm in my like short hair era, so I just love the lid. It'S perfect. I didn't cut it or anything, but, like I said, I added My Curls and it's just really cute. The hair is very soft. It curls very well and as y'all can see, the lace is melted. Okay looks really good, definitely HD, so if you want to purchase click the link in my description box, so that is all for this video again. Thank you to love me here for spots from today's video, and I will see you guys in my next one bye.


Comments
Z G: Love it!!