Buss Down Side Part Install Step By Step | Purple Highlights | Megalook Hair
- Posted on 21 March, 2023
- HD Lace Wig
- By Anonymous
●▬▬▬▬▬▬▬▬▬✤#MegalookHair✤▬▬▬▬▬▬▬▬●
☞Get Extra 20% Off With Code:MYtb20
Same Hair I’m Using in the video:http://bit.ly/3JABX6N
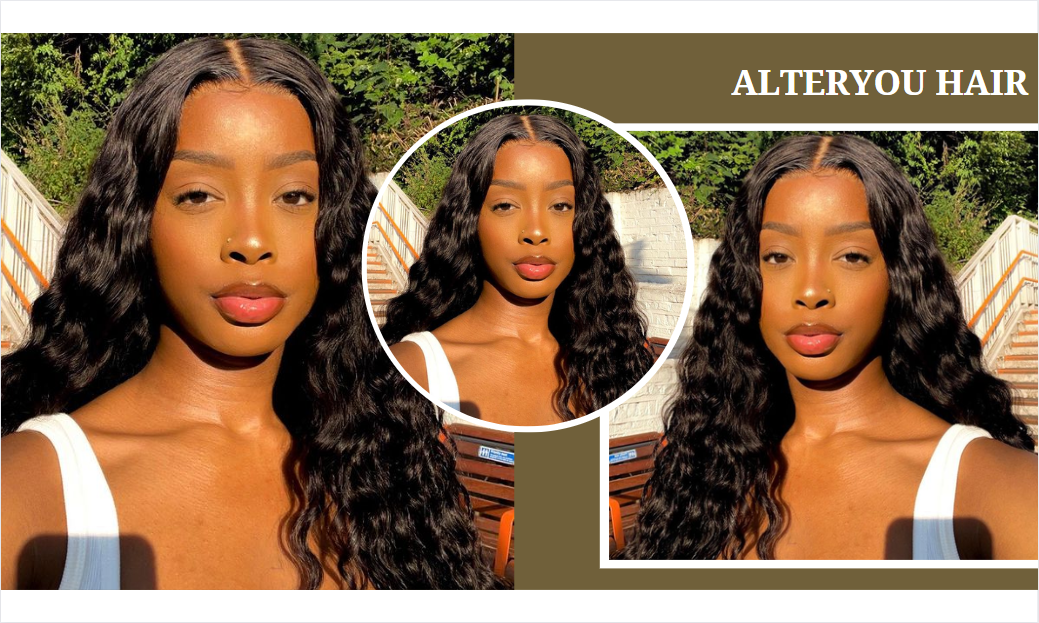
➤➤Hair Info: 13x4 transparent lace purple highlight hair wig 22 inch
Click into our website, more crazy deals are waiting for you
Official website:➤http://bit.ly/3lueNqC
#Balayage Wig:➤https://bit.ly/3JU8xSc
New pop wig:➤https://bit.ly/3yVwSkg
Contact us:
Contact us: E-mail: [email protected]
Whatsapp: +8618903741680
YTB : https://goo.gl/8xk6nX
INS:https://www.instagram.com/megalookhair...
Products used: Mr. Pen- Elastic Band, 0.6", 11 Yards, Black, Elastic Band for Sewing, Black Elastic Band, Elastic Straps, Stretch Elastic for Sewing, Fabric Elastic Band, Waistband Elastic https://a.co/d/9kZJuXQ
Motanar Professional Grooming Scissors for Personal Care Facial Hair Removal and Ear Nose Eyebrow Trimming Stainless Steel Fine Straight Tip Scissors Men https://a.co/d/8aqqqhI
Nairobi Wrapp-It Shine Foaming Lotion, 8 Ounce https://a.co/d/7LH6UBX
Fantasia Liquid Mousse Spritz 2 oz. Super https://a.co/d/cA9NLIE
Ruby Kisses Cream Foundation 3D Face Creator 2-Color Foundation and Concealer, 12 Hour Wear Long Lasting, Medium to Full Coverage (Level 15) https://a.co/d/0Pgtw7S
Aunt Jackie's Flaxseed Recipes Curl Mane-Tenance Anti-Poof Defining Curl Whip, Smoothes and Defines Dry, Frizzy Hair for Natural Curls, 15 oz https://a.co/d/gItGfeW
Glue: https://www.chastyanaj.com/product-pag...
My Socials
IG: @kamanijean
Twitter: @kamanijeann
TikTok: @manijean888
Wig IG: @wigssoldbymani
Email me for business inquiries only [email protected]
Hey everybody and welcome to my channel welcome back if you are a returning viewers. So if you guys would like to see how I installed this 22 inch purple highlights from Mega Look hair and how you can achieve a bust down side part and some slate ass edges stay tuned because yeah this is going to be a long video. So I hope you're ready we're getting straight into it: hey y'all um. I know I said in my last video that, like my edges was like going and like my hairline was receding, but I think I was just tweaking because my braids were so old, but I got some new braids and I'm feeling better and it's looking better. So I think I was really tweaking anyways. The ball cap is on now stretched her on out and now I'm taking my scissors to cut around my ears and um yeah, so we can have a perfectly laid bald cap. We have to do this. First and foremost, foreign spray - this is for sensitive skin and it's a extra strong cold. I believe I've seen this at the hair store. I said: let me get this because sensitive skin. I definitely had that. So I got a little mini version of it to try. It out - and I really liked how this laid down my cap, it didn't give me any issues and it wasn't too different from using the red. Can I guess it was just less harsh but yeah guys, I'm spraying that all around my bald cap um and smoothing that out with my fingers to keep it in place, then I'm going to blow dry that on a cool high setting until it is completely y'all, Hear them cars OMG, but I'm touching my fingers around it to make sure that it is dry before I actually ended and start cutting off the cap. Like I'm doing now, so I cut directly in the middle and then I choose the side to just Glide that not lace. This is not lace! Yeah! You like this cap right on off as I'm doing here, and then I'm going to do it on the next side is well so that the cap isn't just hanging in the back. I like to cut it directly in the middle and take those two pieces and just tie it in a not not too tight, because it will give you a headache. Do not tighten too tight. Okay, just tie it slightly to where it's in place, and then I cut off the excess cap after that, and I got me some new Ruby kisses cream foundation. I got level 13 and 14 because I'm like level 15 like it works, but in the light it does kind of look light and I don't like that like I wanted to really give scalp and like my skin, so that's the 15 that I usually use, and I honestly y'all, I should have like remembered what exactly color I used, but it was in between the 13 and the 14., I'm not sure, but both of them were like good matches and you guys kind of like see the Caster on my cap. I did not like that at all, so to avoid that, I recommend, just using the Edmond Wonder, lay spray on your ball cap right in front of your edges and not directly on them, like don't spread too far back have some control because yeah the cast like Takes away from the true color of the makeup on the lace and yeah, we don't want that. We do not want that, but I'm taking my root, I'm not rude because y'all! Oh, my gosh, Erica J hold me down glue and my popsicle stick and I'm using that around the edges of my cap to just hold it down a little bit better. So it can look a little bit more seamless, and I also went in with some essential for rubbing alcohol to cleanse my skin for any extra oils or the makeup that was left over from the cap, so that when we do adhere the glue to our skin. For the lace it won't interfere with it and it can lay perfectly flat and seamless, but right here right now we have this wig on and, as you can see it's biggest like, I don't know why these companies wigs be big, or I don't know if my Head is just super small or what, but this wig was like extra extra large cheese, but I'm using my scissors to cut around the ear tabs and I have to go in and cut quite a bit off so like the hairline was just throwing me off a Little bit because it was just so much that I didn't use, you know like it looked a little wonky, but it's okay, we finessed it and it looked good. So after I cut that off, that's what it's looking like and I'm like like it's giving Neanderthal forehead and I'm I'm not with that. So I took some of the hair in the front and parted that out and I'm going to take some more here to give it like a perfect. You know what I'm saying make it look good and we're just going to rip those right off, because that's going to look a lot better, so I'm just ripping you don't have to like. Be scared to do this, like it's. Okay, just rip those hairs off straight like that, and we're good, like the hairline, looks a lot better once all of that is done. So then I'm going to push the wig back and we're going to get into actually going this wig on. So I'm using my air condition holding me down Gloom like how I did before and I'm using a thin amount. It'S recommended to use a thin amount, because when you use a lot it just doesn't it doesn't dry, clear, like it'll, be gunky and clumpy, and you want it to be seamless. You want it to just lay flat so make sure to use a thin amount, but yeah you guys use my popsicles stick and I'm smoothing this out. I'M trying to keep it directly in front of my cap not too far up and not too close to the cab. You feel me like. We want it to be a little bit forward, but not too much to the point where the forehead or my forehead is going to be like giving small, because I don't like that. I really don't like, but by all means, if you like your forehead to look small, you know push that glue up as far as you'd like, but my personal personal preference, I like to keep my hairline looking pretty natural and as if you know like my forehead, Is still intact so after I have that all smoothed out, I'm going to blow dry this on a cool high setting until it is dry and tacky being really precise. With this touching it along the way, when I see that it's kind of getting clear to make sure that it's Tacky Tacky Tacky, this is my fourth layer. I did four layers total, and this is the fourth last one and I'm just yeah doing the same exact process gliding that right along the cap and then smoothing that out in front of the cap not too far up and not too far back, okay, so yeah, The perfect perfect recipe, smoothing that all out I will say I do push the glue a little bit further up than like on the sides in like the middle of my head, because my forehead is kind of big. I'M not gon na lie and I do like it to not look super big with the plucking, because you know like with the plucking it's going to make its own type of hairline type Vibe. And if I pluck it - and I put my wig right where my forehead would be, it just looks it look weird, so I do push it up a little bit further at the front. I do do that, I will admit, but you guys can see where that glue is clear and yeah, since it's clear and dry it's time to put this wig on. So I'm stretching this lace out and I'm stretching it pretty. I'M stretching it a lot because this wig was big, so I'm trying to make sure it doesn't Ripple in the front or anywhere. So I'm really trying my best to stretch it out and usually I'll put the wig on all at once. But since this lace was super big, I did one side at a time. So after that side was complete, I went over to this one touched. It stretched it out the same way. Oh my gosh. I hope y'all don't mind my stuttering, but it's something that I kind of can't help but, like I do have a stuttering problem like if y'all really hear me in my videos, I stutter quite a bit and it's like I'm, Not Gon na Keep editing my video To not stutter, like I just gon na, have to take the real, the realness of it like I stutter I stutter, but yeah. Now that the wick is on and I've pushed that lace into my skin, I'm taking this fun to comb and my um blow dryer on a cool high setting and I'm just pushing that lace further into my skin and I'm being pretty aggressive with this because, like I said this wig was big and if you don't do that, like you're going to get some Rippling and we do not want ripples like that, I mean I got ripples regardless, like the wick is still in my head two days later and yeah. It'S definitely Rippling in the front, but with a fresh install to avoid that you definitely want to stretch everything out like y'all just seen. I just shot the lace at the end and I also stretched out the band but yeah. While this band is on for about 10 minutes, exactly I'm taking my comb and I'm making my part, I'm making my deep side part and as you guys can see, I don't do it in just all one. Take I really like play with it to see what kind of part that I want and how to perfect it. So that's what I do and that's what I'm doing here side note I feel like. If I didn't talk so fast and these voiceovers, I definitely won't stutter as much, but I got ta talk fast, like we're. Moving fast, like this moves fast. If I was to talk as slow as I actually do, when I do talk slow, we would be here for 35 minutes, and I don't know if y'all want that so anyways I am taking each section, I'm parting out sections and I'm using my caracare wax stick And my hot comb to flatten out this hair, so it can be super seamless. Okay, like we love a flat, install, so we're going to take extra steps to make sure it is flat flat flat flat flat, so yeah guys I'm taking sections and I'm just hot combing each one through, and this is in real time you guys. So I'm actually like going this speed. I use it slow, sometimes and also like don't use it slow, but for the most part, if you want it to be really flat, you want to go slow with it. Okay to really get that product in boom. Y'All see that really get that product in so yeah. That'S what I'm doing! That'S what I'm doing here and foreign and I'm repeating the same thing on the side where the part is not where the part is, but where the part isn't like, where the hair is going to be falling so yeah. This isn't like where I started it, but this is where I'm showing y'all, where I started it, because I definitely did go like session section by section by section by section so yeah, I'm kind of almost done with it. So I'm showing you guys how I'm almost done with it and yeah. This is how you're gon na get your wig flat, like you have to go in section by section. If you want your weight to be super flat, like you see, hair stylists be doing their clients um, you really need to make sure to go Section by section. Okay, do y'all see that y'all see that and you can just like. Imagine touching it how I am like it feel it felt so good like it felt so flat, but now that this band is off and the wig is looking, oh so flat. I thought I wanted to use my scissors to cut off the lace, but I said sorry can I grabbed my Razor my OG way of doing things and yeah I'm just cutting off the extra lace. I didn't go too much in like a zigzag motion. I kind of just like lifted the um razor upwards and cut well not on this part, because it's my sideburns and I have to like switch it and flip it around, but yeah as you guys can see here, I'm not really doing too much of a zigzag. How I usually say I would do because, after using the scissors on my lace, the last install, they kind of just showed me that it really doesn't have to be zigzag as long as it's getting a good cut. So yeah I'm cutting some extra lace off on this side, as you guys can see because it just it just wasn't necessary for it to be. Then I just want it to look perfect, so yeah bro, I literally set sections so many times that was so uncalled for it anyways, I'm taking that glue and I'm using just a tiny bit in the bottom of the razor to smooth that out, because using a Popsicle, stick is just too big like when you're trying to lay down the small pieces of the lace, so I'll just use the bottom of that. So I take my blow dryer on a coil high setting and I blow dry that and it doesn't take long to blow dry because it is just a tiny little piece that we're doing and I'll just stick that down with my fingers and there's also some pieces. Sticking up on this side too, so I repeated the same process over here foreign. It was some pieces on this side that I didn't really like just hanging like I didn't like how it looked so I took my scissors and I cut that off. Then I'm taking my Ruby kisses cream foundation. I swear. I really am so sorry that I don't know which shade that I use, but it was between the 13 and the 14, and I'm using this makeup brush to just Glide that makeup on this lace, to get it more blended with my skin give it. You know skin for real, but I'm taking some more of that ebb and wonder: lace, spray, the sensitive skin one that I used prior to and I'm using just a little bit of that not taking too much and I'm dabbing that around the lace not too much Like on the hairline but on the lace and then on in front of the lace on my skin too, so it can look really seamless like it's. My scalp so yeah doing that patting that, through in Pro tip what you want to do, which shout out to ebony um. Basically, you want to let that sit there until it gets a little bit dry down for like like 30 seconds before actually putting the band on now that I have my band on I'm gon na. Let that sit for like 10 minutes and I'm going to finish flat ironing my hair. I did flat iron, my hair on my mannequin head, because with straight hair, it just makes sense to me to flat iron it on a mannequin head. So I can get it like tracked by track and it can be super silky and I leave the frontal part parted out and I don't mess with that until it's actually on my head. So that's what I'm doing here just flat ironing these pieces out. So it can be all the way finished and once that's done now, it's time for these baby hairs. I didn't edit too much of this out, which is why this video is like 26 minutes long, because I really wanted you guys guys to see like the full process of me doing my baby hairs, because yeah don't be all rainbows and like flowers and and like Sunshine, like I'll, be not struggling, but it's really a process like it's more than just pulling the baby hairs out and swooping them like I'll, be like it's really an art. So I don't want to talk too much. While I do this, I want you guys to just watch this and I'll pop back in and say some things if I need to but yeah you guys. This is where I'll really be concentrated the most because, like the baby, hairs are really the most important part. You feel me, and I did things really dramatic, because I was just feeling I haven't done my wig in like three weeks and I was just feeling extra like I wanted dramatic baby hairs this time. So that's what we did and that's what we're going to get into okay, so yeah, I'm just parting them out right now and then hot coming them through, so that they can get extremely flat, okay and silky when we lay them down foreign foreign foreign plucking. Some of these hairs out and I'm plucking it in places where it's already you can see spaces in between the hairs just to give it a more natural effect because they are going to be dramatic. And I don't want them to look bulky and dramatic, like in a bad way like in a nasty way. I still want them to look. You know clean and not like they're doing too much like we want to do the most, but not too much you know. So that's what I'm doing here and then I have to comb those hairs on out. Then I'm taking my scissors and I'm just basically shaving these hairs off and like to keep them the length of my eyebrows, basically but yeah. Just cutting these hairs off right now, foreign make the baby hairs, look, fluffy and natural. You want to take a half inch, curling iron, and this is the kiss Pro half inch pencil flat iron and I'm curling them upwards. Usually I curl my sideburns like under, but this time I curve them over. Just because I was like. Let me do something different like. Let me just do this. Why not so that's what I did and I'm not too mad at the outcome, like they looked really good all together, but yeah, I'm just curling these baby hairs getting them nice and tight. You want to hold it and then release it. Just like that, and I use some Icy Fantasia holding Spritz for my baby hairs and yeah y'all - I they don't be doing it for me for real for, like sometimes it works for me. Sometimes it doesn't so you guys will see here in a second after I'm. In the process of doing them and trying to moat them, I take some Nairobi holding foam to help molt them down even better but yeah. When it comes to my baby hairs, I really just try to swoop it like, as you guys can see, and I use my finger to help mold it at the same time and I'm really just taking like sea Strokes. Like imagine a ocean wave, you know like a waving ocean. You just want to make that and you know just keep that going. Keep that going until you get it like perfect in your eyes. You know it's a trial and error process. Like I said, I didn't edit too much of this out, so you guys are really seeing the whole process foreign. It'S so funny to me how every time I do my baby hairs, I do them differently like every time, but right here, I'm taking some got to be glue gel in the Black Bottle. I took a little bit of that on the sides where I'm swooping right now to help mold it a little bit further, because I did what want to swoop these hairs into the lace. As you guys can see so yeah. I took some actual gel to help with that foreign place. I took this small blow dryer not blow dryer this, like I don't even know it's for your lashes or whatever you want to use it for but they're for my lashes Furrow, but I just took that to help melt, that real, quick and I'm taking my scissors And I'm cutting it a little bit in the front to just make it look a little bit more, you know, so it can hit a little bit better. I don't know why I did that it just felt right like I can't really tell you why I did that, but it just makes it look better and more put together, but now moving on to my sideburns, I am using the same. Holding Spritz. I see Fantasia liquid foam Spritz or something like that. I don't know it's it's only down below, but yeah you guys. I realized that wasn't really working for me either so yeah I took some of that um foam again boom right here to help melt that better. How I like it because it just honestly like the foam, just helps it since it's wet and like foamy, I mean the sprays wet too, but the foam is like foamy. So it's it's easier to use I'll, say to like form a baby hair in a swoop. At least for these thickness and the dramatic baby hair is also doing today, it was a better, a better Vibe. So that's what I'm doing here just trying to really get this swooped correctly, how I would like it to look foreign foreign foreign, foreign ERS and I'm plucking out some of this plucking that I did because it just wasn't sitting right with me like it wasn't. Looking seamless and put together as it was on the other side and just look how luscious this hair looks and how it put together this install is I cut some more of these hairs also can look a little bit more natural. I don't want them. I don't like when they're hanging like by my eyebrow too much and I'm taking my Ruby, kisses cream foundation. I'M really not sure what shade, but it's one of the two that I've been using today in this small makeup brush to make the part look more natural and seamless and put together the part, was kind of purple. I think that was because of me bleaching. The knots I think, the purple kind of bled through a little bit - I'm not sure, but it was a quick fix with using this cream foundation here, just buffing that one through then I'm taking some of my wax sticks to help flatten that out before I hot Comb and I had to take my tweezers and just plug some of these hairs away that I swooped, because it just it just wasn't sitting right with me, so I tweaked it and I mixed it a little bit and then I'm combing those hairs out that I Plucked and then gelling those back down as they were before I just felt like the hairs on this side, could be a little bit more natural looking and softer, as they were on the other side, so yeah. That was just a quick little fix there, and now I can take my hot comb now that that is swooped back down back to business, but yeah. The wax that I'm using is the same wax. Stick. I'Ve been using this whole time. The carry carrot, wax stick and yeah y'all see how flat it is like. Oh, my gosh and so shiny, like oh, my God, foreign. It'S always important to take your hot comb really aggressively, not not aggressively, but really be firm with it towards the back. Soaking. Look! Seamless all the way around and I'm taking some of this Nairobi holding foam to help with the overall flatness of this install. So it can look really fresh like we just got our hair done at the salon, but we really did have the comfort of our own home so yeah. This is pretty much the end of the tutorial. Thank you guys so much for watching. I hope you got something from this and learned something from this and thank you for watching all the way through. If you did. Thank you also for all the subscribing you guys are doing like oh my gosh, if only I could hug you all. I love all of you and make sure to like comment. Subscribe I'll, see you guys in my next one


Comments
Nina Negedu: Missed your uploads, Mani. The wig looks so good on you
Ayiyi Hair: So lovely!
Niya J: girl for bald caps since the sides lift for you bold hold liquid gold i have the same problem and super oily skin ! it works soooo good
Nanasopretty: Love it
Sonèt: Definitely on of my top fav hairstyles on you
Hermosa Hair: Beautiful~❤❤
Tiny_amethyst: Baby hairs are honestly the hardest part for me.lace be looking like scalp!!but I mess it up with baby hairs
quinnasia: this color look so good on you
Peter Rodriguez: Yes, this is very good
nailah’s lifee: curlying tutorial or edges tutorial next pleasee
Sapphy R: ❤❤❤
Meet josey: I missed that face, so pretty
K L: Mega look wigs are so big on me too it’s annoying and the way they make the wig is weird but the colours are beautiful
BlackinAction: Literally just ordered this
Ashimary Hair:
PrettyB Dior: I’m looking the color
Rhoda Johnson: Damn you good!!!!✨
SimplyKacy: You are soo cute! And talented
Nisha Nelson: Have you sold the wig already?
chime: I was just wacthing tiu