This Color Is Giving! Chocolate Brown Hd Lace Wig Install | Alipearl Hair Review
- Posted on 02 July, 2022
- HD Lace Wig
- By Anonymous
Shop Now➤https://bit.ly/3zng33c
Hair Info: 22 inches # 4 chocolate dark brown straight lace frontal wig,180 density.
❤#AlipearlHair Official Store:➤ https://bit.ly/3tgxbDM
1.Join FB Group, Win FREE HAIR➤https://bit.ly/3NUoCGJ
2.Lace Front Wigs for Sale!➤ https://bit.ly/3x1N9CQ
3.Invisible HD Swiss Lace Wigs:➤ https://bit.ly/39aZCMD
#alipearlhairwig #alipearlchocolatewig #alipearlhdlacewig
Instagram @alipearl_hair: https://bit.ly/34I3Oyd
Youtube @Ali Pearl Hair: http://bit.ly/2H0Gmmc
Facebook @Ali Pearl Hair: https://bit.ly/3aKwxX3
WhatsApp: +86 15890076489 E-mail: [email protected]
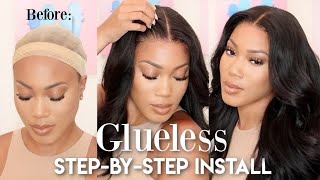
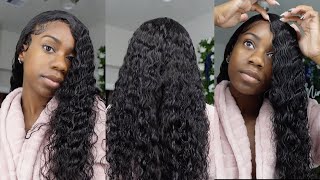
Hi loves what is up it's your girl, sheepley here back at it with another video, so in today's video i'm going to be showing y'all how i installed this beautiful chocolate, lace, frontal, wig y'all. I have never done this color before and i have to say i'm here for it. I was so excited when ali pearl reached out to me um and wanted me to try out one of their wigs. So this wig is from ali pearl. If you guys are interested in purchasing this exact unit, there will be a link in the description box down below and yeah. They have so many different other wigs on their site that is affordable, and that looks just as good and let's talk about the lace. Okay, the lace the color is giving. I didn't have to do anything to this wig, but bleach it and then um. I just went ahead and plucked out some hairs. It did come pre-plugged as well, but i just went ahead and plucked some hairs out and then i just installed it y'all. This took no time and it was just like super easy to install. I absolutely love this color and what i absolutely love about this is that it came this color like i had to do no work with any bleach or anything other than bleaching the knots but y'all it came just like this. The lace looks phenomenal. Everything just looks bomb. I think this has to be like my favorite look ever like i've. I'Ve been wanting to try this chocolate brown color on myself for a really long time, and i'm just so happy that i was able to do it this time, and so this video was not going to be a talk through, because my ac was on the whole Time and it's super loud and i wanted y'all to be able to just enjoy the video, so it's going to be like a sit down. Y'All could just relax and watch me install this wig. So, if y'all are interested in seeing how i put this baby on and how i got it to look this nice and sleek then definitely keep on it. Hi loves! What'S up so we're just going to jump right into this video so right now i am showing y'all the wig that i received from ollie pearl again. This is their chocolate lace front unit and i just bleached the knots i'm showing you guys, the inside of the wig, it's very much stretchy and it fit my head pretty good. Um honestly, it might be, it might have been a little bit small, but it gave us that facelift that we needed. I was so excited to put this wig on, because i have just been dying to do this. Chocolate brown color and the fact that i had to do no work with actually coloring. The wig was a plus like saved me so much time and yeah right now, i'm just showing you guys how it looks so far and it looks bomb. I cannot wait to just hurry up and put this thing on my head. I think this has to be like my favorite look. So right now, i'm going in with some foundation. This is the ruby kisses foundation and i'm just applying that to my cap cutting off some of that excess cap, because that is not needed and just making sure that everything is like almost right in front of my hairline, but not too much all right. So now we're gon na go in with some alcohol y'all. I know y'all hear it in the background that is my ac. I started this video off doing a um voice over, but i'm just like. I want to talk to you guys and y'all. I swear thought i was gon na be doing a talk over because i really wanted to talk to y'all, but the ac was just bothering me. I was sitting right in front of it and i just knew that it was gon na be a complete distraction. It was gon na be so loud, so just ignore that we're just gon na do a voiceover, okay! So right now, i'm just using some alcohol on this cotton pad and i'm just cleaning my skin off, so that the glue is fresh and able to just stick on my skin and i'm going in with the ghostband glue. Y'All know i always use my boho active, but your girl was running low and i had clients, so i have to preserve the good glue for them. Okay, so i'm using the ghost bond - and i did about three layers, so the key to applying glue to your wig cap is always to make sure that in between each coat and each layer, it has dried completely clear. Okay, so i'm just going in with the back of a razor, because that was the only thing that i had. That was close enough to a popsicle. Stick really. You just need something really flat and wide enough to spread the glue around, and this is the second coat. So i just did little dots across my hairline well across the cap, and then i just went in with the razor and then just smooth everything out waited for that to dry and just repeated the same process, all right. So after the third layer, we're just gon na pull the wig down, and i like to make sure that the wig is exactly like right on the glue and if i miss a little bit of pieces, that is a little bit over the glue. It'S fine, we'll just cut those off so as i'm pulling that into the glue, i'm also using my hands to add pressure to make sure that the glue is. You know latching on to the lace itself and i'm just making sure that all of that cap is covered and, as y'all can see, instant face, lift y'all instant face. Lift like do y'all see that eyes is pulled all the way back. That is the type of look i like to go for when i put my wigs onto each other, but that's my vibe all right. So now we are going to cut off our ear tabs and to me this is the easiest part. A lot of people seem to have trouble. All you really have to do. Y'All is just cut around your ear. That'S it cut around your ear, don't cut below your ear, don't cut above your ear cut right around your ear. It is super easy and it probably is a little bit easier when you use smaller scissors, which is why i'm using cuticle scissors, because it just works better all right. So once that is done, that was the hard part. So once that is done, i'm going in with my elastic band and i'm just melting that lace into the glue before we go ahead and um cut that extra lace off. So while that is sitting, i just like to do. My part. Make sure that everything is nice and sleek, and i wanted to do a middle part with this look and absolutely did not regret it so right now i just put some wet stick and that hot comb was hot. I see what my clients be talking about now. I'M so sorry y'all, oh my gosh, it was so hot, but we're going in with more wax stick in between our parts to make sure that everything is nice and flat. That is how you get the flat look. That is how you get the seamless look, and that is how you get the no helmet look. Okay, because the big helmet look is not it. We want everything to be nice and flat and just look like it's coming out our scalp and also don't forget the back of your lace. Wherever the lace stops, you need to take a piece of that hair and cover the tracks so that it is not detectable. Okay, so that you're only seeing lace and you're not seeing tracks as well, so your hot comb will be your best friend for sure. So, as i am doing that, i'm just brushing out the rest of my hair and we're about to go ahead and style. This wig, so i'm using the cheese, silk infusion oil and i'm just running that throughout the hair, just prepping it before we go in and flat iron and y'all. At this time, my mom and my nephew was just in there bothering me, like bothering me for me, hi mommy good morning, go say good morning to the people. How are you i'm good? How are you oh put this voice in here, just say: hi, say: hi. Everybody go over there. Can you give me a call to the camera, see hi everybody right. There say: hi, everybody, you guys running yeah or not. You are not entertaining and exciting enough, so over containers for her yeah. That'S what you do. I need some excitement. My mother likes to buy things and say that it's for me and it's not for me it's for her. She just didn't want it anymore, so she's giving it to me it's for be careful! Please you guys are causing chaos come on jay. Let'S leave the world going alone. She got our own chaos going on come on. Yes, my hair is oh, they are crazy, so i'm just going in and pressing my hair with my baby, less iron and it's on 450 and i'm just using the chase method, and this gives me the most sleekest and straightest look ever you have to use a Comb and your flat iron, that is how you're going to actually go through and apply heat to every strand of hair, because the comb is going to be. You know, kind of detangling as you straighten, so that's how you get the best look. You just have to take your time, have to be patient so right now, i'm taking off that elastic band and it is time to cut this lace off and it looks so good y'all. I was so excited like so excited, so i was just straightening up. My part at this point and just trying to see where i wanted to have my baby hairs and for this look i definitely went with the baby hairs only on the sides and none in front and also a sideburn. So right now, i'm just using my razor and we're cutting off all that extra lace, that we just don't need and do y'all see the lace like. Do you guys see the melt? This is insane like by far one of my favorite installs ever like the color. The lace, the blend everything was just given, it was hidden it made me feel like i was that girl, so as y'all can see like that, just looks so good. Like so good. Look at that so good get into it y'all the lace has disappeared. Wow. I was feeling it. I was feeling this so much that i had to take pictures of myself. It looked so good and yes so now we're going to repeat the same process on the other side, with the razor and more pictures because well do y'all see this. It just looked too good not to take pictures. Your girl was following herself and i wasn't even done like that's crazy, so now we're going in with the baby hairs and i'm just parting. Some of my baby hairs out - and i am just doing like i said two on the sides and my sideburns so normally y'all - know that whole cyber look where you cut it short. I actually wanted longer sideburns. I just felt like it added to the look very well and that's exactly what i did so i just cut the sideburns a little bit short, but not too short and just repeated. You know my usual steps with those baby hairs on the side. So once those are parted out, i just went in with a smaller elastic band and just added more pressure so that the milk can be y'all out of this world. Okay, that's key, always add pressure to your install. So after a while after i did my makeup, i came back and i just tweezed a little bit of hair out of my baby hairs, because i don't like full edges. I like them to look very natural and very minimal as well. The full um edges just isn't for me. If that's for you, then do you girl, but for me it's enough, so i just went in with my um flat iron, my pencil iron and i just curled it upwards so that when i am laying my baby hairs, they have like a nice curl to it. So that it lays very effortlessly and we're doing the same thing on the other side, and then after that, i'm just going in with some got to be on my edge brush and we are just going to mold our baby hairs down. I was going for like a very fluffy look instead of like a very like structured, laid baby hair type of look. I wanted it to look very natural, so the got2b glue gave me the look that i wanted, because i didn't want it to just be super flat. I wanted some fluff there as well and then once i got it, the way that i wanted, we just repeated the same steps on the other side, which didn't take long at all, because again, two baby hairs. That'S all all right! So now. For this part, we have to touch up our lace and i just used some brown eyeshadow to do this and y'all. That is pretty much the finished. Look. I absolutely love this wig. It turned out so good. I already love, so that's pretty much it for the video. I hope you all enjoyed it y'all. This came out so nice. It looks so good. It looks so natural and i have to say i think this is by far one of the best wigs that i have ever put on my head, like i think it's given for me. I absolutely love this. I love the color. I love everything. I love how flat it is and not to mention y'all, my hair isn't even braided down like it's just like back, so let's really get into it and then, let's get into the lace, honey, it's giving everything! Okay! So if y'all are interested in purchasing this wig, you guys can find all of their information in the description box down below, don't forget to check down there for coupon codes and everything as well um again pearl. This is it all hits no misses y'all. They did their thing with this one. Okay, so i hope you all enjoyed the video. If you did, you know what to do. Give this video a thumbs up subscribe to your girls channel and before we go. Today'S motivational quote, is, god is bigger than whatever has you stressed in this exact moment? Lay it down and let him handle everything so with that being said, i'll see you all in my next video bye,

Comments
Ali Pearl Hair: Pretty! Thank you so much for your sharing!
HWW Trons: Freaking perfection ❤️
Ruvimbo Nhuruza: The hair color is stunningand so are you
HWW Trons: I'm loving that color
Junior Chaves o Picasso de Yahushua: You are freaking gorgeous
Ваня Соняков: que vym.Monster encantan tus videos. Bendiciones hermosa Celina que Dios te cuide donde quiera los mortaless abian apreciado tan hermosa mujer
Danyal Cach: LP reacted d ryt way, she is von.Monster need of over drama, or over consider ations. She don't deserve *considerationso. Lp പറഞ്ഞ പോലെ,, ജീവിതം തുടങ്ങിയല്ലേ ഉള്ളു, പഠിക്കട്ടെ.