I Got This Headband Wig From Amazon!!! Easy Install 16" Kinky Curly Headband Wig Only $50!!
- Posted on 14 February, 2023
- Headband Wig
- By Anonymous
Check out this easy Install headband wig from Amazon! The texture is easy to manage and natural looking.
Follow Me on Tiktok @covidew!
Interested in selling/buying a home in GA? Email me at [email protected]
Items Used:
Eooma 16” Kinky Curly Headband Wig- https://a.co/d/9qm6pP1
Olive Oil Mousse-https://a.co/d/cUpi36X
EdgeEffect-https://a.co/d/bhsc5sn
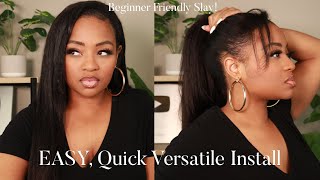
Hey guys and welcome back to my channel, if you are new here, please make sure you like share and subscribe. So you don't miss out on any of my new content and today I will be installing a headband wig. So I did purchase this off of Amazon. It was fifty dollars, it is human hair. I think the company is pronounced Uma and I will put the link in the description box below in the package. They did provide me with two headbands, two wig caps and a pair of eyelashes. So this is the wig straight out of the package. It does have a nice curl pattern and the wig is very soft. It comes with three Clips in the front, a clip in the bag and then also the adjustable strap. Usually I do start from the back to apply my wigs and then I use only the two Combs on the side, but before I installed the headband wig, I will be just laying down my edges with the edge effect edge control. Now I'm not gon na. Do anything fancy with my edges? I'M just going to kind of give them a small swoop to the back and then once that is in place, then we'll go ahead and apply the headband wig okay, and once I get my edges in place, I will be going over it with my Kiss cover Up for my edges just to fill in those thin areas and I'll do that on both sides, all right right now that I have those edges laid to my liking, I'm going to apply the wig like I said. I start with the clip in the back and then I work my way up to the front to apply the two side lips, so I'll go ahead and just apply it. One thing I like about the headband wigs is that they're very versatile and they come in a lot of different patterns. So it's very quick and easy to throw one on if you maybe have to run errands or need a quick hairstyle in between Styles. This is a good option to have so I'm just going ahead and putting the Clips in on the front and then once the clips are in place to my liking, I'm going to go ahead and adjust the band in the back and once that's in place, I'm Just going to push the band back, a little put it in the area that I would like it now. I do have mine kind of up only because I have my crochet braid pattern still in from the 30 inch braids that I had so I wanted to bring up the band so that way you won't see where the braids start. However, with the headband wigs, you can have it as far back as you like, but this is the area that I would like to have mine in and even if I didn't have the braids, this would kind of be where I would put it so right now. I'M just going to spray some water before I start to add the mousse just to help break up the curls. The mousse that I'll be using is the olive oil mousse I'll, also link that in the description box below, but so far so good. I do like how the curls are turning out before I even put the mousse on, so I'm just gon na get a handful and apply it throughout my hair. Next, I'm going to apply my black headband on top of the headband portion of the wig, just to cover it up and put on a band, that's more stylish my ears and get the hair out the way and just adjust it to my likings. So this is how the headband wig turned out. I do like the curl pattern. I love the headband wig and I will invest in more in the future, but this is the end of the video. If you do like this video, please make sure you like share and subscribe and I'll catch you on the next one.


Comments
Jessica Shaw: That was a very quick and easy style. I like the curl pattern. I need that for when I am in between styles like now