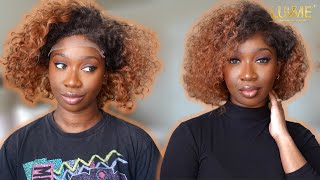
In My Ginger Girl Era Ft Rodolave Hair
- Posted on 16 March, 2023
- Lace Front Wig
- By Anonymous
Hey guys
I hope you enjoy this one.
Don’t forget to like, share, comment and subscribe if you haven’t.
For reviews and collaborations:
Instagram:
https://instagram.com/diana_mbuvi?utm_...
Link to the hair:
RODOLAVE Ginger Orange Human Hair Lace Frontal Wig Straight 13X4 HD Transparent Lace Front Wigs for Black Women 180% Density Glueless Pre Plucked with Baby Hair 24 Inch https://www.amazon.com/dp/B0BR7FWTF3?r...
#amazonwigs #gingerwigs #wiginstalls
Thank you, hi guys, welcome to my channel long time, no video, but we are glad to see we are back so for today's video, I'm going to be showing you guys how I installed this um wig from a company called Roto live on Amazon, and these are The complimentaries the wig came with this was the wig straight out of the box. I loved the color, I loved the lace and basically the construction of the wig. It obviously came with three Combs on the inside and I will talk about the specifications of the wig as I progress. This was after I washed and conditioned the wig before I continue. Please make sure you subscribe if you're not subscribed and thank you to all my subbies um. So for this week I started by tinting the list, which is basically applying the lace with a shade of foundation. That is your skin color so that it matches your skin and it looks like it's coming from your scalp um. So I did that and then proceeded to spray. The lace with some got to be spray just to ensure that the foundation really really stayed in place. This step is optional, but I just did it so yeah, basically just tinting the lace. Then I had forgotten to lay my edges. At the beginning, I just laid my edges with normal gel laid my edges to ensure that they don't touch any spray, and then, after that I proceeded to fit the wig in onto my head. So before you start applying any spray or glue, you want to make sure that the wig fits first of all by adjusting the straps at the at the wigs and then cutting the lace. So here I'm just cutting the excess lace and then here I'm splitting the part at the ears to cut the lace on the ear part now, for this part, I'm not an expert. What I did is I partitioned the part where I felt my ears were more comfortable and cut it flat while lying the wig on the table. I hope that makes sense um. I also realized that it's easier for me to cut the lace when it's not on my head, so I did attempt to cut the lace with it on my head, though it wasn't as successful. I don't know I don't know how to do Direction with my hand like it feels weird it feels like I'm being left-handed. I don't know if that makes sense, but whichever feels more easy and faster - and you know more comfortable for you - you're welcome to do it. I just did try to cut it on my head, but then later on, removed the wig and laid and cut the lace. While it wasn't on my head, like you guys, can see, and of course you want to cut your lace in a zigzag motion to ensure that it looks like it. Okay, it looks more natural, instead of it being so straight, and then it looks so Wiggy. So after I was done cutting my list, I proceeded to laying the wig using the spray. Basically, what you do is um spray, some spray onto your scalp and then use your finger or anything flat to spray to spread it all over and then dry it and then melt it so for drying. You need to use anything that can produce cool air. So you can use a fan or you can use the cool part of your blow dryer and then lay place the the lace there and then blue jay again with the warm, warm or hot settings on your blow dry. So basically, you alternate between um drying, laying and melting, so drying is cold. Um then laying on our killer to lace and then melting. You use the hot or warm settings of your blow dry you're, going to notice that um it may lift. As you proceed. Just keep repeating the process and remember that got to be spray is, is like a little amount is enough like too much of it will make it flake, so just use a small amount at a time. You'D rather keep building, rather than use a lot of amount which will make the least messy and white. So this is me basically just laying the wig using the got to be spray and yeah nothing. You know nothing rocket Sands or Greek about it. I will keep repeating the process. I will obviously film more videos, so in case anyone needs anything else to understand or interpret. Don'T worry. There will be more videos, so I do feel now it's time for me to talk about the wig, as I continue to late on the video. So the wig is a ginger colored wig it according to the seller on Amazon. They claim that it has a transparent, 13x4 HD lace. Now I don't know much about laces, so I cannot lie and tell you. I am sure, but I liked the lace it was really really smooth um as compared to a previous wig. I have worked with the wig is also 24 inches, it is 108 80 percent density and it is obviously human hair. You can apply heat to it. You can definitely diet. I will leave the this the link to the wig in the description box for anyone who would be interested to purchase um. I live in Kenya, basically Africa. So if you're shipping from Amazon to Africa, you do need to use a shipping company. So after I was done, laying the lace I tied the melting band onto my head, so that the wig could lay or melt a little more. Please be careful when you're tying this, so that it's not too tight, because you will get a headache. I have gotten a headache before and it's not cute, then I tried to do some curls initially. I wanted it to be a very born straight wig, but I wish I had flat ironed it prior to me placing it on my head, so I tried to flatter in it on my head. It wasn't working out for me, and this is the first time I'm playing toning it, so I ended up getting um some cards using my flat iron. Instead, after I was content with my kalim project, I proceeded to use some wax stick on the wig to hold any flyaways and used a hot comb, of course, to melt. You always need a hot comb to melt your wigs. Now this was my favorite part of the lace belt. I wish I was as patient as I was during this part. Can you see that yeah, so I've been on Tick Tock a lot lately and Tick Tock made me buy this Spritz and I got it from DuBois, so the Spritz is apparently meant to hide your lace, I'm not sure. If I used it correctly, we'll watch more Tick, Tock videos, so I sprayed it and then dried again, the the Spritz and then used most. At this point I was just using all the products I have and then blow dried and started combing. I think these were the final steps, and this was the final look which I like, and I dig and I'm gon na practice till I get better. So we've come to the final parts or like we're done with the install, and this is how it turned out. I'M actually quite impressed, I'm not mad, like I'm, not mad, it's it's giving something, I'm trying I'm proud of myself and they are struggling with some white ashy things on my on my like wig lines. If I make all that and today, I'm not seeing it but yeah it's it's actually cute. I like the colors I managed to do like I love it and though there's something about the texture. That'S a bit coarse, but when you run your fingers they're still like going through, but it's still soft. I don't know how to explain it. It keeps it's it's cute and, of course the link is in the in the description box in case you'd like to purchase the wig again, I got it from Amazon. So thank you for watching. If you watched up until here and make sure you do like and subscribe and support my week Journey so yeah, that's it guys. I will see you guys on my next uploads foreign


Comments
Brigit Mulwa: I need that wig ASAP!! It looks so good
Margaret Wangui: Cutie!!