Blonde Bob T-Part Wig Install | Amazon Wig | Ty Lashea
- Posted on 12 July, 2022
- T Part Wig
- By Anonymous
Hair details
Blonde Bob Wig 613 Human Hair 10 Inch Lace Front
My Boutique
1021xclusives.com
IG @1021xclusives
Discount code: BADD
Clothes Haul from my boutique 1021 Xclusives | Black Owned Business
Follow me:
IG @ty.Lashea
TikTok Ty.lashea
Poshmark - https://posh.mk/xNyiZQqeAgb
Like, comment, SUBSCRIBE
Business inquires
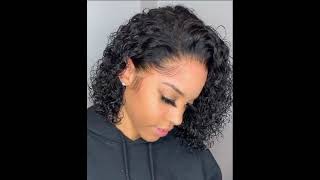
Hey y'all welcome to my channel, it's your girl, tyler, shearer, taisha or ty, and welcome back to another hair video. If you're new here, i just asked that you go ahead and hit that subscribe button turn your notification bell, because you got content coming all the time. Now, let's get into the video so as you can see today, i'm going to be installing this gorgeous blonde bob wig. It is a tea party. Wig! So and you know, say: amazon live because you know. I love me some amazon boots. So if you like how this looks - and you want to see how i achieved this stay tuned - all right y'all, so let's get into this unit straight out the packaging. So of course, i'm going to show you literally right off the little bag that it comes in. So here it is and y'all this hair was so soft and y'all see that little bump she got she's giving - and this is what the lace looks like um. It is a teapart wig, so it of course, has about half an inch to an inch in the front, and then it has that little middle part two clips in the front one clip in the middle and then a clip in the back as well. So let's put her on - and this is what she looks like no customization at all: no plucking, no bleaching, no nothing! This is just straight out the package, so i'm gon na go ahead and put makeup on. This is what it looks like after i put the makeup on, and i didn't really do any plucking here so now, i'm gon na start installing her. So, of course, i'm just cutting my lace into different sections. Just to help me have more control over how i apply it. So that's all i'm doing here and then i'm going to put each section back next, i'm going to be taking my got to be and just bring the section that i'm working on and i'm not even lifting the lace up, i'm just literally spraying. On top of it, making sure that i get a nice even coat comb combine that in and then i'm gon na go ahead and take my blow dryer and let that lace melt and i'm gon na just repeat this process throughout each little section. I cut. That'S not the we case, that's how we're gon na stay the same forever. So now i just take my band and put that on my lace just to let it melt even more and we'll be back once it's done now that the lace has melted as much as i would like. I'M gon na go ahead and take off my band, which always feels so good, and then i'm gon na go ahead and start cutting my lace. I do like to cut it in like a zigzag motion, if possible, just to give it a little more natural look. Instead of you know, like a rounded look, so i'm just going to go ahead and cut the lace off of all my sections. Next, i'm taking my shebron wax stick and i'm just going to go ahead and start sectioning, my hair from the top, and just putting my wax right on the top just so that i can get a more flat effect. This is really not necessary for this wing because the hair is not that thick. So you really don't need to do this, but i'm extra so i have to so i'm gon na just do this process on both sides and then i'm gon na go ahead with my hot comb and smooth it down now we're taking some edges out. I already started on one side and i'm just pretty much playing with how much hair i want to take. You know blonde hair. You got to take a little more because the edge control be making that blonde hair disappear. So now i'm just kind of smoothing it back just to make sure i got all the hair that i wanted and it looks pretty nice to me before we actually start doing the baby hairs, i'm taking my god to be and putting a little bit on the End of my rat tail comb because, as you can see, my lace was like lifted in certain areas, and i just wanted to secure that. So i'm just taking that got to be on that comb and putting it right along the edges that was kind of lifting, and this will just secure it even more so after i do that, i'm going to start going ahead and do my edges. I did go ahead and cut them things and, as you can see, they're pretty long, so i'm going to take my flat iron and curl them y'all. I'Ve said this before: if you have a small flat iron use that i'll be burning myself with this thing. So much so yeah, i'm just curling my edges before we start styling now, i'm just taking my edge control and smoothing down my baby hairs in a style that i like i did have to play with them a little bit, but i finally got them to a Way that i like them once my baby hairs, are styled how i wanted them. I went ahead and went in my got to be spray just to secure it one more time and i'm going to go ahead and put my band on so that it can melt even more while my edges is doing their thing. I just went ahead and took my flat iron and start just smoothing the hair down. It did come pretty flat and smooth, but you know i just wanted to see different ways that i could style it. So i did go ahead and start doing that, as you can tell it kind of looked pretty thin at the ends and i was trying to figure out a way to maybe like camouflage that - and i was like. Maybe i should cut it. Should i cut it. Yeah, i'm gon na cut it so i'll, be right back before we cut, though i am gon na put baby hair a little swoop doodle in the middle, because something about my baby hairs was not okay, it's probably the color. I don't know so. I am just going to go ahead and put the little swoop doop in the middle, and then we can get back to cutting the hair all right. So, let's get to it. So now i'm just kind of playing around seeing where i want to start and boom. She did it and y'all best decision i could have made so as you can see the length made such a difference, it looks so much more full and beautiful. So i'm gon na just repeat this process at this length on both sides and i'm gon na come right back and y'all gon na see y'all see, y'all see the difference. It looks so so so good. I took this wig from about an eight to a ten. So last step, i'm just taking my powder makeup, putting that on my part line and my hairline to give a more natural look and that'll, be it before the final review, so, okay y'all. So this is the final reveal of the wig. I do need to um. Have someone like fix the back for me because it's not really even like i want it to be, but i'm glad i did decide to go ahead and cut it. I probably cut like i want to say like two two and a half inches off and it looks so much better. It'S giving way more full and just having that blunt, i think just sets the look off and um. If i were you, i would go ahead and pluck more than i did along the hairline. If you want like more of a seamless look yes, so i am obsessed with how this looks on me. I love the length. I love the color everything about it. So if you like, how this looks make sure you click the link in the description box and buy yourself one two, if you made it all the way to the end of this video, i want to give you a big. Thank you make sure you hit that subscribe button because y'all be watching but not subscribing, subscribe and we'll see you next time. Bye.

Comments
Keep Up W/ MsJones: Great look, love the lashes
Uniquely.A: It looks great love
Taylor Janae: Gorgeous !
Natnice: Other than the baby hair..this is cute!!!