How I Lay My Wigs + Beauty Forever Honey Blonde Curly Wig | Beginner Friendly
- Posted on 07 September, 2021
- T Part Wig
- By Anonymous
[OPEN FOR DETAILS] Hey loves! Thanks for tuning in! This is a hair tutorial in which I'm unboxing and reviewing BEAUTY FOREVER HAIR Honey Blonde Highlight wig. All important details are listed down bellow.
#wiginstallation #beautyforeverhair #curlyhair #humanhairwig #review
T W I T T E R | https://twitter.com/beautywmayra
I N S T A G R A M | https://www.instagram.com/beautywmayra...
T I K T O K | @beautywmayra
♡ ♡ ♡ ♡ ♡ ♡ ♡ ♡ ♡ ♡ ♡ ♡ ♡ ♡ ♡
- L I N K S -
LINK TO HAIR: https://amzn.to/37bqc3B
BEAUTY FOREVER WEBSITE: https://amzn.to/2KJs3jT
BEAUTY FOREVER AMAZON STORE: https://amzn.to/2KJs3jT
IG: @beauty_forever_hair https://goo.gl/jiNuEN
FB@Beauty forever hair https://goo.gl/2W9juN
♡ ♡ ♡ ♡ ♡ ♡ ♡ ♡ ♡ ♡ ♡ ♡ ♡ ♡ ♡
- H O T S A L E FO R B E A U T Y F O R E V E R H A I R -
- 9000+Sold Highlight lace front wig: https://amzn.to/34oJyBI
- Wear and Go headband water wave wig: https://amzn.to/3kmQp3P
- Don’t miss the Body Wave Lace front wig: https://amzn.to/2J7ECGR
- 99% Girls choose the Bob wig: https://amzn.to/2NwFWqU
- 96% Girls choose the New U part wig: https://amzn.to/3jrTgrg
- 99% Girls choose the Beauty Forever Deep Wave: https://amzn.to/2HMc9Y8
- 97% Girls choose the Beauty Forever Curly hair: http://amzn.to/2AEIJmC
- 97% Girls choose the Beauty Forever Straight Hair: https://amzn.to/2I9Mgkq
♡ ♡ ♡ ♡ ♡ ♡ ♡ ♡ ♡ ♡ ♡ ♡ ♡ ♡ ♡
.
.
.
THIS VIDEO IS NOT SPONSORED. I DID NOT GET PAID TO PROMOTE THESE PRODUCTS, HOWEVER, THEY WERE SENT TO ME TOTALLY FREE OF CHARGE.
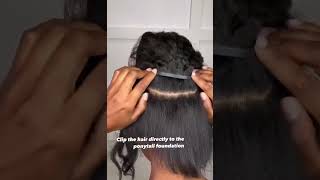
Love to see you shine in the night, like the diamond, you are yeah hi, guys welcome to my channel. This is your girl maida over here and in today's video, i'm gon na be showing you guys how i installed this beautiful blonde honey wig from beautiful. Ever they sent me this hair, which is available amazon page and their website is a 16 inches blonde honey blonde wig with beautiful highlights. It'S super super pretty super soft. I love the hair and it was really fun and easy to install. It already came pre-plugged, but i did i did. I did plug a little bit more outside the camera and yeah i'm just going to go ahead and start installing the wig. I already have my braids done. So i'm just going to apply some oil on my scalp and proceed to put my wig cap on. I usually do the bold cap method, but because i didn't want to stay long time with the hair, because i had to get my hair braided. I just decided to do the wig cap regularly and yeah, and then i went ahead and i put a little bit of foundation all over the front of the wig cap. So it can mimic the color of my skin and then i proceed to start customizing and installing the wig. The first thing i did is cut the excess lace on the sides, so we can properly feed on the sides of my hair and be comfortable around the ears. Then i went ahead. I clipped the hair and i cut the lace in three sections, so application can be smoother and easier. I'M gon na use my wig dealer glue. This is the only glue i use on my hair and my favorite one um. I feel like i get the best results when i use this glue and it lasts a lot longer than with any other. So basically, i just do section. By section. I apply three layers of the glue on this video, i'm only showing how i apply the three layers on one side, because i didn't want to make the video too repetitive and long so right now, i'm just applying the sides first. Here i lit, i made a little mistake. I usually start with the middle part um the middle section, but it's fine at the end of the day i'm applying the week and whatever part i start with it, doesn't really matter so here i'm putting the third and last um coat of glue and then i'm Just gon na use a little small comb. I couldn't find my other combs for some reason, so i'm using this one, which is the one i found and you did the job so i'm just gon na sleep back and comb the hair and i'm also gon na use the blow dryer. But i'm not quite sure if i put a clip on, i didn't put a clip on how i use the blow dryer, but i usually with the blow dryer and the comb. It should be enough and then i'm just gon na show how i apply the other. Two sections, and i'm just gon na - let you guys watch this part because it's basically the same thing. It'S just applying the glue and you know putting the wig on on the other two sections: okay, now that i'm done gluing um the lace, i'm gon na take a slash, stick band and i'm gon na wrap that part to secure and make sure the glue and The on the lace stay in place. While i fix the hair a little bit there, you guys can see how big it is. It'S so beautiful. The highlights, look, amazing and the hair itself. It'S so so soft i do wish the wig they sent me was a little bit longer, but i am actually happy with this length because i'm not a fan of super long hairs. Now, i'm just doing a part uh on the side. You know a little bit deep and now i'm using my hot comb just going through the roots of the hair on the front and around the side, part to make sure the hair stays where i want it to stay. I'M not going to go through the end, because i don't want to mess up the curls just doing the roots a little bit and then i'm going to use my wig dealer um, sweat, stick. It actually smells really good and i, like i've, been using it for a while and, like i said, it's the only bread i use right now for my hair. I'M gon na go over again with the hot comb and i'm gon na remove the elastic band just to make sure i can get through all the little hairs. When i'm satisfied with my hair, i'm just gon na go ahead and cut the excess lace and i'm doing it on a zigzag. I usually use one of those tiny razor things, but i ran out so i'm just using my little scissors, which work fine and i'm just going on the zigzag method to make it look as natural as possible. Here'S the lace all cut out um. I still have to customize it a little bit more like put some foundation to blend in with my skin, but i'm gon na go ahead and put the elastic band again and then i'm gon na go. Do my face off camera because i, like i said i don't want this video to be extremely long. I might post the video on how i did my makeup. It depends on if i like how it came out or not right now, i'm just gon na go ahead and put some water and foam on the hair. Okay, so here my face is done and the hair is dried. I did fluff it a little bit, but you guys can see how beautiful the curls look. I am just so happy with the results. Um, you guys can see that you can tell where my foundation is, but i'm gon na fix that right now, with some powder, i usually don't put too much product around my hairline when it comes to my wigs. Just a little bit of powder should be able to fix any imperfection around the area. I also went ahead and i with my concealer and i fixed up my hairline. I mean i fixed up my part just a tiny bit. You know you don't need too much. It'S just to make it look more natural and you guys this is the final look. This is the end of the video. I hope you guys like the video tutorial. It was super simple. Also. Everybody can understand every single step that i'm going through the hair is really beautiful. I am going to leave all the details and information on the hair on my description box, so you guys can go ahead and purchase if you like it um, like i said the hair is from beautiful. Ever it was sent to me for free, so i can show you guys and do this tutorial and i love it. I absolutely love it. It was a really nice hair, so yeah, if you like the video, please don't forget, to subscribe and check out my other videos and yeah. I hope you guys, like it see you guys on my next video bye. You

Comments
Doriane Ndong: Wow
Shawtxy: girl please if you have some wig that you don't wear anymore just send it to me i`ll use them till the wig die lol
Drusilla Vinny: c1m48 vun.fyi