Side Part Frontal Wig Install | Bodywave Hair Ft Alipearl Hair | Hannah London
- Posted on 15 March, 2021
- T Part Wig
- By Anonymous
Hey guys this is how I install this 13x4 body wave frontal wig from Ali Pearl hair, hope you enjoy!
SUBSCRIBE TO MY CHANNEL SO YOU DON’T MISS OUT WHEN I UPLOAD:https://www.youtube.com/channel/UCJTJB...
-————————————————————
HAIR INFO
▬▬▬▬▬▬▬▬▬♛#AlipearlHair♛▬▬▬▬▬▬▬▬●
I'm wearing hair: 24inch body wave lace frontal wig 180% density
SHOP NOW: ➤https://bit.ly/3uWWnyv
Invisible HD Swiss Lace Wigs:➤https://bit.ly/2PsFMCm
❤#AlipearlHair Official Store:➤https://bit.ly/2O5ufZl
❤Lace Front Wigs for Sale!➤https://bit.ly/2PFp6bb
❤Glueless 5*5 Lace Closure Wig➤https://bit.ly/3c2MFlJ
Use code “alipearlyoutb”to save $10!
#alipearlhairwig #alipearlHDlacewig #alipearlbodywavehair
Instagram @alipearl_hair: https://bit.ly/34I3Oyd
Youtube @Ali Pearl Hair: http://bit.ly/2H0Gmmc
Facebook @Ali Pearl Hair: https://bit.ly/3aKwxX3
WhatsApp: +86 15890076489 E-mail: [email protected]
ORS SUPERHOLD SPRAY
PAPACHICHISTYLE HOTCOMB
Amazon curling wand
—————————————————————
L E T S C O N N E C T
Email : [email protected]
Instagram : https://www.instagram.com › hannn...Web resultsHannah London (@hannnahlondon) • Instagram photos and videos
Snapchat: https://www.snapchat.com/add/hannahlon...
—————————————————————
A B O U T M E
I live in London
Age: 20
Ethnicity: Nigerian
—————————————————————
Frontal wig
Wig customisation
Hair install
Frontal wig
Client hair
Hair tutorial
Closure wig
—————————————————————
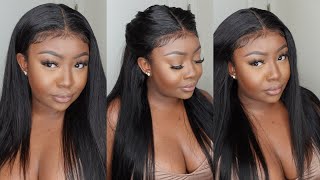
Guys welcome back to my channel i'm back with another hair tutorial and today i'm featuring alipo hair. They sent me their 13x4 180 density, large body weight wig. So this is the wig. It'S a large wig looks like this standard lace. I'Ve bleached the knots and i've plucked the hairline and it's just body wave hair. This is 24 inches. So this is everything that came inside the box, so it came with a headband, a glitter headband and then some fabric headbands and about three actually and then it came with a stocking cup that is very very light and then an elastic band some make eyelashes and The maintenance card, and then lastly, we have the satin bag that you keep your hair in. So first i'm going to do my stocking cap method and all i do is take my got to be spray along with my stocking cap and one that's preferably close to my skin tone. If i don't have one available i'll just apply some foundation on top but yeah. I just take my song cap and then i prepare got to be spray and press it down with my blow dryer. Now i'm just going to cut away all the excess um stocking cap and proceed to melt the lace further by applying another layer of got to be raised by so, as you can see, i've melted that stocking cap and if you like, a detailed stocking cap, my Third, video, let me know, and i'll actually record that but yeah i've done myself in cat method and i put some foundation on top of my lace and now i'm just going to be installing this wig. So first i'm going to cut out my ears and this is necessary as a first step, because it will just let you know how and where your wig is going to lay. So i just make sure i do that first and what i do is i just part the hair around my a and then i just follow it apart with my scissors. Another thing that i did is that i parted the hair to match my hairline and i just cut away or you could pluck away all the excess hair. This hairline was not like my hairline. I have some dips around um like the sideburn area, so i just created those dips and then i just cut behind the part or i pluck away at the hair and i'm just pretty much going to cut all the lace off cutting in zigzag or jagged motions. This just ensures that your lace is undetectable. Then, if you want to cut a straight line, if there's a higher chance, your lace will be visible. So once again over here i have a dip in my hairline, so i am going to mimic that dip. In my natural hairline on the frontal and yeah um, i feel like it's very, very important that you do this step if your frontal is not similar to your actual hairline, because it will not look flattering so i really really advise that you do this step. If maybe you have a boxy hairline and your hairline is round so make sure you create that round hairline it might take a longer process than usual, but it's definitely worth it so to lay my lace today, i'll be using the ors super hold fix it spray And this is just as good or probably even better than the got to be free spray and it's safer and it promotes hair growth so yeah. I highly recommend that spray when it comes to um applying your wig glue this now, i'm just going to section out the areas that are going to all the edges. Should i say that are going to be my um baby, hair and yeah i'll be doing a side part today, so i don't want to go too crazy on the baby hair, but i still ended up getting crazy but yeah i'm going to be doing a side. Part and i'm going to take my foundation and just apply that to the lace and this lace. Isn'T the best lace on camera doesn't really look bad person. It'S not that bad, but it's not the best of laces, i'm not gon na cap. It'S not the best of laces. The lace is quite thick, so it does take a lot of melting, a lot of blending before you actually get to your desired look. So when you're looking at laces that are thin, i wouldn't say this is a very thin melt. Lace, you just have to work with it and then eventually you'll get a nice install. So as i melt my lace, i'm going to be styling the rest of my hair, i'm going to take my john frieda serum. This is the extra extra strength serum and then i'm going to be um curling the hair. I really curl my hair, but today i am i'm going to be turning the hair with a curling wand um. I did hot comb the hair first, just to ensure that it's nice and smooth, because this was like like 3 a.m, and i can't lie. I was never straightened in the hair first, so i just um hot combed through the hair, just to ensure that it's smooth like so and then i wrapped it around the barrel of my curling wand. So now i'm going to remove the band and, as you can see, the lace is melt but, like i said you still need to um. You just need to work with it to ensure that it melts. You really need to put a lot of effort in it's. Not like then easy melts, and now i'm just going to create my c part and cut my edges and then move on to styling them with some aphogee hermes. So to ensure that my side, part hump area lays flat, i just section it out, so i go in sections and i go section by section and i um hot comb, the hair that way it doesn't have that large hump or it's not bumpy at all. It just makes it nice and flat now i'm just going to brush out the curls, because i was after like the loose um, curls and yeah this. This hair is actually quite good. The hair is really really good. The only thing that really needs work is the lace and once that lace is thin, this would be a perfect unit. But i can't cut and kind of say it's perfect, because it's not, but the hair itself is really thick really full and it actually gave me that desired. Look that was after the only issues i had was with the lace. That'S it so yeah guys. This is the end of the in store um. The hair is so lush, as you can see. Um yeah, it's quite long on me. It comes down to my um hips and i'm i'm five foot nine and this is 24 inches. I believe so it's quite long. Quite thick quite full and that's the install guys. I hope you enjoyed this tutorial if you did make sure you like comment and subscribe, and i will see you guys in my next one stay blessed stay safe and stay put up. You


Comments
Lo The Artisan: I’d love to see a detailed stocking cap method it came out flawless
Ali Pearl Hair: FLAWLESS really BOMB install! Love the curls!
Shonnytee: Loved this install it really suited you! It's a shame about the lace but you pulled it off really well you couldn't even tell!
Stitches: The hair looks so nice on you , thanks for sharing .
Stacy A: That wig is gorgeous omg !
Shaniece Tee: You’ve really been banging out content
Jacq Al: How did you do the c part
Hitler’s Ex: Are you a hair stylist?