*Crochet Method* No Leave Out V Part Wig Install Ft Alipearl Hair | No Glue, No Lace, No Leave Out
- Posted on 02 October, 2022
- T Part Wig
- By Anonymous
Hey ya’ll! In todays video I’ll be showing you how I installed this vpart wig with no leave out using the crochet method!
Shop Now➤https://bit.ly/3ReFEBH
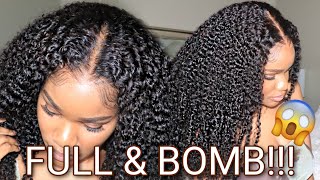
Hair Info: 20inch water wave v part wig 180%density
❤#AlipearlHair Official Store:➤https://bit.ly/3AFZcHY
Up To 50% Off, Lace Frontal Wigs!➤https://bit.ly/3AN7spv
In FB Group, EXCLUSIVE DISCOUNT! ➤https://bit.ly/3O1I8ku
1. 24h Flash Sale!
2. Free Hair and Cash Back!
3. Unlimited Coupons!
#alipearlhairwig #alipearluparthair #alipearlhdlacewig
Instagram @alipearl_hair: https://bit.ly/34I3Oyd
Youtube @Ali Pearl Hair: http://bit.ly/2H0Gmmc
WhatsApp: +86 15890076489 E-mail: [email protected]
Hope you guys enjoy the video & please don't forget to like, comment, subscribe, and hit the notification bell to be notified when I post!
**BUSINESS INQUIRIES***
**PLEASE LIKE, COMMENT, & SUBSCRIBE**
KEEP IN TOUCH: ♡
Instagram: @knzyrae
https://www.instagram.com/knzyrae/
**HELP ME GET TO 100,000 SUBS **
Hey y'all, I'm Kenzie Ray welcome and welcome back to my channel in today's video. I will be showing you guys how to take your V part wig from this to this with absolutely no leave out. So, let's go ahead and jump straight into the video. The hair that I'll be using today is from Ali Pearl, and this is their 20 inch water wave V part unit. I love the texture and how full this hair is, and I also love that it comes with so much security. So you definitely don't have to worry about it going anywhere. They have five Clips in the front Clips in the back and it also has adjustable straps on the side and check out my description box for more details and a discount code for this wig. So to start this style off, I had already braided my hair. A couple days ago, so this is my braid pattern. Nothing too fancy you actually don't have to braid your hair down. You can just put it in like a ponytail if you don't have like really long hair, but I feel like braids is the best option for like a nice Sleek install so before putting on the wig. You just want to go ahead and make sure all of your Clips are open, so I'm just going through and just kind of bending them back to open them up, and I went ahead and clipped down the one in the middle first, because I wanted to make Sure that the wig was sitting in a good spot and when you're lining it up, you just want to make sure that it doesn't go past your hairline. So you want it to sit like right at the front of it and once you get everything nice and lined up we're going to go ahead and begin snapping the Clips in place and when you get to this stuff, you just want to make sure that you Leave a little room between the clip-ins and your part, because this is the area where we're going to make everything just look really natural and seamless all right. So this is how we're looking so far now that the clips are nice and snapped into place next I'll, be using this crochet hook that you can find at a beauty supply store, or you can also order it from Amazon they're, usually only about two or three Dollars so this next step, I'm gon na kind of show you guys two different ways that you can do this on this side. I'Ll show you guys a curly hair method and, on the other side I'll show you guys a straight hair. So what I'm doing right now is just taking like a small section of the hair right underneath where this track starts, and then I'm taking my rat tail comb and I'm just going to tease the hair a little bit just to get it a little frizzy. So that we can really hide the track, and after that you're going to take your crochet hook and put it underneath your hair, you want to make sure it kind of lines up to the area where you pull the piece of hair from the way you're just Gon na put the hair inside of the hook close it up and pull it through your hair and then, after that, you're just going to take that little just kind of throw it over the track and then we're just gon na repeat this same step. We'Re gon na do different sections until the area starts to fill in foreign. So here's how everything is looking so far as you guys can see. We got everything nice and crocheted in, and you know you're pretty much done with that section when the track starts to disappear. So I really love this method because it's like it gives you the feel of having leave out without having to like damage your hair or worry about your hair matching the texture of the wig, or anything like that so now to make it even more natural. Looking we're going to take sections of the hair and I'm going to take my rat tail comb again and I'm just going to tease it a little bit and kind of push the hair forward. So you're going to push the hair forward like towards your face foreign and I like to just use my fingers and just kind of play around with the hair a little bit because of the texture of this hair. It doesn't really have to be perfect, so I feel like this method is best on curly hair, like I said, I'm going to try to show an example of maybe how I can work with straight hair as well, but just in my opinion, I think it works Best on like Curly or textured hair, so this is how we are looking so far and y'all is really given scalp. It'S really given. Hair is literally growing from my scalp. So as with most wigs - and you know like lace, closures and everything like that, it's not going to be a hundred percent. You know undetectable, but I definitely think that this is a good illusion and a good alternative to like not having to damage your hair or have to worry about your hair, blended with your wigs. So now I'm going to show you guys, a method that you can use if you're doing it with straight hair. So for this side, instead of um taking the sections of hair and teasing it, I just took the section of hair and just and just crocheted it right underneath mine. So I skipped the step where I tease the hair. This is just to give it like a more Sleek look: foreign crocheting everything in I'm gon na go ahead and take my sections and tease it just a little bit just to kind of hide the parts where I crocheted it at, but I'm not teasing it as Much as I did the other side so just enough to where you kind of hide your sections that you used to crochet the hair in foreign y'all. So that is it. I just played around with the hair just a little more, but, as you can see, that part looks so good. It looks so natural. I definitely will be using this method again. This was my first time trying this and I just think that it turned out so nicely. I saw a couple people trying this method on Tick, Tock and here on YouTube. So I was like. Let me give it a try, so I definitely will be doing this method from now on whenever I have like a V part or you part wig, but yeah, I feel like this method is perfect. If you do not want to be bothered with leave out, you don't want to wear a lace, closure or anything like that and again, this hair is from Ally Pearl. This is their 20 inch water wave hair. I love this hair so much I've been looking for me, a good water wave wig and I have definitely found it if you guys are interested in this wig I'll have all of the information in my description box, along with the discount code, for you guys to Use, thank you guys so much for watching. I really hope that you enjoyed this video. Please don't forget to like comment and subscribe. Also, if you have any questions about this install or any questions about the process, don't hesitate to leave them below. Also, don't forget to check out Ali Pearl I'll have all of their information in my description box, along with the discount code - and I will see you guys in my next video bye


Comments
Erica R: So beautiful still have yet to try a wig!