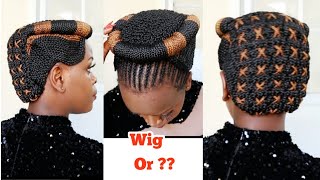
Diy Wig Tutorials/Micro Braided Wig With Neat Straight Part/No Closure Braids Wig Explained.
- Posted on 17 November, 2022
- T Part Wig
- By Anonymous
Hello kreative people. I hope this video helps you create neat and beautiful braided wigs for yourself and your businesses. Check out the links below for full and related braided wig videos and don't forget to subscribe for more creative videos. Thank you.
*Please consider subscribing for more fun videos on hairstyles, wigs, crochet braids, and lots of DIY projects.
https://youtube.com/channel/UC0UsCoc1V...
***********************************************
Business inquiries:
How to make a micro braided wig
How to sew a swiss lace net to a wig cap
DIY box braided wig w lace closure part 1
How to DIY box braids wig
How to prepare braiding hair 2 ways
LET’S CONNECT
Instagram:
https://instagram.com/kinaafriquekreat...
Facebook:
https://www.facebook.com/kinaAfriquekr...
VISIT MY ETSY SHOP
https://www.etsy.com/shop/Kinaafriquek...
SUBSCRIBE for more videos
https://youtube.com/channel/UC0UsCoc1V...
Hello, everyone welcome again to my channel in today's video, we'll be showing you guys how I create a straight center part on my micro braided, wigs and I will be using the sport to show you guys how the lace net looks like. So this is the center part right here and the braids usually fall either to the left and to the right and the middle part Force right there. This is my zoomed version of the lace net and I'm going to use it to show you guys where the needle goes and the spaces between each braid so keep watching. So these are the holes that form the center part right there, and now I'm going to show you guys where I put the latch hook, so my crochet needle goes right there and it goes through three or four holes. If you want to - and this is the line that I skipped and the next braid goes in the next hole and goes through one two and three again and you repeat the process so pretty much, this is what I do and I know it's very hard. Sometimes for me to zoom in on the lace net itself to show you guys doing my tutorial, so I hope this helps and you repeat the process on the other side. So I'm going to go ahead and show you guys how I do it on a wig that I made for a client so keep watching. So I decided to highlight for a better understanding. So these are the braids right here and then you have the spaces in between each braid and there you have the center part, and then you have the braids. On the other side, you can check out my video on how to sew the lace net on the wig cap. So you know the direction in which to place your lace net. So let's go ahead and get this week started: amen, foreign foreign foreign foreign side and I'm going to repeat the same process. On the other side, it takes time, focus and patience. To get a neat finish, you can also check the description for the full tutorial and other related videos, so I'm going to go ahead and show you guys. The final look so guys. I hope you found this video useful if you did go ahead and give this video a thumbs up, leave a comment subscribe to my channel. If you like my content, thank you guys. So much for watching remain creative and I'll see you guys in my next video


Comments
sochique: Amazing!! How do you determine the middle part? I'd like to give this a go and I want to get it right like yours. Thank you.
Karawa Mirabelle: So neat!
Kadijah Auqanda: Kaaguze mkn o