How To Install A U-Part/V-Part Wig With No Leave Out | Ft Clemyluxhair
- Posted on 18 November, 2022
- T Part Wig
- By Anonymous
Hi guys, today I show you how to adjust and install your v-part wig without leave out. This is a quick and easy process.
Thanks for watching till the end :)
Xoxo Mani
How to Remove this wig: https://youtu.be/ONw0ByOUuSI
Support the Channel: https://www.paypal.me/Manikeny
For PR & Business Inquiry: [email protected]
Shop Hair: www.clemylux.com
IG & TikTok: @Clemyluxhair & @Clemylux
Let's be friends:
Tiktok: Manikeny
IG: https://www.instagram.com/_manikeny/
Twitter : https://twitter.com/_Manikeny
My Equipment:
My Ring light: https://amzn.to/2I2EjOf
My Sony A5100 camera: https://amzn.to/2H08JNQ
My Sony A6400 Camera: https://amzn.to/3Mz10aM
My Sigma lens: https://amzn.to/3tHGvjs
My SD card: https://amzn.to/3sPx5TR
My Mic: https://amzn.to/3sR5lOJ
My led light on camera: https://amzn.to/3HSSXST
My external hard drive: https://amzn.to/35UD0hA
Bluetooth Camera Remote: https://amzn.to/2ZUffO4
*Never Limit Yourself*
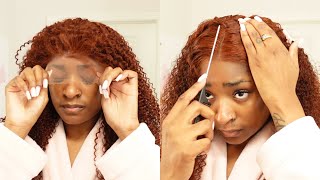
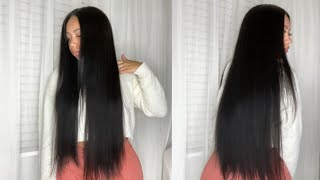
Hey guys welcome back to my channel, it's your girl, manikeni again. If you are new here, you are very welcome very part of this family. I appreciate you guys as usual, so today I'm going to be showing you guys how I install my? U part wig stroke V, part wig with zero leave out, like I don't have the time to be leaving out my hair and trying to match my natural hair to the texture of the hair I'm trying to put on, and all of that. That is a lot of work, because if I do that - and I have to do that every day before I leave my house - and I do not have the time for that - okay - so just make it easy with zero leave out and it still looks Supernatural. This is all's cup okay, this is my scalp and you have to enter inside my scalp to be able to see that this is a week. Okay. So if you want to see how I achieve this look, then stay tuned and let's get right into this video. It'S my any candy, so first I want to show you guys the construction of this wig. It'S actually a u-part wig, so it comes with Combs um. I think about four Combs on each side and um a little empty lace which I will cut out, which you see me cutting out now so after cutting that out, I was actually thinking. Maybe I can wear this wig with the provided, Combs it comes with, but that did not really work out. So after I cut out, you see me cutting the lace after I'm done doing that, I will try it on to see what hairstyle do. I want to go on with today. Do I want it to be a middle part, a side part um. You see, I still have my wig cap on just because I was just trying it on to see how it will fit. So after trying a few times, I finally decided I'll go for a side part, but then I realized the wig cap of this wig is a little bit small for my big head so but we're going to work with it, it's going to work out, so I Did not um like the Combs it came with, and just like in my previous video. This Is My Method. I just take these little pins that I bought off Amazon and I'm going to sew four pieces into the week two per side of the part. So now it's time to put on the wig or to try on the wig for real. So I have to remove my wig cap because it just doesn't make sense with this install the the line. The part is a bit too deep for me to a recap, which is bad, because I really need my long hair. My hair is really long. My natural hair - I really needed a cap to you, know hold in that hair, but it just doesn't work so now I'm going to pin in the hair on the sides. At this point I had put just two of the pins I had sewn in just two of those pins one on each side, because I was you know, trying to be faster, but I realized that two pins just makes the weak hang. So I decided to add two more pins, so there's two pins per side and that's how it looks then I'm going to go back and start my install, so I decided to go for a side. Part I'll start pinning the hair into my braids. As you see me doing here, make sure that there is not a lot of tension or little to no tension when you're pinning it down, because when you start crocheting, it's going to put a little bit of pressure on your own hair. So when you're pinning it down just make sure there is not no pressure, little no pressure on your hair, so this was looking at like sorry. This was looking like after pinning it down. You see that it is not hanging as much as it was hanging before when I had just the two pins, and now we can go in with the crochet. I guess I'm feeling myself already so before going in with the crochet. I first of all use my Contour powder and color the sides of the wig cap, just to make sure that all those sides which are looking a little grayish or so are going to look darker and match my scalp. You can also go with something black like a black eyeshadow. Then I'm going to start doing the crochet method, I'm going to try my best to zoom in as much as I can um. So you can see exactly what I'm doing so. I take the pin - and I put it into my braid and this is challenging to do with a mirror, but I tried then I wrapped the hair around the pin, then close. The pin you can see the struggle was real um, the first two three of them. I had to struggle a little bit, but then I got the hang of it so and then it went really fast, so I put the hair in there um. I hope you can see it because my finger is blocking it. Then I closed the pin and I pulled it through so if you know how to do crochet this, so should this method should be really really um easy for you or simple for you to do so. I just repeat this process again, I'm just showing it in real time, so you can see exactly how it works. If you want to see it closer, just stay tuned because down the line, I will show it again, maybe in slow motion for you to actually see how it works. So you see I put the pin in my own braid, then I wrap part of the wigs hair in it and I pull it through and then you can see it already covering you see it's already covering the wig and you know it's giving us that camouflage Effect we want so now I'm going to speed this up, but I'm just going to repeat the same thing that I have been doing all along the part so that it covers the whole part. You know so that everything looks uniform the way it's supposed to. So you can see just my scalp - I don't see any part of the week, so this method will enable you know you to still use the hair to not let your own leave out in the wind in the cold in the harsh weather, so your hair stays Protected under this, while you are slaying a week without having to bother about laying a lace, lace, closure glue spray all of that stuff, and that's why I really love this method. So now I am done with this one side and I'm just showing you guys what it's looking like. So you can see the difference between the side I have crocheted and the side I have not crocheted, and it's just is the look. Okay, it's giving. So now. I'M kind of showing you guys in slow motion. I think here is a better angle, so you see me putting the pin into my braid, which is under the wig, and then I take some of the hair of the week and I wrap it around. You know hook it in that little hook of that PIN then I will close it up so that it keeps the hair in it and then I'll pull it through, and it's very simple and easy see painless easy fast and I pull it through and I put It on top so it covers that line of the wig and that's pretty much what I've been doing or I would do all along the part to cover all of that. And after doing that, you should have a very clean part which will be your own scalp and the wig should not be showing at all. This should be like a natural look. One will think either you have done a crochet braid hairstyle, or it's just your own hair, growing out of your scalp, depending on how good you do this foreign. Hopefully, I've been able to explain it well enough for you to be able to do it yourself and that those zooming parts that I did know to zoom in and show you were clear enough. But if you have any questions, you can always ask me in the comment section. I'M always I reply pretty much every comment honestly. I feel like I'm the only person that does that, maybe not the only person but the only person. I know that does that so right now in the front I take a like. I do the same thing, but I make sure that I take like little parts of hair just to make it have a better camouflage, the bigger the part of the hair you take. You look more like crochet um in this particular on this particular day. I wanted to be fast, so it looks a bit like crochet, but now I will go in and separate the curls just to give it a more natural look, because when the curls are all together, you can still maybe see like pick the cap through a little Bit but just separated, you know separate the curls, the more you separate them, the more natural you look. So after separating the curls, I just run my fingers through it and tease it a little bit. You know the more you do that, the more natural you look! Um, the better you hide the cap and the braids and everything else and yeah. So now I'm just you know, checking out. If there's any spots, I need to fix and just running my finger to it pretty much and enjoying it and yeah. That is the look. So guys that's pretty much it um. This will take you anywhere between 15 to 30 minutes, depending on how fast or slow you are but um doing. The crochet itself took me about eight minutes and real time and um yeah and then I'll just use my fingers. After I get to this point, you know either I'll use a little brush. You know just to tease this side to cover any part of the cap that is showing, and yes that is pretty much it, and this is the final look you have to like enter inside my scalp to be able to see that this is a wig, because There'S no lace - and this is my favorite part about this, because I don't have to stress about um the lace showing somebody being able to see my lace and all of that stuff. This is just pure scalp, okay and I can put my hair to the side and it will still look natural and you still look natural. You know so yeah. This is pretty much the look and I'm happy with this method. I'Ve done it before with the kinky straight. This is the first time I'm doing it with a curly hair like kinky, curly, hair and um. I'M definitely loving the look. I don't regret trying this. Thank you guys so much for watching before I leave. I will leave my next video somewhere on the screen and please please please. If you enjoyed this video subscribe below and click the little bell, so you get notified every time. I post something new okay do not miss any updates. Next video will be right here on the screen. I'Ll see you guys in the next one bye,


Comments
Sandra Mesang: It actually looks easy