How To Properly Customize A Good Synthetic Wig - Walk Through/Step By Step! Sol Beauty Wigs Launch
- Posted on 31 January, 2020
- T Part Wig
- By Anonymous
Hair Instagram: https://www.instagram.com/solbeautywig...
Link to Wig Website: https://solbeautywigs.com/
My favorite hair brand/lace front brand on Aliexpress: https://s.click.aliexpress.com/e/_AbIh...
Best Selling beauty products on Amazon: https://amzn.to/3ytKRfl
Personal Instagram: https://www.instagram.com/sarahsolbeau...
NEW HAIR STYLE GAMES POSTED EVERY DAY ON IG STORIES
Facebook: https://www.facebook.com/solbeautyoffi...
----------------------------
*There may be affiliate links in this description box*
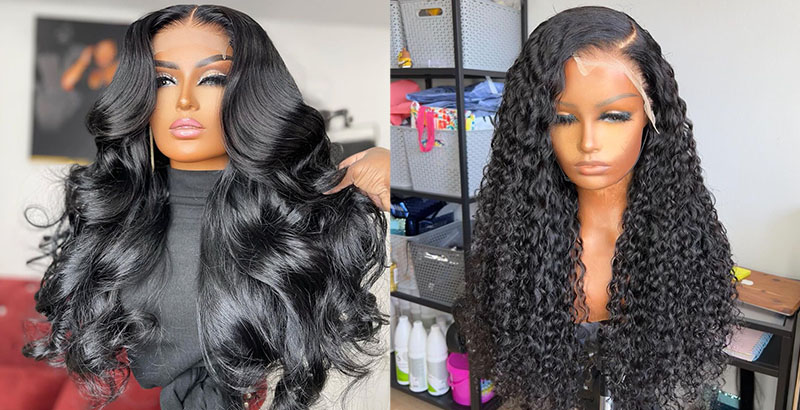
Hello: everyone, it's Sara welcome back to Seoul, bTW! Okay, you guys. I know you guys see her. Okay, we're gon na talk about her. As you guys know, I have been teasing this launch for a long long time. I just recently started hardcore teaser at these past couple weeks, a lot of you, I've gotten so much feedback and engagement and signups because, as you guys know, only 100 people are going to be getting the discover. I have on this hair right here. So I just want to say a special thank you to all of the people who expressed interest in this hair, I'm so happy to finally be releasing it, and I hope you guys like the way she's looking so we're gon na start with some t pins and We'Re gon na be attaching the wig onto the Menken head with this t pin and if this is your first time, you know customizing awake make sure you have a cup of tea at hand. We'Re gon na need some glue. This is the got to be glued. Um, I prefer the black one, please get the black one instead of the yellow one. That'S water in that bottle as well, which needs water and scissors. Another important one that I forgot to mention is a razor like an eyebrow razor you're gon na need that to you remove some of the hair from the frontal and you're gon na need a comb as well along with a brush. So the reason why I'm using an eyebrow razor instead of a tweezer is because just easier to remove synthetic hair with the razor and I'm just showing you guys the process. A lot of this is gon na, be just me razoring away at this hair. So if you don't want to watch all of that, you can just skip forward, but yeah. A lot of this is just getting it to be as customized and as natural-looking as possible. So the reason why I decided to make this video step by step and as long as as it is, is because I've been getting a lot of questions about how I raise or down my wigs, and this is the easiest way to customize a synthetic wig. You guys do not try using a tweezer and with this method, I'm able to customize it as best as I can and getting it to look as natural by razoring from the base. Please razor from the base do not razor from a longer distance, because it's just not gon na look as good trust me and it's not gon na look as customizing as natural. If you don't start from the base so make sure you do it from the base. It'S gon na take longer, but just just do it? Okay, trust me, okay, so after I've parted the area where I want my baby ours to be, I am sort of separating the baby hairs from the rest of the hair by braiding little pieces of sections of the baby hair. You don't have to do it. This small, like other sections, but this is for people who are extreme beginners. You know you've never customized a wig before, and you know this is just super simple that I think anyone can follow just part away your baby hairs or any hair that you want to be away from the rest of the hair and just keep that out of The way, while you are customizing your hair, it's gon na make a big difference in how it turns out. Now I am parting, another upper section of the hair. This is just that I can fit out the hair just a tad bit more honestly, it's already very pre plucked, so you don't really need to do this step. If you really don't want to to be honest, but I like to do it just because I don't know makes me feel good get this beat untagged for free drink beats, do down low royalty. Free beats at free beats io. Alright, I'm back. I hope you guys are enjoying the music. It'S very relaxing. I love it a lot. I purposely chose that for you guys just so, you guys can really chill out. While you do this, it's supposed to be very therapeutic okay, so this part is where I'm showing you guys me trying to use a tweezer, it's just so much harder for me to get the hair out of the lace and that's gon na result in me, ripping The lace I mean I did get a little bit out, but all that work when I could have just used a razor and gotten the same result. You know down low royalty. Free beats at free beats io. So if you are wondering why my hand is why my other hand is holding the hair, it's just so that I can hold the hair up and get to the base, as you know, as low as I possibly can go, and that's just gon na result in The way just like I said, just looking more natural just start at the base, alright start at the base, all right so we're gon na start with the Scot to be, and essentially I'm just using a little bit of it literally, not much at all. Just to keep the hair back, I like it when the hair is like more further back and you can see more the baby hairs in the hairline. I think it just looks way more natural, like that. I don't like it when the hair is falling too far forward and this glue is cream in color, which I just hate. This is my first time using that yellow glue. I wasn't expecting to hate it this much. To be honest, you guys, but then the black glue I had to run. I had to literally buy the first black glue that I saw eventually because I did get it after filming this video, but anyway the black mousse is better than the yellow blue because it just holds better. It'S not creamy, it's actually clear, so you won't get much residue. You won't get anywhere to do actually and it holds really really well. It just holds so much better than yellow blue. Like so much better, you guys get the black glue okay. So this part here, I am just trying to figure out how I want my baby hairs to look. I removing a lot of the hair from the actual baby hairline, because I don't want to have really long thick baby hairs. So when you can remove hair in between the little baby hair sections, it's just gon na make it look a lot more natural trust me and make sure you get to the very base, because this is a very important part. People will look at this section way. More than they'll look at the other parts of your hair, so you know you want to make sure you, your baby hairs and your hair line itself just looks you know, neat and flawless and yeah just get as much hair as you can, and you know you Can tailor this to, however, you want you, don't have to follow what I'm doing people like their baby hair in certain ways, but if you want to get it exactly the way I have it now, then you should follow these steps, because these are gon na help. You out, okay, so I'm just adding concealer, you can add any concealer you want, and I'm gon na, follow up with that by using some powder and that's gon na help to really really set the concealer in there and not interfere with the glue too too much Get the speed untagged for free and drink beep uh-oh down low royalty free beats at free beats io. Alright, you guys it is time to cut that lace off and there is a bit of lace on there. So um, it's not too hard to cut off you. Just want to start by cutting down the middle making sure not to cut the baby hairs, I'm stop where you want your baby hair. So you start and then just sort of use your razor to glide along the hairline making sure to say close to the hairline before away from, like farther away from the baby hairs. Just like a little like little um fingernails worth of space, a fingernail tips worth of space above lace that you should leave out and this glue is just horrible. I was trying to show you guys how it would look on the mannequin, but god this glue just sucks so much so much. It doesn't want to stay on like the baby. Hairs just stand up really quickly, so I was really frustrated with this glue. To be honest, like up, this is really just a yellow, glue, hate video right now. It'S like 25 minutes of me hating on the yellow glue. Basically, get this beat untag for free at three beats that I Oh so now I'm taking this time to cut a bit of lace at the back of the wig, and that lace is just so that you can put your hair up in a bun or ponytail. If you wanted to I'll leave a link to a video where I style this wig in like 10 different styles and you'll, see how I put this hair in a ponytail. It'S so cute, very natural-looking, so yeah check that out I'll leave a little card right at the top or right hand corner. Oh okay, so we got ta talk about this. I tried to do a bald cap method with that damn glue and it's left such so much residue. You guys it's crazy. However, in the new video I did the ball cap method with the black glue and it was so much better. I also use a free spray, and that was also very amazing. I loved that process, but this was horrible. This glue is just so bad, but I'll try to make the best of it. I think you know cuz it's all I had at the time and when you're cutting off the excess lace from the wig, you know off the sides by your ears. Please don't do what I did and do it on your head. Please take the wig off and then cut that extra bit of lace off, because you don't want you don't want to cut your ears off. Just don't don't be me. Okay, don't be me, so you you don't have to do the ball. Cap method, like I did all you have to do, is just put on your wig cap and then put your wig on and then just put the glue along your hairline and then add the wig on top of the glue super easy just exactly what I did You can still see a bit of the glue residue I'd recommend waiting until those tries a little bit just so that it's not as white. I was a little. I was rushing a little bit. I was I'm not gon na lie, but so now I'm just cutting some face-framing layers. You can totally skip this step. You don't have to do this. I just like to do it because it just makes my it just frames my face much better and I don't know I just like the way it looks so yeah, I'm doing it with the same eyebrow. Razor trust me. This will help to limit the amount of errors that you make when doing this process. So if your beginning, with beginner with thinning out hair, use the eyebrow razor, it's honestly much easier get. This beat untagged for free, a drink, beeps uh-oh down low royalty, free beats at free beats aiyo. I have not worn grey hair and a very long time, but let me tell you right now: this style, oh my god, I had to debut first, because this style is color everything about it, I'm just I'm not even trying to like act out for you guys. I'M letting me try to show out this hair is so soft. This wig right here - it's just it's just so beautiful, and it makes me so happy that it comes in four different colors, because I know that not a lot of people would want to wear a great color like this. Even though some people on my Instagram, you guys get me, you guys, might want to that's perfectly fine, it comes in black and the black color is also so amazing. I'M just so happy that I get to sell such a beautiful products like this, but that's it. Nothing else will compare to this be right here. Nothing will compare to this beanie right here to this beauty right here. Let'S, let's get into the specs of this weight really quickly. I feel, like a lot of people, would love to have a style like this. That'S very affordable and that still looks really really good. I think this is a very look popular style. You know to have like wavy, big bombshell, curls like this, it's just it's like everyone likes a style like this and everyone. I think a lot would like the link to it's not extremely long. As you can see it's just a little bit past my boobs. It'S the top quality synthetic, it's the Futura fiber with and the Kanekalon fiber mix, and if it's your fiber is basically just like a really soft and silky synthetic hair, fiber hook it up on Google or if you want, you can check out the link in the Description, it's going to give you a better idea as to what Futura is it's so, as I stated the first 100 people to purchase the first volume in the soul, weight collection will get 25 % off, which is roughly around $ 20 off. So I'm not going to be doing this for long once it reaches 100 people, I'm closing it. So it's gon na go back to the regular price. Each wig will be each new way will be released on the 24th, and the reason why I did this is because I really wanted to start a really fun exciting, engaging company that isn't just throwing up 150 or 200 wigs on their site. They you know care about each wig that they produce and it just limits the amount of confusion that there is. You know, there's so many wigs out there. I feel like it's hard to choose the right one, especially when it comes to you like synthetic wigs. So I want to make a little bit easier for people to choose like and always choose a really good quality, and that's why I really wanted to restart so PD again. If you guys have any questions, please feel free to leave them in the comment section down below. Thank you guys so much for watching. If you guys liked this video, please don't forget to give it a thumbs up and subscribe to my channel, because I make new videos every single week and today is the release of soul, beauty, wigs and it's a very exciting day. You guys once you guys, get your way cuz, you can review it and let me know when you guys like fit and stuff and I'll be posting all of you guys in your wigs on the wig up slave or sorry, the wall of slay, the wall ously On my website and I'll catch you in my next one bye - oh my god, I've owned that video with the middle part - and I won't ever do that again, because this side part is definitely where it's at time through side part. You

Comments
AriBee MUE: I recently bought my first synthetic lace frontal wig to take a break from human hair (I enjoy coloring hair) and found your video bc I needed guidance trying to make the hairline less bulky. Thanks for this!
Zoe D: I bought my first ever wig snd it came today and this video really helped me thank you
Sarah Summerr: Link in description for the link to the wig! - Next video will be uploaded at 3pm where I create multiple different styles with this wig! - Love you guys so so much, thank you for everythingg. BTW-- Thats powder on my back leg lool
Angelique Sargent: This wig looks like outre charisma
Kyyyng J: Love that color
BodiedBykeira: You look so cute boo that color is
Darshan Gardner: Hi you have great lighting
Carmishia Hooks: Got 2 be is NOT GLUE! It is GEL.
Sandra D: The link don’t work
Raducanu Marina Luana: I don t see it on the website anymore..
Sandra D: The link don’t work
Blouq 1: