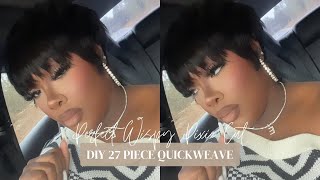
Reddish Brown Frontal Wig Install | From Start To Finish | Hermosa Hair | Young Africana
- Posted on 09 January, 2023
- T Part Wig
- By Anonymous
●▬▬▬▬▬▬▬▬♛#Hermosahair♛▬▬▬▬▬▬▬▬●
Hair Detail: #33 Red Brown 13x4 Lace Frontal Body Wave 24 inch
* Get Extra 20% Off, Code:COLOR20
Direct Link ➤ https://bit.ly/3B2Ud5i
#Hermosahair Official Website: https://bit.ly/3iAmn16
※ Buy Now, Pay Later with PayPal/ Klarna, 4 Interest-Free payments
More Best Selling Wigs:
Lace Front Wigs for Sale☛: https://bit.ly/3uiII5V
Invisible HD Lace Wigs☛: https://bit.ly/3FnLKfx
Hot Colored Wigs☛: https://bit.ly/3gTbkzq
❥Follow our social media:
IG @hermosahairmall: https://www.instagram.com/hermosahair...
FB @hermosahairmall: https://www.facebook.com/hermosahairma...
TikTok @hermosahairmall: https://www.tiktok.com/@hermosahairmal...
Email: [email protected]
Whatsapp: +86 13253731788
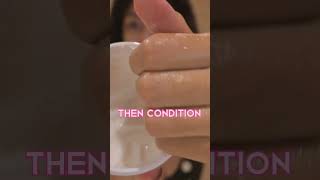
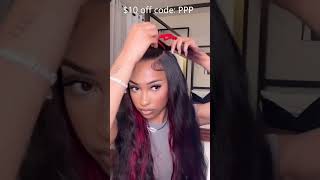
So what is up y'all? It'S your girl, young Africana and in today's video I'll, be showing you guys how to achieve this wet and wavy reddish wig from start to finish I'll. Show you guys how to install and style this hair. This hair already came pre-colored. So all my beginners that are wanting a colored wig go ahead and continue watching this video. So today's hair sponsor is from Hermosa hair. I have their number three red Brown, 13x4 frontal body wave wig. This is in their color, the reddish brown and 24 inches, and I did tint and bleach the knots off camera right now. What I'm doing is I'm gon na go ahead and just use my Garnier Fructis um Sleek and Shine Serum, and I am just spreading that throughout the entire hair and prepping It For The Styling. So, to achieve this crimped wet and wavy hair, I am using my crimper. This is my Bed Head crimper that I did get from Ulta um. You could go ahead and get that from your available Ulta and it's just a purple colored one um. So right now I'm just crimping the hair in sections, as you guys can see. I already have a good chunk of the hair already crimped and how I'm crimping is. I'M gon na go after every last crimp and going to start a new crimp. Just everything could be aligned and well, and I also like to to make sure that, within my section of my row that I cut out the hair, I like my crimps to pretty much align with each other so that it is nice and uniform. Then hopefully you guys see what I'm talking about once. You guys see the rest of the row that I've done, but my crumbs start at the same exact place all across just so. It'S nice and cohesive and I curl all the way until the end, and I do have it on the hottest setting and I'm gon na just go ahead and do this all around the hair, usually with crimps. I would use like a a Hairspray before I start. Crimping just to let the crimp stay, but I'm just looking for that. Nice loose, wet and wavy type style, and I am going to finger comb it at the ending. So I do not need any type of you know, reinforcement or hairspray to make it hard, because I do plan on spreading it out foreign, and this is how this row looks as you guys can see, the crimps are all aligned and uniformed now I am doing Like a no part, part type of look, I just want to give like that little flipped over type of look so um in that little section where I am flipping it over, I'm just curling the hair backwards. I don't know where this logic came from. To be honest for me, but I didn't want to part, which is why I just you know kind of pushed it to the back like how I'm going to swoop it just so I can curl it in yeah. It kind of just falls together because if I did the crimp sideways, it will kind of give it a part, and I don't want to part at all and overall, these are the finished results, as you guys can see. We have that no part part effect going on and I did hot comb the edges just so it could be all nice and slick back foreign ball cap method already done and if you guys aren't familiar with the ball cap method, I want to learn. I do have a video um that I posted um before this video on how to do that. I have updated ball cap Method, video up, so if you want to see that go ahead and um check out my channel, but what I'm doing right now is I'm just making sure that the wig is nice and properly aligned with my hairline and I'm going to Go ahead and cut some slits at the temples of the lace. Just so I can have my lace, nice and prepared for the glue. Now, once I have the wig position where I want it to be, I just flip it back and I'm not gon na go ahead and use. My Erica J hold me down, adhesive, I'm just going in section. So I'm setting up with the middle part first and the side second and um, I'm doing just only two layers and I'm using just the metal piece of my rattle comb to smear out the glue. So it's nice and flat, oh and then I'm just going to go ahead and work on the sides as well, and you want to make sure that these layers dry completely dry before you apply the next layer and when I say dry actually mean dry clear. So once you don't see any more of the white of the glue, you are now ready to apply the next layer or to apply your lace onto the glue and, like I said, I'm only doing two layers of this. So once this first layer dry completely clear. I'M applying my second layer, foreign foreign now once my second layer is dry now onto applying the lace I like to work in sections again, so I'm starting off with the middle first, because that's where we glue down first and I'm just going to go ahead and Apply the lace and the hairline in front of the glue and then I'm going to follow suit for the sides and again you could just tell where the glues are just to see like when you see that it's shiny, you just want to make sure that the Hairline is in front of the shininess and then once you have it placed where you want it to that's, when you go ahead and use your hands just to press it down and to secure it, foreign with the eyebrow razor and cut in a jagged motion right Next to my hairline, you want to get as close to the hairline as possible, just so that it's not like excess lace lingering around and because we did place the lace in front of the glue you are going to have some excess lace. Just flipped up. You can either decide to cut it off or to glue it down, but I like to glue it down um, just because it kind of fits like my hairline already, so I kind of don't want to mess it up um. So once I'm done, cutting it off or cutting off the excess lace with my eyebrow razor, I'm going to go in with some glue on the back of my hand and um the metal piece of my rat tail comb, and I like to call this part detailing. So I'm going to go ahead and just detail just go into the places that I don't have any glue at foreign, I'm just carving out with some baby hairs at the temples and also the tendrils of my ears and I'm just using my hot comb on the Hottest setting just to press it down, so it lays nice and flat down foreign for an extreme melt. I'M gon na go in with my Fantasia Spritz and I'm just going to go ahead and spray down my fingers. While I first try to do on my fingers, but I got I got over it and just I started spraying it on the hairline itself, but you want to spray this on your hairline and then use your elastic band just to wrap it down once you are Done spraying your entire hairline and letting it sit for about 30 minutes, so it could really melt in your lace now once the 30 minutes is up, I'm gon na go ahead and unravel it, and this is how it looks. I am now going to go ahead and cut my baby hairs and I'm cutting my baby hairs in an upwards diagonal motion, well at least for the ones that are at my temple and then for the ones at my ears. I'M just going to cut in a downward jacket, um little diagonal motion foreign and I'm just going to go ahead and curl. My baby hairs upwards to support it for me to carve them and swoop them, and I'm using my Spritz again and my baby hair brush and I'm going to swoop and hold just to form those baby hairs and then to further on with um the baby hairs. Just to make sure that it's nice and flat, I'm going in with my Erica J fluff stuff mousse, I'm just going to apply that and then swoop it and I'm gon na do this for all of my baby hairs, foreign and then to finish it off. I'M going to apply some of the mousse onto my actual hairline and where the laces exposed. Because again this helps further my melts as well and makes the lace look extra melted. And once that's done, I'm going to go back in with my elastic band and just let that sit until it dries for about 15 minutes. And then I went ahead and did my makeup off camera. And now I'm just going to go ahead and prepare to finish off the styling of my hair. As you can see, I got that wet and wavy vavavoom type of vibe going on, and I'm loving that so I'm gon na go in with the Garnier Fructis Sleek and Shine Serum I'm gon na spread throughout my hands and then use my hands to kind of Separate um some of the curls, so it just looks more wavier and more um. You know uniformed again really want that nice and wet and wavy type look, and now I'm going to go ahead and just comb out my baby hair, because I love my baby hairs to be nice and fluffy and once I am done playing around with the baby Hairs and playing around with the hair: these are the finished results. I hope you guys enjoyed this video like comment subscribe to my channel if you have not go ahead and click that Bell to get notified. When I post my videos - and I hope to see you guys in the next segment by the way, comment down some green and orange Hearts, if you are at the ending of this video and are subscribed so I'll catch, you guys in the next one later,

Comments
Fidelis' World: How did u get the eyebrows to match exactly! Your amazing! I love how u take time off and come back better than ever! So inspiring! Thanks for sharing your talents with us!
TheCRYSTALLURE: Loveeeee Ginger on you. Each shade of red looks soo good on you! ✨
Quatasha Duncan: Beautiful can you please post a tutorial for the make up look!!!!!
Jacqia Galle: Beautiful love that color
Zainab Jimoh: Gorgeous ❤
Tanzy The Glow Up Guru: Heyyyy gorgeous;!! Love the hair and make up!!;!! Slayyyyyed
KiaraJanae Edouard: I loooovw your videos! I deadass am watching your videos while I’m attempting to do dis wig wish me luck lol
Vandoria Li: This was definitely look what contacts are you wearing?
Dee Luther: Great Video As Always Lovely thumbNail Tho U DEFINITELY Slay This Look U DiD a Amazing Job Your drop Dead Gorgeous Makeup Always BomB Nice Cheeks Bones Have a Fantastic Week Too Stay Bless N Be Safe Always
Shanise Nicole: Slaaaayedddddd but you know that love this color on you
Rochelle Black: That is so gorgeous she is so beautiful
Shawndrea D: Info this is pretty m. What eyeshadow palette did you use?
Fidelis' World: Updated video on those brows! Please!!
BEAUTIFUL Queen: Love hair and makeup
Netta Enee TV: Girl I love you but why do you have to slay so good hunty yassssss
Sammy Da Goat: Bomb Ginger Color Stunning Makeup
Ashley Edwards: Yes ma'am!!!!
True: Your makeup looks STAY giving.
Serenity L:
N i n a ‘ z D r e a m n: ❤️
Evang Keyshunda E. Boyd: Makeupdoll looks are influencing
Kittygirlkk9: Yesssssssssss my mommy loves you
Shalissa Jones: can we plleeaaasssee get the deets on the makeupwhich palette(s)?
Raye8405: New Subbie! ❤️
Royale: Don’t play with it don’t play with it
Staciii Brown: