Affordable Side Part Bob Quickweave Tutorial! | Purple Pack Hair! Beginner Friendly! Erica Danley
- Posted on 16 February, 2023
- T Part Wig
- By Anonymous
AFFORDABLE DEEP SIDE PART BOB QUICKWEAVE TUTORIAL! Using Purple Pack Hair! Detailed, Beginner Friendly! We all love a good bob with lots of body! This hair is super soft and affordable and was super easy to blend with my leave out. This is literally my staple for a cute quick style with minimal effort that will always be on trend! What look should I test out next? Sound off in the comments below along with any other content you wanna see from me! Make it official and subscribe to my channel to join the family! Don’t forget to give this video a big thumbs up or down and turn those post notifications on for me (you’re gonna need them!) I love y’all oh so freaking much! Erica Danley
Heyy Babe! Check These Out!
CHIT CHAT GRWM! DATE NIGHT MAKEUP! | New Dossier Fragrances!
FLAWLESS BASE MAKEUP TUTORIAL! | My Favorite Products For The Best Base Ever!
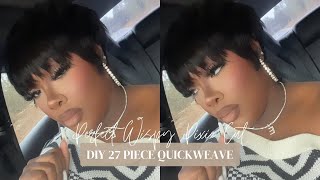
HOW TO: WISPY 27 PIECE PIXIE CUT QUICKWEAVE! | Detailed Track Placement, and Cutting!
NEW JUVIA’S PLACE I AM MAGIC NATURAL RADIANCE FOUNDATION REVIEW | Full Face of Juvia’s!
WEEKLY VLOG! | First Day Back at the Gym, Burlington Run, Lunch Date, and More!
SUPER NATURAL GLOWY MAKEUP TUTORIAL! | New Makeup By Mario Surreal Skin Foundation!
HNB COSMETICS LUMINOUS SOFT FOCUS AIRBRUSH FOUNDATION & CONCEALER REVIEW!
NEW MAKEUP BY MARIO SURREAL SKIN FOUNDATION REVIEW! | Full Tutorial, and Wear Test!
DEEP SIDE PART QUICKWEAVE TUTORIAL! | Extremely Detailed, and Beginner Friendly!
AFFORDABLE SIMPLE BADDIE MAKEUP TUTORIAL | Luxury Baddie On A Budget
DRUNK GRWM! https://youtu.be/0TtD2TDUY6c
$30 Highlighted Quickweave! Using Organique Hair!
SNATCHED BRONZY FULL GLAM! | Trying the New Nars Cream Bronzer & White Concealer Hack!
THE ONLY NOSE CONTOUR TUTORIAL YOU’LL EVER NEED! IN DEPTH! | HOW TO CATFISH WITH MAKEUP
Products:
1- 10in pack of purple pack hair (may need 3 packs depending on head size I used 2 packs)
1- 12in pack of purple pack hair
Mielle Rosemary Drops
Quickweave Salon Pro 30secs Glue
Got2B Glued Spray
Roberts Diamond Bond Shield
Dye Brush
Shears/Scissors
Razor Comb
Wig Cap
Biosilk
Eap Heat Flat Iron
Clips
Let’s Become Friends!
•Instagram: @theericadanley @ericadanleyartistry
•TikTok: @theericadanley
•Snapchat: @theericadanley
•Facebook: Erica Danley
Connect With Me/ Write Me or Send Me Goodies!
Email: [email protected]
#Quickweave #Bob #PurplePackHair
Foreign, how y'all doing it's your girl Erica so today Miss girl. We are here because y'all need y'all a little quick hairdo or whatever y'all trying to get this side. Part Bob accomplished. So I'm here to help y'all out so number one check out my growth girl. It'S been a little journey, we're still growing, we still working. So you know I'm starting off with my meal. Rosemary mint drops, you know, y'all, don't sold them out, but thankfully you know I buy mine when they be buy one get 150 off. So you know I got a couple bottles on dick. You know what I'm saying so, I'm just greasing my edges greasing my scalp real good. You know working it from the root to the tutor before we get started, really massaging that in there - and I will say um, this is not an ad. This is not a sponsored. I wish that it was though, but this stuff really do work. I feel like that's what has aided me in my growth or whatever, even though my edges just a little bit sparse, but that's another store for another time. So what I'm doing here is. I am sectioning out the part for my leave out. So I do a rough estimate of how I want my part to look so this is about what my part will be so now I know like okay, I just need to leave out about an inch of space on both sides of this part. Okay. So I also leave out all of my edges that way. You know I can do cute little shrimp Dooms. You know what I'm saying on the side, and I can also like push my Bob back tuck it behind my ear. You know make sure it's cute and you know I'm like dang girl. You almost got a ball with your ear. I had to check myself before I wrecked myself. I was like what you got a little damage bro. Why girl? You didn't grew like that. So, like I said um here, I am just taking about an inch on both sides of that part. Like I said, the part that you do here doesn't have to be perfect. Um. You just want an estimate of like so just so. You can see how much to leave out about how much hair to leave out on both sides. I like to do about an inch on both sides of the part um, but you can also just take your comb and lay it like right in the part section. I didn't do it on here, just because I know what I'm doing, but if you take your part and just lay some of that hair on top of it just take that comb and if you can see the color on through the hair, you ain't got enough Lever, that's the easiest way to say so. Just lay your comb right beside that part with a little piece of hair on top of it. If you can see the comb, you ain't got enough leave out, because that means you can see the track, because the track that you're going to be gluing down is approximately the same size as um all right silicone. So that's just about how I measure that out - and I just take me a little rubber band or whatever. Sometimes I take a clip whatever I have handsy and I just go ahead and I lock that down to the side so, like I said, um you're parting for your leave out does not have to be perfect, but you want it as neat as possible. That way you can avoid, you know accidentally getting glue or any type of residue on your real hair. So it's very um crucial that you know you just have clean parting. It doesn't have to be 100 perfect. You know just good enough to your lock, and so it doesn't get in your hair or anything like that. So, like I said I rope off both of my sides just so you know I have a little hair in the front to leave. So I can, you know, really cover those tracks and as well as do me a couple edges. I can push it back a little bit when I say push it back. I mean just like flip it back and then bring it back to the front um. So you have like that little front, tuft, bang area piece. I don't really know the official word for it, but you know what I mean like. I can literally push the hair back and still do like the little cute things with it. So you want to make sure that you do have enough hair on the sides to cover that track as well. So that's also why my side part looks like this so now, because this is a braidless tutorial, because, yes, I am that black girl, I don't know how to braid. I just take my extra control and my little straight teeth. Comb and I slick my hair down in a very tight but well, I don't want to say, is tight but a flat mushed up, looking donut, braid or whatever, just depending on my mood, um just to get as flat as possible. Under my install um and this method works for me, if you know how to braid, you can absolutely braid it down, do what works for you but girl. I have not got there yet. I have tried to teach myself how to braid. I have went to Clay. I don't know how it just yeah, some things ain't meant to be. You know, God, God said. If I gave her all these talents, you know what would I give everybody else, so he took away my ability to bro. I know how to plant dough. I could do a play. I just cannot do like cornrows like straight backs or wigs and styles and stuff like that, but this little this little slick down banging the Bible. It do the job you know, so I just take my rubber band lock it down. I know what y'all say about rubber bands. It is what it is um, but I do I didn't do it on here. You couldn't see it, but I had it soaking in some of my little Rosemary um hair drops just so. The rubber band is nice and oily. I guess so it's not too too damaging and yeah. So this is what my little bun looks like. I don't put the edge control completely through my hair, just enough to Slick it down and get it nice and flat underneath our Dome cap. So once you do that, you want to go ahead and put your wig cap on um. I just lay mine directly on my hair, when I say directly on my hair, as you can see here, I didn't cut it or anything. I lay it directly like right there, where it is on The Parting that way you can save yourself some time you don't have to worry about cutting the cap all the way around, like you would like a normal, wig and style. I just lay it directly on the line where I want it to be um, and here I am just making sure that my edges are going to cover making sure you know I got enough trying to do what it do. So I like to First Take a layer of got to be sprayed around the edges and around the perimeter to make sure that the cap is adhered to. My head um. You really want to ensure that it is stuck to your head that way. It do not move okay, you do not want your quick, weave, slipping and sliding to the back of your head, and now you got eight more inches of space around your forehead that you didn't ask for, because you did not take the time to secure your cap. I will say this is the longest. In my opinion, this is the longest and most tedious part of doing a quick weave, making sure that that cap is fully secured, but it's the best you want to ensure that you got to be spray. Your diamond bond, which I'm going to show y'all here in a second you want to make sure all these things are completely dry. If need be, pull out. Your handy dandy blow dryer blow dry that bad boy me. On the other hand, I had a lot going on here. I was um. I was washing clothes. I was on the phone I watched TV, so I really just let my air dry and I was just playing around, but if I'm in a rush, I'm definitely going to pull out my blow dryer and make sure that it is super secure um. But I did. I actually I'm lying to y'all I actually did went in and I blow dried it at the very end. Here after I applied my diamond Bond just to make sure that it was nice and adhered to. My head, I forgot to mention as well. I just like to take a color pencil. This was just an old lip lining that I had laying around. You can use an eyeliner or white sharpie, whatever you have um and I like to outline my leave out that way. I can just go ahead and easily see where I'm applying my diamond Bond, seeing where I'm applying my got to be spray, and I just traced that leave out section just to make sure that none of that gets in that leave out because girl. Let me tell you if you do you're gon na have to wash it out, and that is going to be a pain trying to it's gon na be a pain trying to to literally wash that out on a brand new install like it's. It'S not fun. So take my advice: if you can see through the black cap, be my guess, if you prefer to use a nude cap, be my guest, I will say with the new caps, you can see your hair underneath so much better but in my opinion, the black cap, Just looks better, it's more aesthetically sound. I don't I don't know, but I just like to outline my part just so I can see my leave out and see where I'm applying my holding products all right so finally for the hair, so y'all, why? Nobody tell me Bobby hadn't got so high, so I went back to purple pack. I got um color number one and I got a 12 inch and a 10 inch so um when it comes to a bob. You know. Typically, you put the longer links in the back when it comes to Bob. You put the shorter links in the back and work your way up, so I'm starting with the 10 inch hair um. I only use this purple and red quick weave glue. It'S the best glue. I don't know what the other gray one is on the marker for because it is not that girl, okay, um and if you've ever seen, one of my previous quick weave tutorials. This is literally like the easiest process. Y'All could ever do. This is the best skill that you can ever learn that way. You know you can always be able to depend on yourself just in case you get that hey boot text um, you literally just like you did in school when you was cheating off of Wikipedia and where else you literally just cut copy and paste when it comes To quick weave when I say cut measure your track to your head size, as you see that I did with this hair track and you do it again so once you measure it, you cut it, you copy it and you paste. It literally see how I'm just pasting that, on my hand, making sure that I'm applying enough pressure all around that track, ensuring that it's glued to my head. If you have any issues hit it with your blow dryer and she will lock down when it says 30 seconds, since she stuck 30 seconds and she's stuck on Sammy um, literally just keep cut, copying and pasting um measure the track to your head, cut that copy. That piece again and again and again and paste it on your head, it's very simple and it's just a repetitive process. When it comes to Bobs, I pretty, I don't do anything special. I just take it from ear to ear side to side um until we get up to the top, and here it is at the top of my head once you get closer to that side being shorter, obviously, you're going to be playing more here to the other Side, but I literally just run it all the way to the top until my right ear guys is left looking at this video cannot fit any more hair. Then I'm just applying the tracks to the my left, your right on this screen. So that's out of my head and, as you can see, I do like to curve my tracks on my left, your right like where my bang is for that side of my head. I do like to curve my tracks a little bit just so they give me a little bit of volume um because I don't like I personally, don't like no super Sleek Bob. I like a little bit of hair in my face, but if you do not want any hair in your face for your Bob do not curve your tracks on the side of your head, just keep bringing them directly straight now, you don't need to curve them in The front um and, like I said, yeah, just keep going with the process. I did want to include this little clip for y'all. Just so y'all can see it's such an easy and forgiving process. If you mess up a little bit, I don't know how I did it to be honest with you. I was probably trying to talk on the phone too fast being grown, but you know um for some reason. I had so much extra hair left over that. I just could not fit on this side of my head, even with me curving the track. I was like. Oh, my God, I don't know how I left this much track, but all I did was literally cut right here on that little piece of track that you still see hanging. That'S not that doesn't have any place to go, and I just take that tiny little piece of hair if I can get it loose and I'm just sticking it on the other side of my head, because it's like a puzzle, you just fill in all of the Little gaps and I'll press her into place because hoof and throws hell. I just don't believe in doing that. I feel like that's a curse. I feel like it's bad luck, okay, y'all! So once your hair is completely full, as you can see here, both sides are completely full um. I did put more side more hair on my left, your right that side of my head, obviously because the the part is a deep side part. So, of course, I'm gon na have to add more tracks there. I like to go on top of everything with one final piece. It goes directly on top of those lines that you made that way. There is no gaps, there's no space, there's no buckling. There'S no lumpy Dumpty frogs out on the log type of area on there and you you pretty much hit Miss girl, you know so this is the tedious part. I literally just hold my breath. Take my wide tooth comb with each pass and you just want to play around with how short you want. It start long go short order. You can always take some more off. You cannot put it back on once. It'S already been cut. So if this is your first time just sit down right in front of the mirror comb, as you go, take little Snippets at a time and you'll be fine um, I will say I was trying to film this well. I was filming this in front of my vanity, but I ended up moving um a couple of my mirrors around, so I can see um but I'm showing y'all how I cut my Bobs. I did have to cut the rest in the bathroom um when it comes to the back of my head, but I pretty much just measure it and just keep going like. I start on one side and I just carry it all the way around um. If you need to, you can sit in front of two mirrors, but I promise you it's not that hard um take tiny pieces at a time. If you feel like you, know, you're gon na mess up or you can even just take your guy like I did this little piece here, just to show you guys and just carry that one piece of guide all the way around. If you just can't, you know, like walk your scissors straight around your head like that, but it was was pretty. It was pretty simple. You can also take a razor comb to the end of your hair just on the ends, if it's a little bit uneven, you know where you can see the back and that will smooth it all out. So if you get one of those little Tinker, what do they call it? The little tinkle razor comb attachment pieces, one of those little cheap, they're like two dollars. A little razor combs. Do that across the end of your Bob, and that will blend out any place that you know you feel like it's just Jagged, you couldn't get it smooth because you couldn't see it back in your neck and girl. You are set to go. You are golden all right so boom once you don't put a Creek in your neck from trying to cut your Bob yourself, make sure that hole. Ain'T still make sure she ain't stiff. As you can see, she moving plenty body, yada, yada yada, now we're gon na go in and cut out I'll leave out. Please be careful with this stuff guys. I have to go in and put a little metal clip right there, because for some reason I can never cut my cap without cutting my hair. I don't I just don't understand. Maybe it's a sign that I really need to learn how to braid, because I just I'll be I'll, be real life just slipping off to my head when I cut that leave out section like it never fails, but one hack that I've started doing as you can See here I just take the metal piece of my comb: lift it up, poke a hole in it and that that's been saving me a little bit um and then I just lit it. As you can see here dang I did cut it right there. I ain't even noticed it um yeah. I just run the cap All the Way backwards. Once I get a little snip in there, and now you just want to take your favorite flat iron and your favorite um oil, or whatever you use to you, know like Silk out your hair. I prefer to use my EP flat iron and my bio silk. Just to go ahead and press out that her and get her Blended and on Friday to lay some salt, I'm not going to Slick my edges down for this video because, honestly guys it was like 3am. When I did this. So I was going to sleep, but I was gon na go ahead on and press it out, but that's what it looked like. It'S giving yada yada yada's, giving don't play with her, don't play with it, don't play with it! Don'T play with it. Come on baby. Don'T play with it, you know, and this is the part that I was telling y'all about. I can literally push it back a little bit. I can take it behind my ear. I can give cute, you know you don't want to bump the hands, but you just want to keep it smooth thanks for watching yeah. Don'T forget to like comment subscribe and follow me on all my social platforms. Love ya.
Comments
noelle333x: instead of cornrows you could do flat twists theyre way easier
Sophia Larsson: You are beautiful black qeen