How To Install A 5X1 T Part Closure Wig Using Only Elastic Band | No Baby Hair | Synthetic Wig
- Posted on 27 November, 2021
- T Part Wig
- By Anonymous
Hello guys, welcome back to my channel!
Thanks for watching
Please LIKE, SHARE, COMMENT, and SUBSCRIBE for more videos!
✨ IG: https://instagram.com/vivianbeautyands...
✨ Email: [email protected] (For business inquiries)
✨ Based in Abu Dhabi (UAE)
✨ My second channel https://youtube.com/c/StylebyViv (Sewing channel)
✨ DIY 5X1 Lace Closure Wig: Video
$15 Hair | How To Make A Beautiful Wig Using One Pack Of Kinky Straight Hair https://youtu.be/Lg9RFZ9A4UU
✨ Black Elastic Band For Wigs
✨ Flat Iron set on low heat
✨ Shampoo
✨ Hair Brush
How-to Ventilate A Natural Looking Hairline On A 1 Inch 5*1 T part closure Lace https://youtu.be/5rqXuoRuuaM
CLOSE-UP: How-to Ventilate Hair Lace Closure/Frontal wig Using Ventilating Needle
Where I purchase my materials/tools (Aliepxpress Links )
Wig mannequin head https://s.click.aliexpress.com/e/_9uCo...
Adjustable Wig Stand https://s.click.aliexpress.com/e/_9uim...
✨SWISS LACE NET FOR WIG MAKING✨
1/4 Yard Swiss Lace For Wig Making https://s.click.aliexpress.com/e/_9Ig5...
Closure/Frontal Lace https://s.click.aliexpress.com/e/_AEHO... (4x4'' 13x4'' 2x4'' 2x6 and more)
3 Pcs Pin ventilating needle https://s.click.aliexpress.com/e/_AsjO...
Small/ Tiny Latch Hook https://s.click.aliexpress.com/e/_9vGh...
✨✨CAPS✨✨
Mesh Dome Caps (Small-Large Size) https://s.click.aliexpress.com/e/_9HcT...
Spandex Dome Cap (Small-Large Size) https://s.click.aliexpress.com/e/_ArVx...
Thick Mesh Dome Cap (Net Free Size) https://s.click.aliexpress.com/e/_A9X5...
AMAZON LINKS
Swiss Lace For Wig Making https://amzn.to/33JaChD
4 Pcs Pin ventilating needle https://amzn.to/3IfIfXw
Spandex Dome cap & Mesh Caps For Wigs Making (Small-Large Size) https://amzn.to/3BFOKAp
Black Elastic Band For Wigs https://amzn.to/3LW3FLy
#howinstallsyntheticwig
#removeshinefromsyntheticwig
#kinkystraightwig #quickwiginstall
#gluelesswig
How To Install A 5X1 T Part Closure Wig Using Only Elastic Band | No Baby Hair | Synthetic Wig
This video is not sponsored. The links above are affiliate links. This means I'll make a small commission if you make a purchase using any of the links
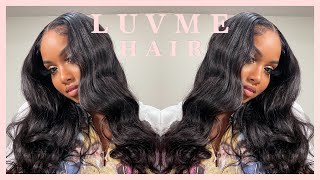
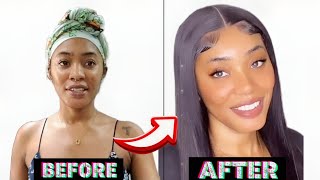
Hello, everyone and welcome back to my channel if you're new, here you're, welcome - and i hope you all are doing well so for today's video, i'm going to be installing this beautiful five by one uh t part lace, closure wig. So this is a diy wig. I made a few months ago so, if you haven't seen the video on how i made this beautiful wig i'll, put the link in the description box down below so be sure to check out the video. If you want to learn how to make your own wig from scratch, go ahead and click on the link down below back to the main video. So for today's video i won't be using any glue gel or got to be spray for the install. Today, i'm going to be installing this wig using only elastic band. So, in order for the hair to do exactly what i want, i'm going to go ahead and flat iron, the hair. So, to start, i'm going ahead to adjust my flat iron to i'm, setting it to a low heat and first i'm going ahead to test it out on the um on a little piece of hair, draw a little amount of hair just to make sure that the Temperature is right before going ahead to um use it on the wig, so you want to make sure to try. It set the temperature, you want to use and go ahead and try it on a small amount of hair. You can even try it on the back side, so that way, you know if the temperature is right or not. Okay, so right here, i'm going ahead to flat iron, the roots of the hair, not all the way, i'm just flat ironing the roots of the hair. So that way it will lay flat i didn't want. I don't want it to be uh puffy and also doing it. This way here to direct the hair towards the direction on how i want the hair to um to lay, as you can see, it's laying flat. So this is what i am going for because for today's install, like i said earlier, i won't be using any product for the installation, so i'm relying on the hair to do exactly what i want without using any other product. So, after flat ironing the roots of the hair, as you can see right here so to take away some of the shine, i'm going to have to apply um shampoo. So this do not. You don't need a special shampoo for this process. You can use any shampoo um that you have so right here, i'm using the the my regular shampoo, the one i use for my natural hair and i'm just i took a little bit and right now, i'm just going ahead to apply it on the hair. So next i'm just going to go ahead and comb it through and brush it through yeah. So here's how the yellow wig is looking so moving on to the next step, it's time to cut out the excess lace so right here, i'm going ahead to take the scissors and i'm cutting on the excess lace following the edge of the hairline. So here is the hairline after cutting out the uh, the lace okay, so i already went ahead and did my makeup off camera nice time to uh, install the wig so first thing. First, before going ahead to cut at the elastic band or tint the lace, i'm gon na first of all, put on the wig. So that way, i will see how tight i want the wig to be before going ahead to cut at the elastic band. So for the wig cap, i use a medium size, wig cap to make uh this wig, which is the perfect, perfect size. Medium sized cap is the perfect wig size for me, as you can see in this video. I just went ahead and put on the wig and it's sitting perfectly okay, i haven't had the elastic band, it's sitting perfectly. The lace is not lifting it. It'S doing the right thing, okay, but in order to make sure that the wig is properly secured in place in case, if it's a windy day, my wig will not go. You know flying so to prevent that i'm going to be adding elastic band so right here. I'M going ahead to pull on the on the wig to see how tight i want it to be uh so now that i make sure of that, i'm going to go ahead and measure the elastic band. So when measuring at your elastic band, you want to make sure after measuring it right, you need to make sure that you're cutting it at the right length. You don't want to cut it too short. Okay, if you cut it too short, it would be too tight. It would be uncomfortable and you might end up giving yourself a headache or a sauce cap. So in order to avoid that, you need to make sure you are cutting out the right uh length for the elastic band. So once you cut your elastic bands, you need to before you sew it to the wig okay, you need to put it back in place to check the tightness, okay, just to check it before going ahead to attach it to the cap. So once you have the right length for your elastic band, you can go ahead and attach it to the cap. Okay, right now, i'm going ahead to secure the other side of the elastic band in place. So what on this part right here, you want to make sure that the elastic band is straight and not twisted. Okay, you want to make sure the elastic band is not twisted before going ahead to secure the other side in place. Next step is to tint the lace so this so since this is a synthetic wig, i can bleach the knot. So instead i'm going to be tinting the lace using um foundation. So i took my foundation pump a little bit uh on the back of my hand, so right now, i'm going ahead to uh use a fluffy brush to apply that on the lace, so i'm using the foundation to tint the lace things. I can't bleach the knots again. This is a synthetic wig and not human hair. Okay, so here's how the wig or the lace is looking after applying the foundation. Okay. So now it's time to put on the wig so just like that flip it towards the back. So next and right here, i'm going ahead to position it where i want it to sit. As you can see right here, the wig and the lace is sitting perfectly in place. The lace is laying flat. Okay, look at that flat. It'S not lifting this. Is it right here look at that the major work is done. The all that is left is to position it where i want it to sit and just that's it. That'S it. Nothing is holding this wig apart from the elastic band and it is sitting flat flat like this. Wig is so beautiful, and i love it. The fact that i can style it. However, i want i can decide to style it as a middle part or a side pad, so this is it right here. This is the final result of the first style, which is the middle part, and i love this wig love the texture of the hair love. The look of it no baby hair, i all my wigs, all the wigs i've made. I usually do like a baby hair. I just want one okay, one without baby hairs and i love it, love it my go-to everyday wig. This is it right here and it's easy to switch the style, because i just like lift it up and position it where i want it to sit like the side part, i can decide to do the side, part on the left side or the right side, and It'S done just like that. Super quick super, easy look at that. I'Ve just switched the style around now i have a side part hairstyle. This is so beautiful and i love it love it all right guys, so i'm just gon na hate to uh comb it brush it well and bam. This is it look at that flow. Look at this cute style right here. Look at that! I love it. I hope you guys do too. I know there's so much excitement in my voice. That'S because i really love this wig. I hope you guys do too. I hope you find this video helpful. If you do, please don't forget to give it a big thumbs up and also, if you're new to my channel, please don't forget to hit the subscribe button down below and also check the description box down below for the video on how i make this wig. Using only one pack of hair and also all the details and things i use in this, video will be in the description box down below so be sure to check the description box down below. Thank you all so much for watching and i'll see you all. In my next one, you


Comments
Deborah Petty: Very informative! Looking forward to seeing your next video.
sweettwiny: I love it, sis you are gifted
neumy light003: Lovely Being waiting for you to upload a new video and here it is Thanks girlie, very beautiful
YesCakes byAndrea: Loved your video. You’re so beautiful
Bulu Linda: Merci pour tout Viviane !
Romoya: Your so beautiful ...can you make a headband wig?
Faith: You are very talented, for me got2b is a must tho
Rebecca Murille: You should look into fortified shampoo for fast hair growth.
Jennifer Laignel: Lovely ❤❤
sweettwiny: I see someone comment asking u to make a headband wig and I’m asking too, can u please make one, please and thank u ☺️
Houefa Avocefohoun: Waoh is So beautiful
J Mac: Beautiful () Chocolate Queen ‼️Who’s multitalented♀️
Heloveskam: You are not lost, you are redirecting. You are not a failure, you are learning. You are not behind, you are preparing. this is for anyone that needs to see this.
Meriama Iseli: Very nice