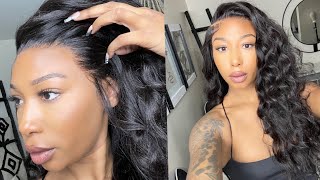
Deep Side Part Reddish Brown Water Wave Wig Ft Unice Hair
- Posted on 25 November, 2022
- U Part Wig
- By Anonymous
Free Wig Black Friday $100 OFF & 48 Hours Delivery
●▬▬▬▬▬▬▬▬▬♛#UNicehair♛ ▬▬▬▬▬▬▬▬▬●
I’m using Reddish Brown Water Wave wig 26": https://bit.ly/3U5XurH
https://www.unice.com/ 30 inches & TOP Wig: http://bit.ly/3U3PKG5
Download “UNice” App (Extra 5$ OFF) ➤ https://link.unice.com/appdownload-you...
☛limited Black Friday Extra 15% OFF Code: black60
Afterpay & klarna & Quadpay & Sezzle, PAY 4 Equal payment Within 6 weeks!
NEW arrival precious blonde wigs in UNice: http://bit.ly/3TYpFIf
Affordable & Popular Glueless V-part Hairstyles: https://bit.ly/3fDUkwv
GET FREE HAIR With Friends Help on ”UNice” App➤ https://link.unice.com/bargain-ytb
Aliexpress TOP UNice Hair store➤ https://s.click.aliexpress.com/e/_pvse...
Amazon UNice Hair Store ➤ https://amzn.to/3afUszy
[email protected]: https://www.tiktok.com/@unicehairoffic...?
Instagram @unicehair: https://www.instagram.com/unicehair/
UNice YouTube Channel: https://www.youtube.com/c/UniceHair
Facebook @UNiceMall: https://business.facebook.com/UNiceMal...
Facebook UNice Fans Club Free Wig Giveaway: https://st.unice.com/afcc9
#blackfriday #Thanksgiving #unicehair
——————————————————————
♡KEEP UP WITH ME♡
IG: @Hypnoticlaadyy 46.2k
TikTok: @Hypnoticlaadyy 28k
Email: [email protected] ——————————————————————
What'S up, ladies welcome back to my channel, it's your girl, hypnotic, lady and jumping right in the company I will be working with. Is you nice or Unis? This is all the nooks and goodies. Of course, y'all know I got a silk drawstring bag. Wig cap eyelashes edge control, brush um Bonnets and they sent me this uh ball cap and then I got a hot comb y'all. This hot comb goes to 450 degrees. It is bedazzled, it is so cute. I haven't got like a real Appliance, give you know from them in a while. So, as you guys can see you press the button, it goes all the way down one side: you can go all the way down to the lowest which is 175 and then you can press the right side and it goes all the way up to 450. bomb.com. You niece y'all did it. Thank you. This is the wig. This is their reddish brown, 13x4 water wave wig, and it is in 26 inches and a 180 density jumping right in I'm, going to go ahead and cut off my excess lace using an eyebrow razor um. The unit did come, pre-plunked and all I had to do was lightly bleach. The knots with this being pre-colored hair. You don't have to let the glitch sit bleach sit on there as long as you would with black hair, but yeah. Once I get one side cut off, you guys can see it's already. Looking like my hair already given scalp, and we ain't did nothing. We put no makeup nothing on now, I'm just going to repeat the same steps on the other side and then we're going to lay this down with about two or three layers of my Erica J hold me down. Adhesive I live by the Erica J hold me down adhesive. I use this on myself and on my clients, and my clients literally have a hold down for three weeks with this adhesive. So, as you guys can see, I'm going to take my adhesive and I'm going to spread it out with my uh rat tail comb and I'm going to use my blow dryer in between you want to dry this until it turns clear and then repeat, like I Said I do this about three or four times and then once that's done, we are going to mount that lace on in and wrap up this install. Don'T you give up, as you guys can see, the lace is ready to go. The glue is clear. It might be a little white on the cap, but that's just because the glue dried on the cap, but any adhesive that you got on your skin. It should definitely dry clear now, I'm just gently placing everything down like so and then once we get through with that, I am going to go in with my blow dryer give it a nice firm press and my blow dryer in between just to make sure everything Is nice and snug if you see any lace that didn't get tapped down by the adhesive, you want to go ahead and cut that off with your excess scissors like so once that's done, I am going to take my rat tail comb and we will be doing Kind of a curved deep side part I'm going to get ready to mold my part down and pull out my edges and baby hairs. Then we're going to lay those down like so and then we're going to wrap up this install okay. This is quick and easy. Now I am going to be doing um a semi deep part, as you guys can see, they did send me a full 13x4 front tool which is ear to ear full. So you guys can see that it's not one of those u-part wigs that have the um thin lace on the sides and the majority of The Parting space is in the middle. It is not like that. It is even all the way around. So what I did just so I could, since I couldn't do a straight back, you know long part. I am going to curve it and ain't nothing wrong with a curved part. I have been seeing the girlies eat the curved Parts up these days. Okay, they are the go-to for a side part. Now I have that done. I'M going to take my Eunice hot comb and I'm going to press all of that out. You want to get it as flat as possible. You don't want no lumps no humps, no bumps. Everything needs to look like your hair. You want it to try to get as flat as possible, don't burn yourself but try to get it as flat as possible once I'm done molding. My part, like I said, I'm going to pull out my baby hairs and we are going to get ready to lay those down. When I do my baby hairs for my side Parts, as you guys can see, I kind of want my edges going into my hairline um, those of you who wear wigs or the girlies that you know get this little yard. You know what I'm talking about like. I literally when I do a side part. I can't do it any other way. I just feel like it doesn't even look right anymore when the baby hairs are detached from the hairline. I don't know so here. I am just molding everything making all nice and slick and, as you guys can see, I'm taking my cuticle scissors and I'm cutting upwards in a diagonal. You want to start at the low lowest point and then go up now. I'M taking my composing mini straightener that I got from Amazon and I'm just under curling those hairs a little bit and I did see on YouTube by this other uh subscriber. I can't think of her name um, but she said to kind of comb your baby hairs into place before you actually lay them down or mold them down with your adhesive or your gel. I did go in with some got to be not got to be Eco style gel and I just swooped it on in, but look how nice and Sleek that looks, I'm repeating the same steps for my Sideburn and then boom. It is looking good okay and it's nice and slick and flat. It looks so good now, I'm just bumping down my part, making sure everything's, nice and neat and then we're going to get into the styling of this unit. I'M going to take my tie sheet. I do believe this is a half inch wand, curler um and I'm just doing some loose curls forward and away from my face. It really didn't have no set motion. I just wanted to define the curl pattern a little bit more. Instead of wetting the water wave hair, because I have grown out of the wet hair, look I completely hate it. So for me to try to um, Define my curls or waves, I go in with like a crimp iron or a wand, curler like so, and I just take little small pieces and do curls until I get the desired look of my choice now I did speed This up just for the sake of the video, because this can take a little time, but I literally only hold the hair on there for, like maybe three seconds my taishi iron gets really really hot. So you don't need that much time and, as you guys can see, I already did one side and it's already looking defined like a defined deep wave or water wave wig, which is the look I was going for. So I'm going to finish up this side and just do some random pieces on the other side, and then we are going to come back and show you guys. The finished look and that'll be all foreign guys, but you just can't give up now cause you've got ta, save yourself. The flowers Gon na Save you now, so you better save yourself and everybody's going through it that you just can't give up now once that is done, I'm going to take my Maybelline Fit Me powder in the shade. I do believe it is 235 and I am going to pop that right into my part, just because I want it to look nice and crispy and more defined um any excess makeup. I get on your hair. You can just wipe that off with a makeup, wipe makeup, wipe or a rip wet rag. Oh my God, y'all um. Once that's done! Look at that! This is the finished. Look again you guys this is unis. This is their reddish brown water wave wig. It is a 13 by 4 lace, wig and 26 inches and a 180 density, as you guys can see the wand curls that I put in there along with the natural pattern of the hair. It looks so good and voluptuous. I hate hair that just takes away density and it looks thin and I feel like that's what the hair looks like when you wet it. So, to avoid all of that, I just find going in and trying to define the curls yourself with some heat or a comb definitely helps make the look more seamless and look just more put together. I love this unit perfect for the fall. This color goes very well with my skin tone. I love it. So if you guys like this video, please give me a thumbs up. We are almost at 130 000 subscribers. I love y'all. So much I have a big giveaway coming. Don'T worry like comment subscribe,

Comments
BARBIE DOLL: Yass this color is so on u u did that an let's talk bout these eyebrows ❤️❤️❤️❤️they on point can we get a eyebrow tutorial
Tiffany whaley: Love me some u girly yesss I love this omg killed this look
L. B: Love the look sis, but I hve to knw where u got ur sweater frm?.. Love it