3 Easy Hairstyles |Medium And Long Hair Tutorial |Middle Part Sew-In V-Part/U-Part Wig | April Sunny
- Posted on 13 February, 2022
- U Part Wig
- By Anonymous
Today's hair tutorial is 3 easy hairstyles for medium to long hair! Also, great hair inspo for your middle part sew-in or your v-part/u-part wig. These hairstyles only take a few minutes to achieve. The reason these are some of my favorites is because they are perfect for any occasion making them quite versatile!
I hope you enjoy.
Comment down below which is your favorite, 1,2 or 3?
*********************************
HAIR INFORMATION:
☛Hair Direct link in the video: https://bit.ly/3FZBWFA
Hair Info: 24 Inch Kinky Straight V part Wig 150% density
Use My Special Code get EXTRA $10 OFF & Free Gift: YTBGIFT
The ULTIMATE Relaxed hair Look | Nadula V-part Kinky straight wig
********************************************************
If you're new WELCOME!
LET'S BE FRIENDS
Instagram:https://www.instagram.com/aprilsunny84...
MY CHANNEL: Catch up on my latest and subscribe!
https://www.youtube.com/c/AprilSunnyBe...
LIKE and SHARE
******************************************************************
PLAN FOR HEALTHY HAIR and FIND YOUR ROUTINE
Yes You! Hair Planner
https://www.etsy.com/shop/AprilSunnyBe...
**************************************************************
FAQ
How often do I relax my hair?
4 times a year, top of every season.
What type of relaxer do I use?
Lye
What's my natural hair type?
4C
**************************************************************
GREAT DEALS:
Teddy Blake beautiful handbags
MOERIE hair products
https://moerie.com/?ref=APRILSUNNY
Ana Luisa elagent jewelry
https://www.analuisa.com/aprilmd
VoogueMe stylish NEW glasses:
https://bit.ly/3Hmp2TX (Use discount code “April” )
Moisturestyler:
https://wrapcurl.com/products/moisture...
USE DISCOUNT CODE: April15 for 15% OFF
*****************************************************
MORE VIDEOS:
The ULTIMATE Relaxed hair Look | Nadula V-part Kinky straight wig
LET'S TALK: Olaplex reducing hair fall TESTED
HOW TO: VOLUMINOUS, BOUNCY CURLS
HOW TO: Style headband wig
*********************************************
FILMING EQUIPMENT:
Iphone 13
Neewer umbrella lights https://amzn.to/3GeMjp9
Neewer Reflector 5-in-1 Collapsible Multi-Disc https://amzn.to/3rbyhQE
Tripod (The tripod I have is old and no longer sold)
Neewer Ring light https://amzn.to/3AJVgpg
StudioFX 2400 Watt Large Boom soft boxhttps://amzn.to/3IOHX9L
*******************************************************
BUSINESS INQUIRIES ONLY: [email protected]
Disclaimer:
This video is NOT sponsored. All opinions are my own and 100% honest! I may use affiliate links which help me continue making content for you! It does NOT affect your price. All logos and trademarks belong to their respective owners.
#AprilSunny #EasyHairstyles #V-partwig #Relaxedhair
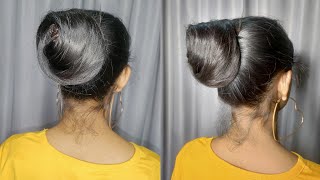
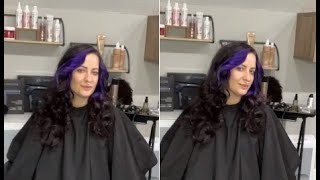
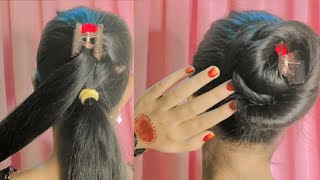
Got my whole family going backwards? Hey guys! Welcome back to my channel. If you are new here, i am april sunny. As you can see. I am still very much in my kinky straight b, part wig. I just popped some curls in there and today i'd like to show you three hairstyles that i'm going to be utilizing, while i am in my kinky straight v-part wig. So if that is something you'd like to see, definitely give this video a big thumbs up and keep on watching okay. So i'm going to start with this beautiful half up half down. Look. I usually wear this when my hair is in sew-in and it's straight, but this is still a perfect opportunity to wear that look. So i'm going to start by sectioning off the area right by my ear right above my ear, because this wig is so dense. I have a lot of hair to work with then i'm just going to pin that off and work on the other side right. So now we have our two sections to work with. As you see, i did not touch any of the back section once you get your two sections, you're just going to pull them together and put them in a ponytail for this ponytail i'm using a scrunchie because keep in mind. I do have a little bit of my hair out on the top there, and i don't want to you know, have any breakage okay. So, as you saw, i just twist the hair around the scrunchie to cover the scrunchie and now i'm just adjusting and pinning the little messy bun to my liking. I absolutely love this style because it's so quick and easy - and it looks like you put forth so much effort when in all actuality, you really didn't go on to this beautiful sideways bow. I mean how cute is that i found it on pinterest, so i wanted to recreate it. So again, this is a half up half down, as i section my top portion off, i am leaving out face framing pieces. This is to make sure the wig on the side is covered, because i didn't leave any of my hair out on the sides this time, i'm taking the classic half up half down section where the middle part is included. So i'm going to take my top section and put it into a cute little ponytail. Once that's complete, i'm going to just smooth out the top of this ponytail and clear any of the hair that got caught up in the rubber band. Okay, i'm going to wrap the hair around my pointer finger and with two finger spaces apart. I'M then going to flip the hair over and wrap it around my ring finger and then wrap it underneath my pointer finger hold all of the hair together because we do want those curls at the bottom and we're going to wrap the rubber band around the bottom Section and then just adjust your little bow as you would like, and then you're going to take a portion of the hair that was left out, wrap it around the middle section of the bow and then pin it underneath smooth out the bottom section, and then you're Done on to our third and final look: it is your classic braid down the center back of your head. I mean who hasn't had this braid right, but classics never go out of style. So let's go so here, i'm just determining how much of the front section! I want to have out which i normally use a lot of hair for my front section, but anyway, once i've decided how much i'm going to go ahead and clip that off and do the same on the other side. Next, i'm going to smooth out the back section as best as possible. Before i start my braid now, what i should have did was made sure that my hair underneath was like braided really flat or something, but it's not it's in, like a very loose low braid. Like ponytail thing underneath here, which doesn't make for the wig to lay as flat as i would like it for this look, but anyway we are going to move forward, no matter what so, as you can see, i am loosely braiding this down the center back of My head: it's just your regular classic cornrow! Really. Once i get down to the nape area, i'm going to make sure the bottom half is covered by braiding it a little bit further past my nape area and then tying it off with a rubber band. After making sure the sides were covered by the hair and none of the wig was exposed, i'm just going to go ahead and pull and feather out the loops of the braid. Once that is complete, i'm going to take a portion of the ponytail and i'm going to wrap it around the rubber band once and then tuck it under the rubber band. Underneath the ponytail, of course, i'm going to remove the hair clips in the front. Releasing my little bangs and i'm just gon na adjust them to give me some face framing pieces and there you have it a really simple braid that you can wear for absolutely any occasion. I often wear this look instead of just pulling it back into a ponytail again. I wish i would have had my hair flat underneath, so this would have given more of a flat appearance, but i absolutely love this look all right. You guys, that's all! I have for you, thank you so much for watching this channel. I hope you've enjoyed this video and i think it's a great alternative for those who do not know how to do a sew-in or don't want to do the sew-in or don't have the extra funds. This is a great alternative, i'll leave the information in the description box down below, as well as the unboxing video for the initial install. All of the details on this wig is in that video so definitely go check it out and until the next time below girl. This hair is getting it. Ma'Am is giving very much sew in. I don't know who gon na tell me on the streets that this is not my hair. It'S so cute. This hair, yeah
Comments
Tarasuewithlove: Absolutely beautiful hairstyles! I will have to give them a try one day.
jasmin lake: This wig is great. it looks like your real hair. You can do so much with it.
World According To Nicole: Hi April!! #2 was my favorite, the bow was gorgeous!! The lip though!!! girllll!!☺️☺️☺️
KP: Hi April, l love all three styles! I am thinking about trying a sew in. I just watched your Winter sew in video, three times and took notes! . Question, can you sew the weave to the net only, or do you have to sew the weave to both the braid and net together? I listened to the point you made about how your braid was damaged because of the tension.
Shitaria Jackson: The braid one is so pretty!!
Rachita E: Love it!!!
Kurlymeka: Loved all the styles the bow was my fav
Maur Carroll: April, April. Girl. You are so creative !!!
Nykicia Jefferson: These were so cute!!! You’re so beautiful!
0tismadaline: Sweetheart journey are looking absolutely stunning, beautiful styles
jasmin lake: Very beautiful as usual. You look pretty
Msnetnet Jones: The styles you be coming up with are Soo beautiful! I wish you lived close to me...you would be an IDEAL stylest!!
jonan358: Beautiful
ROSE OLIVER: Beautiful
Mocha Mommy: I think you look great.
zemakeuplove lawrence: Am sold on this u-part wig
Simonisa S: Huntyyyyyy you just sold me!