How To Make A Wig Making With A Sewing Machine || Hair Colouring From Black To Deep Red
- Posted on 20 February, 2023
- U Part Wig
- By Anonymous
HOW TO MAKE A WIG MAKING WITH A SEWING MACHINE || HAIR COLOURING FROM BLACK TO RED
Bundles and closure used are from ENLBEAUTYHAIR on instagram
#hairtutorials
#wigmaking #sewingmachingwigmaking
Join this channel to get access to perks:
https://www.youtube.com/channel/UCe_sE...
SHOP BELOW
MY BOOKS: E-BOOKS – https://enlbeautyng.com/books
ON AMAZON (PAPERBACK): HOW TO START YOUR HAIR BUSINESS: https://www.amazon.com/HOW-START-YOUR-...
HOW TO START YOUR HAIR BUSINESS (EBOOK)- https://enlbeautyng.com/product/how-to...
Hair Extensions And How To Test Its Quality (EBOOK): https://enlbeautyng.com/product/hair-e...
ENLBEAUTY HAIR (WIGS): HAIR – https://enlbeautyng.com/hair/
WIG MAINTENANCE SERVICE IN LAGOS NIGERIA: https://enlbeautyng.com/wig-maintenanc...- services/
MAKEUP: ENLBEAUTY https://enlbeautyng.com/makeup)
MY HAIR VENDORS:
Vendor Plug – ENL BEAUTY https://enlbeautyng.com/vendor-plug/
1.Raw/ Donor Vietnamese Hair Vendor – https://enlbeautyng.com/vendor-plug/ra...
2.Virgin Vietnamese Hair Vendor – ENL BEAUTY - https://enlbeautyng.com/product/virgin...
3.Virgin Chinese Hair Vendor – ENL BEAUTY
https://enlbeautyng.com/product/virgin...
4.Raw Chinese Hair Vendor – ENL BEAUTY
https://enlbeautyng.com/product/raw-ch...
COURSES: Hair Colouring Course – ENL BEAUTY (enlbeautyng.com)
https://enlbeautyng.com/hair-colouring...
Wig Making Course –
https://enlbeautyng.com/wig-making-cou...
HOW TO ADD HIGHLIGHTS TO YOUR WIG COURSE: https://enlbeautyng.com/product/how-to...
HONEY BROWN HAIR COLOURING & STYLING COURSE: https://enlbeautyng.com/product/ honey-brown-hair-colouring-styling-course/ HONEY BROWN HAIR COLOURING & STYLING COURSE
SPEAK TO ME: https://enlbeautyng.com/one-on-one-bus...
SPEAK TO ME:
IN PERSON TRAINING: EMAIL ME [email protected]
Birthday" by LiQWYD https://soundcloud.com/liqwyd
Creative Commons - Attribution 3.0 Unported - CC BY 3.0
Download / Stream: https://hypeddit.com/link/h150s6
---------------------------------------------------------------------------------------------------
Free download: https://hypeddit.com/link/h150s6
Stream/buy my music:
- Spotify: https://spoti.fi/2RPd66h
- Apple Music: https://apple.co/2TZtpeG
- Soundcloud: https://soundcl
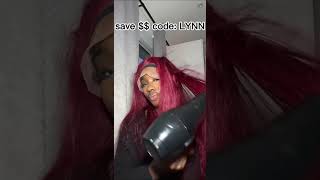
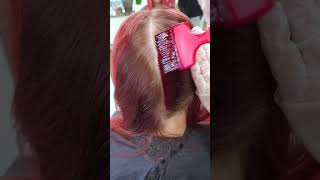
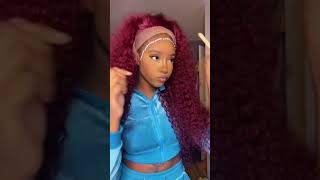
Foreign, this black hair right here, I'm going to turn it into a bead, and then we color the hair. Let'S start first with the wig making process. So I'm using the two by six closure and two bundles of 14 inch bone straight hair. That'S the closure! One piece of closure and two bundles of hair: yes, so next, what I'm going to do is I'm going to reach out for my recap, I'm using the medium sized wig cap on a 22 inch canvas head. This is the closure right here. I'M gon na pin the closure down to the recap on the canvas head and you can see that I move the closure at least half inch forward from where the e-cap is placed. This is to ensure that the closure area is not too backward. So turning so that you put your closure a little bit forward than where the recap is, I pin it only two sides on the front. I'M also going to pin it on the back side and I'm trying to ensure that the line is too straight. You want to ensure that you get the line to be straight while you paint the closure down so that when the client wears the wig the closure area, the pattern of the closure is straight on the client's head. So I'm going to paint this area here. This other side here down that I'm going to reach out for my needle and thread and start sewing down the closure on the wig cap. Some people choose to use your sewing machine when it comes to sewing down the closure, but I prefer to use my my needle launcher because it just helps me ensure that the placement of the closure is perfect. Nothing moves stays in place, so another thing you can do is you can Mark out the area where the closure is supposed to be underneath your sewing machine to sew it, but for certain reason I just prefer to use my little laundry to sew down the closure. So I clip the hair in and I'm about to start using the little entry to sew the no closure on the wig cap and with the way I threaded the needle, I did the double threading method and tied it at the end. So I just put looped the first straight through the closure and the wig cap and secured it by putting into the thread I'm pulling it to get to the end. And I and I'm continuing to sew the closure down on the recap. So just watch and see how I sew down the closure and from one side and take it over to the other side. It'S a very repetitive process. If you watch my other tutorials on how to make it wig, I'm quite sure you've seen how I trade, my needle, if you haven't seen how to, if you don't know how to straight your needle, then you can check out my tutorial on how to make cubic. I think it's a very old tutorial from about three years ago, so I'm gon na link that video up on this one. So you could go and check that out. In case you don't know how to trade, your needle, but it's very simple. So I'm going to keep on sewing the closure down and if there's any place where there's like um, it didn't go too small yeah, I'm just gon na use my needle and pull it and drag it so that this stitching is very smooth from one side. I take it down to the back side and from the back. I take it down to the other side and sew it down securely so watch and see how this goes. Foreign from the downside - and you can see that I'm going to sew from one end and turn it around to the other side, you see the way I turned the the chalk drawing on the weaker. That'S why I'm going to sew the closure on the weaker, because one thing I don't do is I don't cut my wefts. I try as much as possible not to cut it with, except this I'm already at the all part of the week, and it's just something. I must do so. I turn around when I'm sewing. I don't cross my waist, so this is how I I sew on the recap from the way I'm turning around with the choke. That'S how I'm going to be turning around with the wefts so watch, How I do it when I'm done drawing the entire guideline of where I want to place the wefts on I'm going to start to unravel the wefts and tread my needle on the sewing machine. So this right here this sewing machine I use, which is the Victoria sewing machine, so I'm just using the thread now to trade. My sewing machine, if you don't know how to trade a sewing machine just know that the various sewing machines are available in the market. There are different ways in which they thread them. This particular summation, I'm using is not one, that's common, but the reason why I like this image sewing machine is because I can sew with different methods. I can use this straight. I can use the zigzag there's a smaller zigzag, there's a white wider zigzag, so I typically use the number two. That'S a zigzag, the bigger zigzag when I'm sewing. So what I'm going to do now is simply cut open one of the wefts by just cutting out those bands that I used to secure the rest on all parts. Then I'm going to unravel the wefts and starts the wig making process using my sewing machine so because I I'm using just two bundles of hair for this tutorial. For this particular wig, I'm going to use I'm going to sew down just I'm not going to double track this weft, because it's only two bonus of here. I want to ensure that the two bundles of hair is enough to make it full week. So I'm going to use just one single part of the weft and start from the first line. I drew on that week up I'm going to put that first there, at the beginning of the Webster and start to sew it down and from the beginning part make sure you backtrack, like you backtrack the sewing so that you secure the beginning part and also when I get to one corner of the wig when I sew to one corner of the week, I'm also going to backtrack to sew it so that that place there is secure. Then I will take the recap off from the sewing machine, but I sort of pull my thread to allow me um have that room so that I don't have to retread the needle again. Just because I want to see another side, so you can see how I flipped that width around on the other side of the recap, and now I'm just sewing through that beginning area, I'm going to sew it all the way down. What I'm being doing is I'm following the guard, like the guidelines that I already Drew down, for where I want to secure securely sew the wefts on what I'm doing is just sewing the weft on that lines that I drew. So I'm going to take it from one side to the other side and I'll keep on going until I get to the up part of the week. It'S a very repetitive process. Decay, Decay thing is just knowing how to walk your sewing machine and knowing exactly what to do. The guidelines are already there. The big making process is really easy, but the most important thing is: you need to ensure that you pay attention to detail to ensure that you sew the wefts down securely and you don't so the weft in a way that the needle doesn't hold down the wefts. To the recap, because when that happens, you'll be having you find out that there are lots of bombs when you touch the weak at the old Parts. Taking your hand downwards, that's after you finish, making the video it's not going to be smooth so ensure you sew. The tip that's the top of the weft down securely, so pay attention, use your fingers to like hold the recap and the wave to ensure so that you properly secure the wefts down you're, not sowing lower than where the birthday you're not sewing to above the waves. Because she's more like you're, just saying nothing to ensure you sew down the web securely, because that is what is going to ensure that you have a perfect Flawless finish. So take your time, I know some people are able to make their wigs in like 15 minutes. I'Ve not gotten to the point of being able to make wigs in 15 minutes, probably because of the sewing machine type I'm using, hopefully, by the time I upgrade to the bigger industrial sewing machine that has sort of that um circular ball. That just makes rotating around the week the wig big cup, easy then maybe then I'll be. I should be faster with my wig making process, but for now I probably take around 45 minutes to one hour for making weeks. Yes, so I'm gon na go through the entire guidelines and when I'm done with making the wings of making the wig we're going to proceed to the next process, which is the hair coloring process. So just watch me finish the wig making process and when I'm done making a wig if there's any wave that is Left Behind, I go back in and try and push that weight if it's either at the middle area. At the back side anywhere, I see space in between the wig, I'm going to add him in a way of stay. This is what the wig looks like now. After I finish the read making process, I used a scissors and trimmed off the ends of the weed to make it equal you're, going to see how the end of the you can see right now. The ends are sort of uneven, but I'm going to use a clip and trim it off to give me that blonde cut. Look before I proceed to recoloring the hair. So this is the wig right here with the bronze cuts and it's time to recolor the hair and I'm using this developer right here. I believe this is a 30 volume developer, I'm going to put the developer into a mixing bowl and I'm also going to use this color um hair color from L'Oreal. It'S the color, h11 and h8. I'M going to pour the two colors into that bowl of developer and mix it together and next after I've thoroughly mixed the colors together to ensure that it's been evenly mixed, I'm going to start applying the mixture on the wig and how I'm going to do. This is I'm going to start from the back side, I'm going to section the way, the upper of the wig and start applying that color from the back of the wig and take it up towards the middle side and the upper top of the wig watch and See me do this foreign. Thank you, foreign foreign foreign. Thank you, foreign, every strand of the hair into every strand of the hair gets in that color because you don't want a station whereby one side is black. The other side is red, except starts to look you're going for, but pay attention to every detail, every side of the every Strand and ensure that you completely saturates the hair with the color. So the color comes out completely even and smooth foreign foreign ly saturated the wig with the hair color. What I'm going to do next is I'm going to wash off the color after I've left the color on for about 30 minutes to 45 minutes. I'M going to leave that color on for 30 to 45 minutes and then wash it off in my shampoo and conditioner and dry the hair and then style it using my heat. Protectant, hair serum straighten the wig and ensure that the um, the blonde cortis, is very sharp and clean, and I'm going to show you the finished look because this is a very, very easy process. You just requires that you pay attention to detail and you know really color the hair color each strand of the hair really well. You can see I'm coloring the hair from the tip of the hair to the top part of where the weft is and for the closure area. I did not completely color the closure area. I left see closure like about an inch of the closure area on color, because I still wanted it to have that Dark Root. So I didn't color the entire closure area. You can see from how I'm moving yes, so guys, like. I said for the styling of the wig: I washed it off with shampoo conditioner air dry, just check out any of my other videos on how I wash my wigs and style it. I'M quite sure I've done styling for bone straight hair on my channel. So you can watch any of those videos and see how I do it, but it's a very simple process like washing the air and drying it and restarting it it's very simple. So I'm gon na show you the finished. Look after I've completely washed the hair. This is what the hair looks like right now. You can see that the red is not that sharp red, it's sort of like a burgundy and the reason why I love this hair color is because it's a permanent hair color, so you're not going to have this situation whereby, after like a year of the hair, Being exposed to sunlight, the color is going to start fading. It'S going to this color is going to last really long. That'S the reason why I love this particular hair that it's quite expensive, the hair that is expensive, but I love the fact that the color stays for a very long time, because it's a permanent hair color. So guys, if you got value from this video, please make sure you smash. The like button share this video with your friends who are also going to get value out of it, and please subscribe to my channel if you're not subscribed, check out my website for product services that I have available on. My website purchase my ebook on how to start your hair business. If you want to start your hair business in 2023, you should buy my ebook and read it or you can buy the paperback from Amazon and read those books. Those books are going to help you in your hair business. Thank you so much for watching guys, bye,

Comments
Grace Atane: Nice video