Faking A Lace Closure/ Frontal | 3 Invisible Parts | No Knotless Crochet Braids | Hergivenhair
- Posted on 25 January, 2019
- Lace Closure
- By Anonymous
Remember my too broke for a lace closure video?
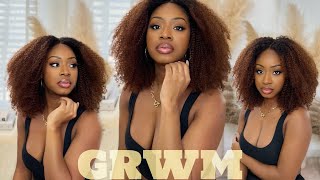
Well, we are faking a lace closure wig again! This time, we are doing 3 invisible parts without using crochet braids or glue. This step by step tutorial includes how to make the wig and goes all the way to styling. We have no closure, no leave-out, just fake scalp!
Let's hang out on IG: @PUREestrogen
WHAT YOU NEED / PRODUCTS USED
http://www.hergivenhair.com/curly-text...
Hair: Curly Textured Wefted Hair
Texture: Curly
Length: 18" 18" 20" inches
More natural hair clip in hair, wefts, lace wigs, styled wigs
http://www.hergivenhair.com/?y=PureEst...
HerGivenHair Contact Info:
Instagram:http://instagram.com/hergivenhair
Facebook:https://www.facebook.com/hergivenhair
2. BEIGE WIG CAP:
3. HAIR SECTIONING CLIPS:
4. NEEDLES:
5. HIGH STRENGTH WEAVE THREAD:
6. COMBS:
7. SCISSORS:
8. MAKEUP DETAIL BRUSH:
9. CONTOUR PALETTE:
10. CURLING WAND:
11. FOUNDATION:
12: PRESSED POWDER:
13. HAIR DYE:
15. LEAVE-IN CONDITIONER:
HOW I DO MY STITCHES: https://youtu.be/zn-bygBRpCY
-Start at 2:55
Let's finish this conversation in the comments! xo
(FAQ)FREQUENTLY ASKED QUESTIONS:
1. Where are you from?
a. Zambia.
2. How tall are you?
a. 5'9.
3. Do you model?
a. Nope.
4. Where is your bookshelf from?
a. Amazon: http://amzn.to/2hsKAqf
It's the Coaster Home Furnishings 800157 Casual Bookcase in White. I bought two.
5. What's your hair type?
4c in the back and 4b in the front...I think.
CONTACT EMAIL : [email protected]
FTC: This video is sponsored by HerGivenHair. I'm glad they asked about this because I've been itching to do it again with curly hair!
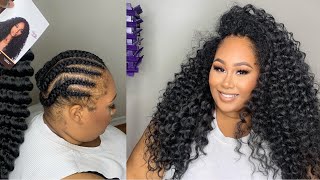
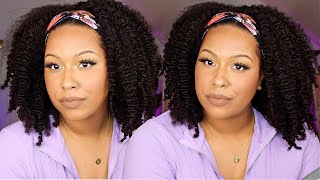
I'M really excited about this video you guys, because we are going to fake another lace, closure wig. I do this entirely too much. I'Ve been doing this technique for like what five years almost it'll be five years this year. I think, and this time we're doing it a little bit differently and we're using curly hair. Last time I use curly hair. I think I did a half wig only with this method and we're not doing crochets 100 % sewn on using her given hair's curly hair, because I trust this hair and I've been working with her given hair for a while. So I'm very familiar with their hair and how well it works and how long it lasts. So we're gon na use three bundles 20-inches curly. 3B. 3C texture. I also have an 18 inch and this is a hundred grams. Another 18 inch. So the hair is very thick and full 100 grams is about 3.3 ounces. You are dealing with a lot of hair. Her given hair is very full. You do not need more than three bundles if you need more than three bundles. I don't know what to tell you, you probably have a big head like ridiculously large, so here are our three bundles, 18, 18 and 20 inches and I'm using a beige cap. This time also hair clips needles and some thread weave thread, high-strength weave thread. You need it and scissors, of course, a lot of combs, because you just never know what kind of comb you want to use. So, there's that and a makeup brush for detail work as well as my contour palette, to help me define parts and draw properly all the boundaries borders lines everything. So this is the wig cap. This is something new and I'm gon na go in drawing my parts. The middle part, of course, is the most important and it has to be about finger length for me anyway. I just need a long part and I'm gon na curve in on the other side, and I go after the stitching so that I know for a fact that this part is going to be a true side part and on the other side, I'm also going to Do another side part, because this is a three part wig. I only ever did a one and a two part. I'Ve done a two part, once only so, I'm really excited about doing three parts, and this one is not going to be as curved as the other one, because I want variety with my parts. I don't want them to all be the same. You know all straight who wants that, so here I'm gon na go in and draw approximately one inch away from everything, so I can separate the front from the back and the back is just going to get care. That'S it! All you have to do is sew. Your hair, in the back, it doesn't matter how you sew, I'm going in a semicircular fashion. You can sew, however, you want, because this is not very important. The only important thing you have to do in the back is make sure your density is correct. So your wig doesn't look weird, that's the only important thing and I'll show you how to do that, because all you have to do. First of all, make sure you pin your wig appropriately while you're going, because you want those pins in there to guide your path and so with a blanket stitch. That'S generally the acceptable way to sew so that you can have a long, lasting wig. But what I'm talking about here is spacing Racing is very important when it comes to wig density. If you want a good natural density, whether it's straight hair or curly, hair, putting a finger in between the widths really helps with spacing. It'S like the idiot-proof way to do it and that will make it so your wig isn't too thick or too thin, regardless of what texture you're using is gon na, be just right and I'm still going back and forth in the semicircle, still pinning my whip down. So my lines can look decent and still using the same, blanket stitch that everybody probably uses now, but I will have the video so make sure you check in the description box to see I keep going until I get a horseshoe that is pretty small and then I start going back and forth still faithful to making sure my lines are good once you get to the top. What I like to do is clean it up a little bit so that all those little gaps are covered. I don't like to see that, even though it doesn't really matter, I just want it covered honestly, but we're gon na do the part area now so get excited this right here, I'm using my uh massager Beverly Hills, soft glam palette and I'm coloring in the part. Again, I needed thicker, and this time the thickness is approximately three widths think you know that little band on the left three times that that's the thickness you're looking at right here. So here we go. You'Re gon na put your weapon down. Okay notice that the hair is going towards the middle, which is where the part is going to be then you're gon na. So now, when I put the weft down, I put it right on the edge of that big thick band that I just made. That'S because this is going to sit there, okay and on the other side, there's hair. That'S going to sit there, that whiffed is going to sit there and the hair will go towards the middle. That'S the whole point make sure the hair is going toward the middle. You go around, I haven't cut my whiffed yet, but I'm going around and I put the weft on that band. Make sure you do that we're gon na do this again with another weft. This time I cut it and it's the length of the part I'm going in the hair is going towards the middle, where the part is going to be, and the weft is lying down right there. Next, to the one that I just put down, it is not going to overlap nothing overlaps as in right at the base of the weft. That area should not overlap. It should not sit on top of anything else. It should be sitting only on the fabric of the wig cap period. Go all the way up and stop at the middle. Now we are going to do the other side again and we're gon na put hair right there on the other side, again we're laying a weft down onto the wig cap, but it's not sitting on top of the other whiffed it's sitting on the side and it's As close to it as possible, this is the ideal density for the part for me approximately two widths, so I'm gon na separate, so you can see the middle a little bit and also so that I can work on actually creating the part and half of it Is gon na get pinned down over there? The other half is gon na get pinned down in another direction, so that they're not touching, and I don't get confused and I'm using my fingers to see where the opening is is where there is no weft at all and I'm taking this weft and sticking it There right there, where there's no web, so I'm going to pass those two webs that I put down and I'm pinning this third weft down right after nothing should be on top of a weft. It should be on top of a wig cap. So it's on top of hair and on top of the wig cap, it is not on top of the weft and I'm sewing it down now pay attention, because this whiffed, the hair, is not going to the middle. It'S going away from the part, because the only job this has is to anchor that hair down so that when it flips over, you can see what resembles a part. This is what makes the part, so I'm gon na go up all the way up and sew. It down and right at the very end, it does actually go over the weft so that I can sew it on the other side and sew it down, and that way the part can go all the way. On the other side, I am going to do the exact same thing, but first I'm going to separate everything, so you can see what it looks like after putting that anchor there. It makes a huge difference. You guys so, let's take all this hair and put it where it's supposed to be and separated. You can see on the right side your right, how it looks and on the left. It just looks like whatever it looks like a part on the right side. It looks like who-knows-what on the left side, so we're gon na work on the left side and we are going to pin the hair down. Another whiffed pin it down after the two widths that we put down right in the middle, where the part is that's where this goes down and we are going to sew it down and again make sure when you sew it down. It goes all the way that semicircle that's in the back. You know that loop that we made make sure it goes all the way past that so that, even in the very back, it's anchored all the way all the way. Okay and now that I've come all the way forward, I'm going to sew on the side right on the wig cap, so that when I finish this thread and make a knot, the thread won't come out and poke out where the part is it's gon na poke Out to the side where nobody can see it, and that is all as far as creating a part I'm gon na separate it. It will look sloppy because it's not on my head, but when you see it on my head, you're gon na be like wow. It actually looks better, but you can see that there's a part here. I need to make those curls sit down properly. I need to make a lot of things work, I'm drawing the makeup and everything, but it will look better once it's sitting on my head. So I'm gon na do all of the parts. I did all three parts that way, so I did all three parts that way and then in between I filled in with wets the hair from the weft. I made sure it fell away from the middle part. So if it's on the left of the middle part, the hair is falling left. If it's on the right of the middle part, the hair is falling right. That'S how I made sure all the gaps were filled, and that is all as far as this wig goes, but you can see right here, there's a gap anywhere where there's a gap. There is a part I'm holding the part right now and flipping it back and forth and filling it in as well. So this is the final look. You can't really see anything because it's hidden and I'm just gon na show you guys one of the other parts before I actually slay the wig and put it on my head. This is one of the parts right here and that's what it looks like good. So here I am using my train, looks untie the knot leaving conditioner. I think this is the leave-in conditioner. It'S a really good product, it's very old and that's why I'm trying to use it on my curly hair, because I didn't get a chance to use it all up on my natural hair and that's what I do when products get old, because I don't like wasting Product, it also does a good job making curls pop. So what I do you can see my shed here on the side I put all the hair into the wig cap and just invert it and let the hair dry like that for about 24 hours, then open the wig cap a little bit. So it can fully dry because it's so concentrated in there, and this is what it looks like after a couple of days. You can see my parts right there shining through and I put the wig on and you can see some of the cap poking through. So here I'm using by Jen by Jen, who knows how to pronounce it. I don't know, but it's 59, that's the color, it's a black color and I'm coloring it in this is a permanent hair dye and I'm using it to color in any part of the cap that is showing and it took a while. Some of it was still showing in this video, but I colored it when I took the wig off just to make sure all the parts were covered. I am considering a different cap method, but this is working for now, it's better than using two caps like I have done in the past and I'm using a blow dryer to dry faster. So I don't get dye on my hands, but let's get into this middle part first, I always have a challenge with middle parts, because I have a big forehead, but this is what it's looking like. You can still see some of the gaps back there, so we're gon na color those in quickly with some dye, and you will see a few minor gaps here and there, but they were covered in a as I saw them. So, let's color that in and I do have a wig cap under here - so it's not exactly coloring my hair, and this is the part I'm separating with a fine-tooth comb so that I can work on it and I'm going in with some makeup pressed powder and Foundation, work wonders and I'm actually using a pressed powder by bare minerals bare Pro. This is shades 27. Of course you can use whatever you want and I'm going in with a curling wand. This is by irresistible Misa sapphire, curling wand and I'll. Have the information in the description box - and this is what we're looking like - it looks pretty good, so I'm calling my hair out and some people may think that I'm combing dry hair. I am NOT. This hair is still a little bit damp. It didn't finish drying because it was in such a concentrated area, so do not call my curly coily or kinky hair, let it be at least a little bit damp and use a wide tooth comb or a rake comb like I'm using right here. You don't want to damage your hair, also, I'm cutting my hair so that I can shape it a little bit better, I'm terrible with middle parts. You guys, I love them, but I'm terrible with them. So it is a little bit of a challenge, but it came out nice and the hair. It looks good, it looks even and I am thankful I combed the back to make sure you know it's good back there, but you will see a little bit of the cap showing through, but it's not like major and I'm tall, so who's really going to see That in real life, let's be honest with ourselves anyway, we are going to do the next part. It'S always a struggle for me to find the parts. If you are wise, you will take that to mean that you should probably secure the part before you put your wig on. Okay, make sure you get your clips on each side then put the wig on not like me putting the wig on and then looking for the part. You know this is too much work, so I'm going in with my curling wand again making sure I laid my hair down. You can use a curling iron. You can use the back of a hot comb. Whatever you want to use, you can also use mousse. I said the N word and you can put a scarf over because mousse will help your hair lie down, so you can do that if you don't have the heat styling tool and all the current one does is really just compress the curls. It doesn't actually straighten the hair, I'm going in with some foundation by Sephora. I, like it, it's a nice, cheap foundation that works well for me, especially since I'm always filming it's great to have products that are affordable. I think it was like $ 20, which is good compared to some of these brands, but I go in with a wedge to get rid of any excess product, and then I go in again with some pressed powder to set it in and lock it down. And this part is good to go after this. Of course you can fine-tune your parts and make them better, but, generally speaking, this is good. I always struggle with my hair and parting. It doesn't matter if it's straight curly kinky curly, whatever I always struggle, so don't ever feel discouraged. Also. I did get makeup on my blouse. I showed you guys on Instagram that I was hiding the makeup on my blouse when I took my picture, but this is a nice shot of the part check out the part. It looks good okay, but I am spot treating the blouse so that I don't have a permanent stain and I'm cleaning off the foundation on my hand, so I don't mess up again, and this is what this this particular side part. This is what it looks like and I'm struggling. I am truly struggling, but it all worked out in the end with the other side part so yeah, I'm kind of cute kind of working on it. This is the part that you guys saw on Instagram, and this is the final. I am touching up any areas that are too light that are not part of the part area with some of that permanent dye and it takes a while for the color to take. But after I was done with my wig most of the areas that needed to be colored got that black dye in them, and I went in with my curling wand, one last time to flatten those curls and make sure they just sit there and sit there. And I also went in with my powder foundation combination, one last time to define my part area, and that is all I think I did a little overkill on this part, but that's okay. This one turned out better. I liked it more, and I did touch up my face because I do get shiny. We all know this. I liked the circle look, so that is all for this video. You guys, thank you so much for watching. As always, and I'm truly thankful that her giving hair wanted to work with me again on a sponsored video that is so cool because we planned this, they wanted me to do this video since November and I'm finally getting out and I'm so excited, and if you Enjoyed this video, please give me a big thumbs up comment down below check out the description box. If you need more information - and I will talk to you guys in the next video until then - take care
Comments
Dante Velasquez: OMG! You see things once they are figured out and they seem so simple LOL. This is so clever and so much better than struggling with crochet! I love this ingenuity. I have an idea for an upgrade that I will DM you on Instagram :-)
Joifully Natural: BRILLIANT!! Thank you for sharing your talent!
abby: this is so relaxing to watch and makes me really want to make a wig, end result is stunning
Stephanie Swtchks: OMG!! I Have watched two other videos talking about this type of parting. One used glue, one pulled hair through. With THIS video, I FINALLY understand what I have been seeing! Just goes to show; keep watching as many vids as you need until it makes sense! THANK YOU SO MUCH FOR SHARING THIS!!! You are awesome!
romantic horror: Omg, this is exactly what I need. I couldn't figure out how to make a part without making an old style closure. This is genius. I'm going to use this method on my next wig. I'm using body wave human hair, good quality, and a standard wig cap. Thank you for this valuable information. Much appreciated!
Brixenta: I honestly have no use for these techniques. But I watched your 400 roller video, & thought you did such a good job, I wanted to subscribe & watch more videos. You’re fierce girl, keep up the good work!!
Kettie P: Amazing, great work. Thanks for sharing.
Caroline K*: Does anyone else watch these not understanding but just enjoying watching it get done. It's like super relaxing even though I COULD NEVER
Tiffany Matthews: Oooo, love the parts. Now I want to redo my hair and I still have at least two more weeks with my current hair. Thanks
edu o.: this must've been the most stressful shit lool. i could never do this, i do this fake closure method all the time but this one, i do not have the time nor the patience sis lol great video tho!
Aneika Williams: love your video!!!!!!!!!!!!!!!!!!!!!!!!!!!!!!!!!!! could you do this method on a straight hair with the same wig cap. please and thanks looking forward to see the next video. much love and support !!!!
Abena Valz: You’re amazing ❤️ Love your videos it’s easy to understand
F KB: Hey. Thanks for the tutorial, I have learned a lot fro you. Can you please a do tutorial with curly hair middle part only? If you have already done one would please post the link here. Cheers.
Rebbiane’s Beauty: I would love to see u do with with a loose or water wave hair... love the idea
Gbemi A: Hello! Great job! Can this be done as a sew in on my head?
Linda Wright: Wow, great video; but to much for me!
Maria Limbo: Thx for the vidéo it's a good help for me thank you so much
Naomi Mingle: Good work done Lovely
Sis Vida: Wonderful look
Cherokee W.: So cute!
Lo Rod: Amazing
tameka david: New sub here! luv it
Vivian Eleleme: I love it,I will do my thanks
Neisha James TV: freaking good!!
Barbara Julia Marques: Love
Mamie: What camera do you use ? You look flawless new subscriber.
Nwokedike Jane: You're so good!!
Hannilor N: I'm too lazy for this. Nice work P. E
Roberta Tramble Martin: Your end product is great only thing is, you don’t explain your technique in a way it can be understood by most viewers. It would help if you explained that you are using six pieces to created the part and state which direction each weft should be positioned and which direction the hair should fall. If you do that you would surely get more positive comments.
Lifestyle by Kam:
Abigail Obeng:
Sonya Kay:
sylvia: I believe this works better with curly hair.
Sammie Joe's Chance: It looks like the 3 track is going over the 2nd track but stitching on to the wig cap. Please correct me if I'm wrong bcus I'm going to try this method.
I Am Jeri: You are Gorgeous!!
Kersha Beaver: Nice
abacus mia: you are clever. Can we do it with a black cap too ?
splorgan: Do wig caps come in different colors? Also this looks really nice, it looks really natural and bouncy
Cynthia Eniola Etefia: Am just watching.. But I dnt understand... Nix work tho
Dating Support: Oh geez I feel stupid