Detailed Video On How To Make A Lace Closure Unit | Temptingbeautycollection.Com
- Posted on 16 November, 2018
- Lace Closure
- By Anonymous
HEY YOU GUYS AND WELCOME BACK TO MY CHANNEL, I HOPE THIS VIDEO HELPS ALL MY BEGINNERS IN THE GAME ON WIG MAKING
SUBCRIBE!!!!!!!!!!!!!! LIKE!!!!!!!!!!!!!! COMMENT BELOW!!!!!!!!!!!!!!!
HAIR * WWW.TEMPTINGBEAUTYCOLLECTION.COM
DYE* ADORE CAJUN SPICE AND CINNAMON
CANVAS HEAD* 22INCH WWW.AMAZON.COM
CAP* DOME CAP BUT I PERFER MESH DOME
SOCIAL MEDIA
IG @TEMPTATIONISABITCH
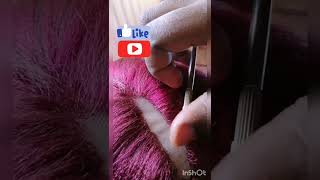
Hey you should girl tempest Nakota welcome back to my channel, you guys, if you have not subscribed. Please do so now, look out for your girl, oh yeah, but anyways. If you have not watched my previous video, I did the water color method on my platinum. 613. Bundles and they came out everything - yes, these are still kind of damp, but it came out so good y'all. So today I'm going to show you guys how to make a custom closure unit. Everybody say: yes, yes, ok! So, first and foremost, I'm going to tell you guys all the details and Nixon necks and stuff that I am going to use to make my custom unit. So everybody asks me a lot of questions about which cap do I use you can get these at your local beauty supply. I do have access to purchase them wholesale as well, but I have ran out and did want to drive all the way over there. So I did go to my local beauty supply and this cost me two dollars. I do like to use the dome style mesh cap. This is a dome with no mesh, but that's all they had so I used it and you can get this at your local beauty supply store. It was a dollar. Ninety-Nine! Okay, stop bad! You know you will need some scissors. Okay, you will also need a spool of thread and I get this bigger thing from my local Beauty Supply. It'S like nine dollars. They have the smaller one if you can't afford it, but I make wigs all the time - and I use this needle. This is my favorite one y'all, and it takes me a little bit longer only because this is my favorite one. You know how you can three I'll go ahead and three like six needles, so you can keep the process going, but I like this one, okay, so and for those who like to import clips in there weeks. I do use these ones. If you can see, they cost me a dollar, it says spring week clips and they are the lace cover one okay and for the main attraction we got the canvas head, which is a size 22. You can. I got a little dial on the shield, a dirty but um the average one woman's hair size is like a 22, so I can make all my custom, wigs and stuff on a size 22. It'S all about how you put your elastic band in there and also I use this type of elastic band for all my custom units. I do have the Jumbo one and I'm out of them, but I do these are typically the ones that I use. I love these I've seen a lot of reviews on YouTube about these that they really don't like them, but I love them and if you want to secure your weeks, it's secure your week. Okay, okay, but I do use these and - and I got these on sale, um, they're, typically adult getting.i, but i bought like twenty four spools of these for a dollar and Hobby Lobby. They was on sale, so I bought the rack. Do you hear me? Okay? Okay, you guys so first things. First, I know my head is cut out of it, but I want to make sure that you guys can see it. We are going to open our mesh, don't cap and you are going to use so this one is the same size all across, but normally on your wig cap. You have a wider part and then you have a smaller part that will go in the back. So I just have to play it by ear the mesh ones have. These are exactly the same length, that's crazy, but you want to kind of like cleaning by your eye and see which side is wider and you always put the smaller one in the back. Okay, so you want to kind of line it up to make sure is even see okay and then these stick pins. That'S in the front, you can get these at your local dollar store. Some people use the T pins. I really don't like the T pins, but these are a dollar and you get Hello bunch of them: okay, okay, so we're gon na tack it down in the back cuz. We don't want her to move okay, so for this next part, once you get your wig cap, don't cap in their position, you hold it down with the two t pins in the back. This is very important when you apply your closure, you want to pull it a little in front of see how it's kind of like you can't see the cap right there. You want to pull it a little over the cap. It'S okay! You don't want to start sewing, and it's back here, because when you cut it, it's not gon na do right. So you put a little forward. Excuse my nails, I need a feel and you pin it down sort of stay where you wanted to. It might look a little funky right now, but you'll trust you'll understand, see. Ok, so now that you got it kind of like pinned down in the front, you see how good it looks so far that it's on ok. So if you pull it back like this, you wan na this is how I do it. A lot of people do it differently, but this is how I make sure that my closure will be sick, uh laid with no bumps ok, so this is kind of like the kindergarten way to do it, but this works for me: okay, hold on weak hit, trying To cut it, ok, so let's get this out the way just colored! Oh yes! Ok! So I hold it down just so. I can see what a pin I'm gon na get a clip and you want to return okay, so you don't want to slow it down with it. Looking like this okay, so you're kind of like pull as tight as you can to keep this a straight line. You don't want it to be like this when you're sawing cuz, it's not gon na do right. It'S gon na do just like this, so you want to pull as tight as you can and place a pen right there. This helps the sawing process. You see how flat it lays with the pen right there and you do the same exact thing on the opposite side. Okay and you understand, when we start stitching, you understand where I'm coming from and it'll make it so much easier for you to do it like this. So now, on the other side, you do the same exact thing, the same exact thing. So now you can kind of see how it's gon na sit okay, so now we have our needle. We have our thread ready. We, let me make sure I can show you how what you can see in everybody threads differently. I'M just gon na show you how I do mine some people go under. I go over that works better for me and I get a little piece, pull it through and pull, and you do the same thing throughout until this sir cared. So here I just asked for it a little bit because it gets a little repetitive, so you just stitch all the way up. You guys you so as I'm securing the back, you do the same things just the same way as you did, and it's okay. If you got like a little bit of crinkles in it, it will stay flat and I'll show you the Aaron resource. So you do the same thing you did for the side. Okay, so now we are done stitching. Now we are going to part her and you can see that is no lumps no lumpy bumpy's. She is flat, okay put it down, so you can see no lumps no bumps. She was laid okay, okay. So now we are going to put this in a pony in a pony. Just we got that out the way we don't do it okay. So now we are going to add the bundles okay, so these are the two clamps up with in the back um. Some people don't like to show on the band me personally, I sew on my band okay, but do what you want. This is just how I do my and I feel like it was a little bit easier for me to understand. I am going to cut this, but I still need to figure out which one is longer than the other, and I think it's this one and it's okay to cut your bundles cuz. I do and these need to be calmed out, but I'll call them out after I swim in, but this is the color. It came out if you have not watched my previous water coloring video. How I did this method, I used to watercolor method and it came out everything and I am using my raw 6:13 blonde on my website. So if you guys are interested in purchasing bundles, I will put it in the description box below okay. So for all my lady sets just starting out. This is how the easy way - okay, so you can put here your little tacky. Remember I told you you can tack it down boom there. You go straight line across if it will act right there you go. You don't have to fight the hairs, I'm gon na fall off, you don't have to keep holding it and then you so from there. Okay and then you would do this all the way up, but keep you guys posted okay. So now that we have our needle together, all you have to do is stick it through the weft. I always stick it through the wealth. My first go around, so I can make sure that the wealth is secured it so pull through and then I stick it through the whip, one more time to make sure it's connected and it stays down. Sometimes they try to give part time, but we want to make sure that it is secured and what it does. Is it really pisses me off, but because of the needle is right there and all you have to do is pull it tight and you can start so on the cross. Excuse me uh, you don't want to cooperate with me today. You, as you can see. I'M halfway through with the first bundle, I'm gon na turn this into a Bob unit, so I'm not gon na make it as full as I would if I wanted to do like a lawn look, but so what I'm gon na keep doing is continue to show Up at this angle, until I get to the very top and okay, so I ran out of here y'all, I usually work with frontals. I had to find some scrap hair bleach it and try to watercolor it. As you can see, it's a little bit dark. So I'm gon na have to go back and dip my whole week. I thought I'm finished with this process because of course you can see that it's darker so be sure when you're using a closure be sure you spread your stuff out wisely if you're going to use only two bundles. I only use two bundles because I didn't want it that fool, because I'm gon na turn it into a bob unit. So now you can see that I'm almost done so now, I'm a reward color it. If you haven't watched my previous video about how to watercolor that it will give you full detail on how to watercolor but yeah your girl messed up this time, so I had to rewrite a color but stay tuned. So now I'm just gon na. Let it sit get out of Killeen girl. I do not want to miss her no more, but it happens, and this is a good how-to video, because a lot of people don't space out their bundles and you can kind of figure out what to do so. Hopefully, this helps you, ladies and hopefully everybody who does here. We all have scrap hair laying around so that came in handy for me today and I'm just gon na, let it soak in there. So I can get it all kind of like matching colors and make it look right. You'Re know you don't want to go around looking like got them both out of clown, and I actually like this better than I originally did. Y'All, yes, color now kind of looked like a ginger redhead. Yes, you [ Applause ] during World War, two there are valve subjects of economic and financial research.


Comments
Jada: When your sewing do you go through the whole cap or the fabric if that makes sense? Great video can’t wait to make mine for my bday!
Ancoria Davis: That hair is so cute and thank you so much for the detailed video I love your channel
Haja Kamara: I really love your video it’s so simple to understand your explanation was so detailed
Chelle Robinson: Thank you boo for making this video , it definitely inspired me & yo voice I love it , #excellent !!
Regullerr: Wow love it I’m gonna save this just incase I want to make a wig
JazzyQ: This was awesome. Saving it to my Hair playlist
Danielle: The color and the wig came out perfect
Stacie M: When you first sewed the lace part in at the beginning do you pull the needle all the way through the elastic band part??
The Design Duo: This was a great video!
Ceanna: Plan on making a wig soon this really helped
Tawanna's World: Great video keep up the great work
Key Moten: Girl it look better the first time I like two tone stuff but it still came out pretty
Wintana Taddese: She’s crazy awesome
Tanneisha Mc Taggart: The hair is cute when making my first wig I don't like too much hair I can put as many or less tracks as I want right and how do I know what frontal goes in the front
Madlyn James: Thank you for sharing this helpful video, I purchased the wonderful product from newigstyle..com four days ago
JazzyQ: You didn’t show how you sow the elastic. Do you have a video for it ??
Bossychick: Where do you order your hair from
Monsie babe2: New subbie great video. What hair you wearing in the video
Shon Lawrence: Very great video,three days ago I got the same one from newigstyle..com
Yvonne Davis:
karol & mary the twins: Nice one
Trinity Upshaw: how do you tell the difference between the front and the back of the wig head
Tanneisha Mc Taggart: Oh and by the way the hair is that
All things Victoria: I got 3 bundles and they are all 16 inch is that okay? Or should have i gotten different inches?
TiaaDaaniee P: Omggg Pretty af and Yo accent is everything I thought I was country
Nisha Watford: That other hair blended well with that orange though still looks good to me ♀️♀️♀️
Nisha Watford: I love that orange
Ki'Ana Riggins: My circumference of my head is like 22.5 and I have a 22 inch mannequin . Is that okay ?? And does the wig expand a little when you cut from under the closure ? My head in very wide in the back . Or should I get another mannequin head bigger because of my head wide in the back
Princess L.D.G's Kingdom: Where do I start the hairline on the block head? Please help me. :(
DESTER SAMUEL: What kind of Tripod do u use?
April Lambert: I have a sister name Tempestt