Lace Closure Hacks‼️|Undectable|How To Properly Install A Lace Closure |My Brand Www.Ibhslays.Com
- Posted on 20 July, 2019
- Lace Closure
- By Anonymous
Welcome to IAmBeautifulHustlerTV .
Be sure to SUBSCRIBE & TURN ON YOUR ALERTS
Follow My Socials:
Instagram:_Beautifulhustler
@thebeautifulhustlerbrand
@beautifulh.refurbishedwigs
Twitter:_Beautifulhustl
YouTube :IAmBeautifulHustlerTV
✨For Sponsorships ,Reviews,& Questions
Email:[email protected]
Contact : 786-571-1313
——————————————————
To BOOK APPTS
TEXT 786-571-1313
To Purchase Hair Www.ibhslays.com
Allow 3-14 Business Days For All Orders
——————————————————
#Youtuber #YoutubeVlogger #YoutubeReviews #Hairtutorials #Miamihairstylist #Miamihair #Duluthhairstylist #TravelingHairstylist #YoutubeTutorials #GeorgiaHair #GeorgiaHairstylist
#Atlantahair #Atlantahairstylist #Celebrityhair #CelebrityHairstylist #SouthCarolinaHairstylist
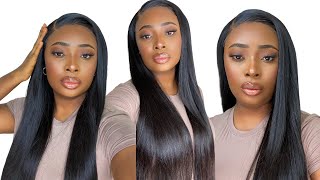
Hey guys and welcome back to my channel, it's not be showing you how to properly install a lace closure. Now this is a lace closure from my own hair company and my website will be relaunching, so you guys can stay tuned and I will have all that information listed below now. This is a four by four links closure and it is actually transparent lace. So I went ahead and you know customize the closure. I went ahead and bleached in knots and I just wanted to let you know that I did not have to plug this closure at all. This is just naturally how my closure comes now, if you watching my previous closure videos things, you know, I like to go ahead and cut those little thick pieces off the side, because it gives the lace closure a more natural look and I will actually be doing A deep side part closure install for today now, like I mentioned before this lace, closure is from my personal hair company and I will have the details to that list. It down below and, as I mentioned, I do not plus disclosure. This is just naturally how it comes after bleaching, the knots now I did go ahead as you seen and place her foundation color, underneath that closure and I'm just gon na go ahead and well. I went ahead and just sewed that closure down and from this point on with you guys to follow exactly what I'm doing to achieve these same results. Now, when you are laying that close, you down, you want to make sure that your client holds that closure down. In place as you saw around and cut off the extra around the ears - and I did off-camera - go ahead and clean my hairline before applying the cap and everything like that, so I'm just gon na go ahead and get straight into Lana's close you down using my Ghost bond lace glue and I'm going to apply three layers, but I'm only gon na show you one layer before actually laying it down now what I did differently as far as the song as closure. Not only did I place that foundation underneath the legs, but I also applied it on top of the lace as well, and I like how it came out better because it just gave me more of a you know. Natural natural look, because sometimes even when you apply that foundation underneath the lace, you can still see like the lace color. So I just went on top of the lace as well like right at the edge of the hairline. So now that that blue has dried. Well has turned clear: I went ahead and placed it down and you can have your client holder while you blow-dry it or you can just do not do it yourself if you can and I'm just going to continue to blow-dry that on warm heat and I'm also Going to use my fingertips to rub their lace down until they blue and also I will go in with a small, fine, toothed comb and comb that lace into the glue and I'm going to pull the lace down applying pressure for that lace closure. So this is pretty much what they closure looks like at that blow-dryer. But now what I'm going to do is actually pull some of those hairs down and it looks very natural, as you can see, and I'm going to begin to cut away that extra lace in a zigzag motion. You do not want to go straight across because, if you want is exact motion, it will give you a more natural finishing look, so I went ahead and cut off that extra lace. So now I'm just gon na go ahead, cut down any of those little pieces. That'S lifting just by tapping the end of my rat tail comb into that go spawn and that's why I have a place on my hand and just sliding that little right under those places, then I'm gon na take the front teeth of my rat tail comb and Just press that lace down into that glue just so that it is extra extra melted. Now, as I mentioned before, or over my ship, I did at all, but I'm not going to show the whole bob cut process today. It was just to give you a detailed video on how to properly lay your lace closure down, especially for a deep side. Part look, and this is actually a really nice closure heck. If you do want that frontal type of look, but you don't want to have to get a whole lace frontal, you can do this as well. Now, as you can see, my client closure is looking very scalp fish and if you follow instructions, just how I do it it should be. You know you should achieve this same or similar results. It'S really pretty much on the foundation. Color that you use make sure you find the one that matches your clients skin tone the best. Now I did go ahead and tie that down while I bonded and the rest of her hair. So this is pretty much what it looks like as soon as I remove it and that's after bonding all of her tracks, and so now I'm just gon na go ahead and begin my parting process and slipping down the hair all around using my wax stick and My hot comb before I actually begin to put in style this week now my client didn't really want much baby hair, so I did not do much baby hair as well little to none today so yeah. I hope you guys do or this video and I hope you learn through finance, because this looks pretty good. So I was happy that I actually recorded this today for you, because I've been doing a lot of installs on myself, but I'm gon na start bringing you guys more full tutorials on clients. That way, you can really really get to learn like you should be able to so now. I'M just gon na go ahead and hop on those screws out and, as you can see, it's looking very very, very natural, and this is the results that you want, especially if your client does not want baby here. So you want to make sure that you are taking your time, even though you should be taking your time with or without baby else. But you know just take your time and follow these steps. So now that I went back and I don't style their cut and everything like that - I'm just going to take minor all these moves and lay that all on the front of that parted area and the closure piece of set itself. And then I'm gon na tie that down once again letting out drive about 10 to 15 minutes and then boom. You come back and you remove it and you will see how super super melted it is into her skin. Now I love using this moves method because it just gives it like an extra extra melt down effect and, like I mentioned before, this is not a foot tutorial just focusing on this closure, so hope you guys did enjoy this quick little short video and thank you For tuning - and these are the finishing result - I'm gon na chocolate video for you here boom. This is no filter. It just is just raw footage until next time,


Comments
Margaret Brown: Thank you for your videos. I appreciate your time and your teaching gift.
NikitheBeautifier: You have skills love, thanks for the video. Definitely will be trying on future clients.
O'shenique Colar: Did you ever like use a concealer for your middle or side part jst to define that part ? If so what concealer you used ? Does it have to match your skin color ?
geri bedford: Loved it
Kalel Craib: Love this
MillieAwna: So bomb
Kashh Glockz: bomb
dennisha goffe: Love it. Next time have a clip with you cutting
Sam Willis:
Shel Desanto: Is that two stocking cap on her head one lighter than the other?
Madison Purifoy: Gorgeouss
P Chantel:
Roe: I love your intro song‼️‼️‼️‼️
deseraymiles87: