Hair Tutorial | How I Make A Full Wig With Lace Closure | Deep Side Part | Myfirstwig | Big Curls
- Posted on 08 April, 2016
- Lace Closure
- By Anonymous
Ive gotten tons of request to show how I make my wigs with a closure so I hope you guys enjoy this step by step wig tutorial!!
The weave&closure I received is from www.myfirstwig.com
4*4" 14inch closure
http://www.myfirstwig.com/malaysian-vi...
2 *22" 1*20" 1*18" bundles
http://www.myfirstwig.com/indian-remy-...
Follow us on social media to see more information:
www.Myfirstwig.com ( Sister line of RPGshow )
Myfirstwig Youtube Page: http://bit.ly/1mzdMJg
Myfirstwig Instagram Page: http://bit.ly/1VAKHJB
Myfirstwig Facebook Page: http://on.fb.me/1O5Ayj4
-------------------------------
Nail Polish: Essie "Ladylike"
Lipstick: Anastasia Beverly hills Bambi
1 1/2 hot tools curling iron
1 1/4 ion curling iron
Dome cap from sally beauty supply
FOR INSTANT RESPONSE TO QUESTIONS FOLLOW ME
INSTAGRAM:@sofreshdyamond
Snapchat: Sofreshdyamond
Twitter: Sofreshdyamond
Like my NEW Facebook page: https://www.facebook.com/sofreshdyamon...
LIKE MY MAKEUP & HAIR PAGE
https://www.facebook.com/pages/Glamor...
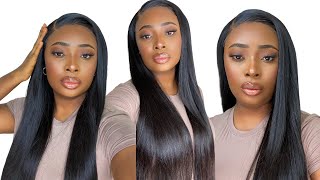
Finally, this tutorial on how I make my wigs, so the hair I'm going to be using today, is from my first wig. This is some Indian hair. All the information will be below in the info bar. This is the cap that I'm going to be using today to make this beautiful bombshell wig. It is just a spandex dome cap that I put on a mannequin head and the reason why you see this tape on the mannequin head is because I sometimes use five bundles on my wig caps and having tape around the medaka head just stretches out. The wig cap, where it makes the wig cap a little bit more bigger now. What you see me doing is putting like these little hair pins around the perimeter of the wig cap to secure the wig cap down. So it does not move around a lot. So that's what I'm pretty much doing here here, I'm taking my needle and I'm going actually through the track. As you can see, I do this because it secures the track down on the cap and I pull the thread all the way through until it gets to the knot. That'S at the end. Now my threading is not the best, I'm not a professional. I don't do hair for a living, so this is a technique that I like to do when it comes to making my wigs. I don't have a particular way that I thread my wigs or thread my width. I just do it, you know, and I just make sure it's really really snug at the beginning, because you definitely want to make sure the beginning of the track is very secured onto the wig, so you won't have any problems with it moving around next, what I'm Going to do is take a hair, pin and pin it down on the track to keep it from moving, and it's also going to give me a straight line. So next I'm going to take the track or take the thread through the cap, pull it through and loop it through I'll. Do it again, okay, put the needle in the cap, pull it through loop, it and there you go. So I'm not going to speed up the video just yet I want you guys to exactly what I'm doing is very simple. Everyone has their own way of sewing, but this is just the way that I like to do it. I'Ve never had any issues prior. So you know know if it's not broke, why fix it? So I'm just going to continue to do this until I get to the folding of the track and in case you're wondering about my fingernail polish, because you guys are always so in love with it. I am wearing the SC nail polish and it's called ladylike love this polish. So let me just show you guys how the weft looks after I have sewn it down see. This is all I do simple easy. You can do it too. Now, when it comes to folding over my tracks, I don't like to cut my WIPs. So I just fold my webs over and what I do is a fold the weltover I take a pin to make sure the web stays flipped and I'm going to take my needle and go through my track. Do not go underneath your track. Go through your track. As you see me doing here, it may be a little difficult to do depending on how, depending on if the wealth will, let you go through like how I had to do it that I had to will go the needle through the wealth, but once you get It you know kind of loose a little bit. It becomes a little bit more easier, but just keep pulling, but just be gentle not to rip the cap. So that's all I do when it comes to flipping over the width. I just really go through a couple times to make sure it's secured and flat and not going anywhere, really love it. So anyways I'm just going to stop talking and let you guys see again how I do my wedding or how I sew down my hair and I'm just want to speed it up just a little bit guys because this video is SuperDuper long. I'M going to come back and explain a couple, different techniques that I'm using in this video, so you guys can see what's going on all right, so, as you can see, I like to bring my track all the way to the front of the wig cap. If you decide to do this, do not sew the band on the wig cap, the elastic band. If you were to sew it, your wig is not going to stretch so go like on the cap, but not on the band. It doesn't really. It may not make sense, you know right now, but if you have the cap in front of you, you will definitely see what I mean like. Don'T sew the band just sew through the cap not going through the band but through the cap, and that's why you see me struggling a little bit right here, because I'm trying to make sure I actually go through the cap and not that elastic band. I just wanted to point that out because I would hate for someone to sew that band and when it's time for them to put it on their head, it's way too small, because it has no stretch ability so yeah. I just wanted to throw that out there. All right now, depending on how you want your hair styled, will depend on where you want your closure to be. I pretty much like to just put my closure right in the center of my wig, because I can just shift my wig if I want it like a side part or something like that, so I'm going to put the closure a little further down off of the Wig cap - and I do this because it lays a lot more flattered if you do it that way, so don't put the lace close to the edge of the wig cap. Have the lace go down just a little further than where the wig ends or the wig cap ends and, as you can see, I'm just gently sewing the let the closure down I'm not pulling on it. You want to be very careful when you're doing this, because you definitely can damage the lace and keep going all the way until you get to the back of the closure, and I'm going to show you why. I don't like to go all the way around. My closure, with this 1/3 when it comes to sewing down closures, I like to do one side at a time, so I'll do one side and I'll finish it off at the top, where the middle and then I'll go to the next side, and I will work On the next side and gently pull as I'm doing and that just makes sure that your closure is going to lay flat, it's not going to have a hump in it because you are pulling as you sew and because I know that's going to happen. That'S why I only sold down one side and by me working on the opposite side. I can now pull that piece down to make sure it doesn't bunch up while I'm sewing it down and as you can see, the top of the closure has like a little hump on it, but I'm going to fix that by just gently pulling the closure once The web has gotten close to the closure. What I do is fold over the width and go through the wefts go through the track to secure it down and have it flat like this, I'm almost getting close to finishing up with my wig. So what I do to close up my wig is, I begin to lay my tracks. Horizontal and I'll. Show you in just a second once I flip this last track. So, as you can see, I'm going to flip this last track and I'm going to lay it over like this, I'm going to continue to do this until I reach the closure voila. Here'S the wig. It is very full and wavy, I'm just going to take a paddle brush and just brush through the hair. To make sure you know, nothing is caught up in any thread, but this hair is absolutely gorgeous. I did not realize how beautiful this hair was. Until this finishing of this wig, like this hair, is so thick in full, like Wow, look at that it has so much body and, like you, can't see any tracks, except for that track, right there, of course, but the rest of the hair, you can't see any Tracks because I sew my tracks so close to each other now this is what the cap looks underneath and I'm going to show you guys how to cut the cap. So you can see your closure, let's go ahead and finish out this video with me, showing you guys how I style my wig, as you saw in the video. This is pretty much how the wig looks once it's done, and this is pretty much the inside of the wig. I don't like to sew my wigs down, so what I do is I sew a elastic band that you can get from like a fabric store and sew it on the sides of the cap, and I'm going to show you how I put it on okay and Then I just pull it down to my liking, so let me just get it right. This hair is very very pretty like look at that and I got my favorite shirt on like I love this superhero shirt. Like I love this superwoman shirt, I love it. I'M going to go ahead and put a clamp right here to keep me from parting, my hair. So, as you can see, I'm going to have like a pretty deep side. Part look. Sorry cash. I week just hit cash okay. So I'm going to take my clamp. Oh I'm really not going for like small curls, I really want like big loose curls, so I'm going to use a bigger curling iron towards the bottom and then use a smaller one towards the top just want to make sure it's hot okay, it's not as hot! Yet s Whitney um okay, so, as you guys can see, this is pretty much how the hair is coming out and I'm really really really feeling it yeah I've pretty much got in my hair parted, where I wanted to be off camera a little later, I'm going To go back and tweak my part some more because I definitely want my part to be a little bit more longer, just gon na add a little bit of foundation to that part. This is totally optional. Some people don't like to do this. Some people add eyeshadow or some people just go ahead and bleach their nuts. I didn't do that, so I'm just going to do what I did and to me it just looks a lot better. This is pretty much the look that I came up with, as you guys seen. I did no layers in this hair. I just pretty much curled it and, as you can see, I just kind of flipped my bangs coming inward in order to get the bangs to look so full and voluminous on this side. So I didn't do anything special didn't do any type of layering. It was super easy, it's all about the flick of your wrist. It'S all about how you curl your hair. I hope you guys enjoyed this video, I'm so sorry, it took so long for me to do this video, but it was so much to do this. Video, like I had to get it at an angle so that you guys didn't see my arms, my hands, my back and all this other stuff, so it just took a little while to get the proper technique down on how to film the video. So you guys can see how I sold the hair onto the wig cap. Well, thank you guys for watching and I'll see you guys in the next video bye


Comments
Zanetta Rose Jones: I love your personality. And this is the best and most easy tutorial I've seen. Bought my first set of bundles recently & now I cant wait to try this out. . Subscribed!
Terrika Love: I really enjoyed your video! You gave a lot of detailed instruction with sewing and how not to sew through the band and what not! Thank you for such a helpful tutorial!
Rhonda Tyus: You did a great job, it looks gorgeous!
CARTER: new subbie can't wait to try this! love the way everything came together!!❤❤
LaneFamilyValues: You made the process very clear and informative. You've inspired me to make my own wig now. tfs!
MyFirstWig: You really did amazing job, very informative! So easy to understand!!! Thanks for sharing! Yay!
S M: Best diy wig tutorial I've ever seen. Beautiful! I've just subscribed.
Taylorgang34: Great video! Very beginner friendly! I love your nail color!!
Natasha Frye: I absolutely loved this video it turned out just lovely you really made this wig pop best one I've seen so far you got skills girl
Caramel Kiss: Thanks for the tutorial! I'm loving your hair.
Stacey Styles40: I love how it came out...you are beautiful and the unit looks fabulous on you
CoCo The Goddess: It came out perfect, U looked so beautiful. Thanx for the tuturial :)
tubes200708: Looks great love the curls
Megg Lafaye: beautiful and simple ! thank you
Elauntra Seoul: Your a really good teacher and I like how you go into detail with an example to follow what you mean. You should really go into teaching!! Very well done
Charlie's 2nd Angel: So Beautiful! !!!!! Great job!
kersha beaver: thank you. you got right to the point. you explored everything very well. can we get a bleaching and coloring tutorial. you just gained a new sub. keep up the good work
Tvocalist Bishop: Love it!!!!
College Woman23: I know this video is old, but the hair was styled so beautiful and it looks gorgeous.❤️❤️
Rolande M: Beautiful job!
Ethel Kasonga: I made my first wige aftr watching this video and it come out nice
Jungle Naps: The final result is stunning. I just wish you could make me one lol
B Michelle: New subscriber; love your channel already!
Tarshia Davis: Yasss you slayed this. I really enjoyed.
Desi Poo: you're so sweet and beautiful and make great easy-to-follow videos! keep it up girl!
falange frank: so beautiful!
Nina Baby: Love this look on u an as always ya makeup looks beautiful❤️❤️❤️
Sharla Martin: It looks really good!
Maravlogs: Love it
genese decius: love this I never thought I'd see some one wear duck bill nails so well either
VaeGracee: LAIIDD!! You def did a good job!
Sonia Sylvester: wow....fantastic job....
Chasity Grimes: Love, love, love!!! Thank you!!
beautyvixen1 TUT-DOLLZ: love it!
MIMI0HESSA: Amazing vedio , your bundles are so thick i love it did you ask for specific density?! ,,, i always wonder how is it like when you put you fingers through the wig can you feel the sew?
Jamillette Claudio: I am always watching your vides and I love it !!!! you inspired me to do a YouTube channel on hair and other things thank you soooo much!!!!! my videos are coming soon
Ebony Faith: Thank you for the in depth tutorial...will attempt to try this...A video request to consider for the future what about a teeth whiting (if you do it) or oral hygiene... something to that effect... Thanks Be Bless!
Cheryl Mitchell: Thank u 4 sharing ur video ur wig is awesome the lace closure look so natural. The wig look beautiful on u it the best I've seen.....
Leanne Peterson: Very nice. Luv the makeup and nail polish. Since subscribing I have not been disappointed. Every video is great.
Auntie Pony: This is beautiful
Margaret Stevenson: So GORGEOUS !!!
ThatsSoNij: does the dome cap usually just for your head ? I've seen a few of ppl say their wig came out too small bc the cap size but I have in an sewin so I can't try my cap on
Shay Lynn: So pretty!!!!!0
Ju Tarver: FINALLY!!!!!! YASSSSSSS HUNTY
Faith In Trust: Love this So is that a stand for the foam head??? If so where u get
Nat-Nat C.: awesome job,.. thank u
Lex Go Financial: is it hard to avoid sewing into the wig head?
Adrienne Peterson: I don't mind the long video,i love your videos wigs save my life when im late for work
Curi Elise: Beautiful Hun!
Paity's World: the hair is really nice!
Briana Brito: I need a wig like this!!
Alishia Lindsay: Thank you!!!
PrincessLexiseLicious: Great video!!!
AlwaysBeautiful: You're so Gorgeous . Love it!!
Felicia Menders: good job love it
TGTᐯ: love the video. You made it look easy
Malaysia Jones: How do you measure your elastic band so it won't be so tight for your head ?
Latisha Grant: I love the shirt & and the hair is cute as well
SuperPhdiva SRB: No apologies needed. this was a Good video. the wig came out nice and beautiful. now I want to try.
Tashira Weeks: yessss I've been waiting on this thanks boo you did a amazing job
princessnerra: Very Pretty!
camipoox3: Would you recommend using the dome cap if you have a small head
SheShells Beauty Shop: Nice. Similar how I made my wig
NaturallyBeautiful4R: . Love your videos. But do a clothing haul for summer. I need tips lol thanks
Keisha Lewis: Luv this wig. Do you make and sell them.
Z Beauty: Yassss I love those bangs! and I was just about to comment on your shirt right before you said something lol tfs
Carmen BlakeTv: very nice you did well I also added you to to my play list so I can watch it again.
Ronixoxox: i followed your video and my wig turned out lovely! only problem is when the wind blows all of the elastic band and tracks around the perimeter are exposed please how do i prevent this
All Trends With Samore: awesome Tutorial
Thalassa Harry: Where did you get that hair from and how many inches is it?
Ethel Kasonga: wow this is the best
Dana Gee: Beautiful
BodyByKym Fitness: I loved the video
MzBombshell06: makeup tutorial on this look its fire!!
FlexiMom 216: thank u for the band info that was really important
R. Boyd: Hello, Excellent Video!!!! Could you Just show us how the Her Hair Curly Wig is doing (I hope that wasn't a Sow in). I love that hair on you. Also are you familiar with NARS Skin line of products? and How about a review on "Bronzers" What your Favs? Are you considering doing Curly for the Summer? Thank You!
Elaine Cochrane: I so wish I'd seen this an hour ago.just sewed wig to band and its like a pea on a mountain now..lmao..had to fill in the spaces afterward.
gladys weveti: WOOOOOOW!!!!
FAITH FUFILLMENT: Fanatastic!!!
Princess Davis: I love your wedding ring
Sandra Green: I missed the horizontal flip over sew part, do you ever bleach your closures? Did the wig last long?
ladynefertitibk: Great video. Thumbs up.
Jamelia Gordon: beautiful
Jasmine PrettyFlawless: Sooo Fab Boo!!!
Ethel Kasonga: Best teacher
Stephany limage: Don't you have to measure your head first before making the wig?
Ashley Davis: lovely
Danielle DeFreitas: Honey you need to make more videos like this. I have watched a ton of wig making videos and this is by far the best at teaching. I can honestly say after watching I have built up the confidence to try. I've been saying this for months, but never really saw a method I deemed easy to follow. You are bomb! Great teacher! Thank you!
Jocelin Hamilton: Thank you for sharing this helpful video, I order the wonderful product from newigstyle..com two days ago
Tina Sethman-Benthall: Beautiful and I like how you broke it down so we can understand it as well... but can you make this for me from looks you would have more skills then me sign aloprcia women.
MzBombshell06: yes. makeup tutorial on this look
Breanna Rankin: Why did you use that cap and not the one with holes I want to make a wig for my birthday but don't know which cap to use
BodyByKym Fitness: I'm not understanding why you had to sew on that blk elastic band when you could have just used the can?????
Ke’Ke The Gem: are those the duck tip nails?
QueenCoCoaMocha: Where u from? u sound like a southern bell...like the wig and style same wig style I make...good job
Patrema Gilbert: cool
Dani: Remind me of tierra marie
Venisha Richie: She did her nails herself I noticed that but I love an educated sophisticated black woman we winning
Patrema Gilbert: yea pretty