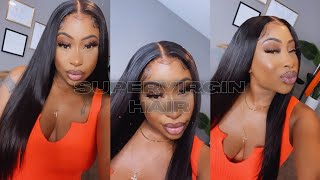
613 To Icy Blonde With Pink Balayage | Wig Tutorial Using Box Dye! | Ft. Super Virgin Hair
- Posted on 08 April, 2022
- Lace Closure
- By Anonymous
●▬▬▬▬▬▬▬▬▬Super Virgin Hair▬▬▬▬▬▬▬▬●
Get $5 OFF use coupon code: WSD38
Hair On Video: 26inch 613 Blonde Straight Hair HD Lace Frontal Wig 13x4
30% off Buying Direct Link ➤https://bit.ly/3tstCLf
Check out website➤ http://www.supervirginhair.com
50% Off IG SALE FOR PROMOTION ➤ https://bit.ly/3wpD5oy
30% Off HD Lace Frontal Wig Body Wave Link ➤ https://bit.ly/3ivN03G
35% Off HD 5x5 Lace Closure Wig Link ➤ https://bit.ly/3wrQJaT
20% Off 38 40inch Long Straight Hair Link➤https://bit.ly/3CZBebr
48% Off 613 Bob Wig Link➤ https://bit.ly/3NcM4j9
Social Media: follow@superhumanhair
Whatsapp: +86 159 1575 5966
Email: [email protected]
______♡ Kaviar Kez ♡______
If you found this video helpful or simply enjoyed watching thumbs up!
☝Subscribe & turn notifications on!!
✨ Enter my latest giveaway for you chance to win a free wig! ✨ Giveaway Ends April 30th 2022
Business Inquiries
Follow me on Instagram
Hair IG:
@kaviarkez
https://instagram.com/p/CNnt5MkHVkN/
Bye, hey guys, welcome back to my channel, i'm caviarquez. I hope you guys are all doing well today we're going to be talking about this beautiful wig that i have installed. You guys are going to actually see me transform just you know your standard 613 wig into this beauty, if you guys want to find out how i slayed this wig and got it looking like this, with only using drugstore products continue watching today's hair sponsor is super Virgin hair i've worked with them a few times already. This is, i think, my third collaboration with them. I tend to lose track. At this point, i have a 26 inch straight 613 wig. This is in the 13x4 frontal and it is, i believe, either 130 or 150 density bye, so this wig definitely looks beautiful, as is you can just wear it like that if you want it, but it's definitely very blonde for me, i'm going to tone her out Before i even put any color on it, and i'd probably recommend not doing this, if you are going to do what i did to it in the end, so this is what it looks like, but i wanted to show you guys anyway, what it looks like, after Being toned, if this was just what you were going to do, and you were just going to leave the wig like that, i ended up stripping the toner out of it from the purple shampoo afterwards, because some spots took too well to the tone and some spots Didn'T take as well as i would have liked, so it was giving me a bit uneven and i was not here for that, so we will remove it. I did use some dish soap to remove the toner and before you move on to the next step, you definitely want to make sure that you rinse out the shampoo thoroughly. So there's nothing left on it before you go in with any color onto the wig. You definitely want to take your time and go in really small sections, because this step it's really important, because you can't really see what you're doing at first until the color starts to develop so you're, literally going in blind with it. But just kind of you know try to do your best to kind of get an idea of where you're applying the color and where you want it see how it's looking kind of like gray, that's what we're not liking, even after i rinsed it out. It still looked like that, so i'm going in again and i'm like. Oh it's still looking great, so i actually went in once more you guys. I don't think you guys will see that in this footage, but i went in again on the roots because it was still giving gray, but right now i'm applying the toner before you apply. The toner definitely want to towel dry, the hair. You don't need it to be dry, but you definitely don't want it to be. Like dripping wet, so you know the toner can really saturate the hair and make sure that you're really running through and making sure that everywhere has the toner on it. So you don't miss any spots, because that's gon na look pretty messed up in the end. If you do miss some spots, we're going in with the pink color this one took really well to the pink. It started processing really fast and you guys can see how beautiful it's looking already and yeah soon we're gon na start installing her, but that's how she turned out. This is what she looks like before the rinse and now this is what it looks like after being rinsed out beautiful, very icy wow. You guys, i'm loving how this turned out. It'S looking so subtle, but so pretty! Oh, my goodness. I'M super excited for this insta. Oh, what's that a ball cap? Oh no! Yeah! Let'S not talk about that! For this install, i really felt the need to do a ball cap just to give this really clear. Like this lace, when i say it's clear, it's see through girl, you put it up to your face. You cannot see lace so um. I knew i needed to do a ball cap. You know just come correct for this unit. The rest of the video is going to be my standard. You know procedure that happens over here on my channel. We'Re gon na be using the evan spray to secure this unit and we're just gon na go from there so enjoy the rest of the video leave. Your thoughts on this install and the color, if you have any questions about anything, leave that in the comment section i'll catch you guys in the end of the video, where i give my final thoughts so casually keep diving into sleep while concrete in the back seat. What'S left of me, drowning in my face is like an ocean negativity is getting closer. Sometimes everything just gets hard. Sometimes they just i remember what you were saying. Sometimes keep losing negativity is getting. Sometimes everything just gets hot. Sometimes everything just gets harder feeling like sometimes a bit of it. Thinking about the stuff. I keep think about the stuff we play. How i'd rather do that instead, me this week started out as a normal 6 13. um. I actually had quite the journey to get here, but once i knew what i wanted to do was just about executing, so the look that i was going for was based on an image that i saw. I saw a wig okay. Let me show you guys the image that i saw online okay and i was like girl. I need to do that with my wig. Can you see how cute it is, and i really feel like we did that? Do you guys think we did that so on this week she has a shadow root, not very wide, maybe like a half an inch to an inch and then it's like pretty icy blonde, and then it goes into like a platinum, pastel pink. So i was thinking about curling it like that too, but it is a straight wig, so i wanted to leave it straight, so we use drugstore products and for the pink. This is what i used and i'm going to show you. I showed you guys all the products that i use, but i use mostly faria products. You can get this anywhere in any drugstore. That is the color that i actually put on the end. It'S called smoky pink another shade that is really important. Was this ice ice blonde? It is a toner, so it's gon na tone out the color. You don't need to have it like on dry hair when you're applying it. I actually applied it first and i didn't leave it on long enough because, generally the rule is like toner. You can leave it on between 10 to 20 minutes, and i was hoping that, like you know, the 10 minute mark would be enough, but it wasn't. Thank goodness, i had some left over in my bowl and i also had to redo the roots, because the first attempt it was looking kind of gray with the color that i used. So you definitely want to use more of like a ashy brown on the root you can use whatever you want. You can use black if you wanted a really dark root, but i didn't want like a jet black root. You guys would have seen me try to purple shampoo this hair. Now it did tone out quite a bit, but what i noticed from the purple shampoo, which is very common with a lot of like 613 wigs is some spots, will take really like well to the purple shampoo. So i actually rinsed that out. I actually used like some dish soap and that took the purple and the blue tones completely out of the hair, and then it went back to yellow. So when i put it on the mannequin to actually color the roots and do all the other stuff. That hair was already like back to its like 613 color, which was pretty yellow so from that. This is what we got it to with this color here, it's beautiful, you guys definitely recommend, and this hair looks so beautiful. You guys i did straighten it off camera, because obviously it would have been a lot of work to do that part um on my head, but yeah. I straightened it and with one or two passes, that's what it came out looking like and for this week, 26 inches, definitely very, very long, i'm loving it. I really love this wig 4613 wig that i pretty much colored twice. It is holding up really well, as you guys can see, it is silky. It'S not looking like a lot of those like 613s, which is very stiff. It'S not stiff at all, as you can see, i'm running my hands through it effortlessly. That'S what you want from a 613 wig if you color treat it you want it to look like this and still move around and have bounce just so you guys know if i was in the hair salon, i would not be coloring a client's hair like this. It'S just a wig, so i can just like slap it on the color and just like you know, not necessarily do like perfectly clean sections, because i know what i'm doing and like i know the end results like so i don't have to like go in and, Like do like really fine sections, but if you guys were like hoping to learn something from this tutorial, do your roots and then towel dry, the hair, because if you're using this one it is a toner and you can apply it with the hair damp like towel. Dried but of course, when you're washing out the color from the root, you don't want to use any conditioner just use shampoo and that's it when you're applying toner. You never want to apply it to like hair that has like conditioner prior to the color. Then. Lastly, go in with your ends because the color the pink will still penetrate through, even though we did put another color like throughout the hair. I would actually recommend drying like this part where you're coloring and i was trying to do it in like a balayage kind of way technique where it's like going in like a v direction. So when i'm applying the pink, i'm not just putting it in a straight line because that's going to leave a demarcation line and it's just going to look like blunt - you never want that. Right say this was a strand of hair. You would apply the pink like you know in the bottom of the hair and then go up on the side and then up on this side, leaving a v shape in the middle that creates like a natural flow to the color. As you can see, it just naturally flows into each other, and it's not like a really blunt line, and we did that here as well. So when you know you're applying your roots, you never just want to stop like right here. You don't want to ever just apply it just like that. You want to apply it and then say this is my brush, i'm applying the paint. Sorry i'm applying the color and then, when i get here, i might go fan it down just a little. Just a little here just a little here, so it's not such a blunt line, if that makes sense, anyways guys. Those are my tips, that's what i recommend you doing if you're going to try this at home. Let me know what you guys think of this install. Let me know what you think of this color. I know i don't oftentimes do like transformations with my wigs, but every now and then, when i actually have the time i love to play around in hair. Those of you who know i did go to hair school and you know, became a hair stylist. So i love hair and i love creating, and i love coloring and things like that. But i want to show you guys colors, that you can do and things that you can do at home, not just like things that you can't find in the store nearby these things you can get anywhere. You can get them at walmart walgreens if you're in the states shoppers drug mart. That'S where i got my hair dye from you can do it at home. I hope you enjoyed this video. Don'T forget to thumbs up this video leave a comment share it with somebody. If you like thanks so much for watching you guys, i got ta run not literally run, but i got ta go i'll catch you guys in another video real soon again, all the information to super virgin hair is gon na, be in the description box below check Them out they got really good 613 hair for an affordable price i'll catch. You guys later bye.
Comments
Tiffany B: I love this extremely helpful tutorial slow enough for everyone to follow along
Michelle Grant: I love this tutorial You did a great job Loving everything you did, the colors are fire♥️.
Michelle Grant: I don't know if it's just me but i really enjoy watching your videos!, The color, the install and all the process was flawless
La'Joia Creary: Yayyyy a dying hair video You definitely did a good job on the dying process it came out so goodIt’s the pink mixed in with the blonde for me !! Matter of fact it’s the whole wig for me !! I loveeee this color on you boo look so silky smooth I love it !! Totally agreed on the v shape for the dying method nobody don’t want blunt demarcations on their wig that would look a mess lol❤️
jojo P: That ash blonde is BEAUTIFULLLLLL! Love it girl nice job
Mellie M: So pretty I love the pink touch
Kaviar Kez: ☺️ hope you all enjoy today’s tutorial! Leave your thoughts on this video!
Brooks Curry: Felicidades, es un buen ejemplo. 250 sentadillasl son unos sexy-dating.uno muchas y un buen ejercicio. Se deja ver que hay muy buenos resultados Saludos desde la Cd.. de world los mortales abian apreciado tan hermosa mujer.k
Ynda Chelc: Yes ma’am !!
J B: What’s the difference between toner and color?