How To : Lace Closure Quick Weave | Fluffy Edges On Lace Closure | Curls W/ Crimp Iron | Ft.Beaufox
- Posted on 04 September, 2021
- Lace Closure
- By Anonymous
Hey my loves In today’s video I’m using my lovely sister as a model & we’re installing a 4x4 lace closure w/ 3 bundles we decided to do the fluffy edge look today w/ crimps how did I do? This video is beginner friendly . Use my discount code (BEAUFOX05) for extra money off thank you for tuning in !!
♡ ♡ ♡ ♡ ♡ ♡ ♡ ♡ ♡ ♡ ♡ ♡ ♡ ♡ ♡
Thank you for being apart of my family! Subscribe and hit the bell for more amazing videos!
♡ ♡ ♡ ♡ ♡ ♡ ♡ ♡ ♡ ♡ ♡ ♡ ♡ ♡ ♡
Business inquiries email [email protected]
▷ CONNECT WITH ME!
TWITTER ‣ https://mobile.twitter.com/xeel__?lang...
INSTAGRAM ‣ https://www.instagram.com/xeel__/
Shop /Book me Www.Alexissjay.com
Follow My hair page : @Alexissjayy
Product Page: @AlexisJaycollection
▷ OTHER VIDEOS YOU MIGHT WANT
♡ ♡ ♡ ♡ ♡ ♡ ♡ ♡ ♡ ♡ ♡ ♡ ♡ ♡ ♡
HAIR INFO
#beaufoxhair #beaufox #bundles #wigs
——————Beaufox Hair——————
Body wave with closure 22 22 22+18 in the video: https://bit.ly/3kp3ECX
Popular Body wave bundles: https://bit.ly/3mAiQQe
UP TO 38% Off on Aliexpress by 828 Sale, Add to cart now!
Beaufox Hair Aliexpress Official Store: https://bit.ly/3Dicz1x
Follow Store + Add Hair to Wish List ↓↓↓
●Get $6 off on Aliexpress Beaufox Hair Official Store
Promo code: BEAUFOX05 to get extra $$$ off
Top sale water wave wig: https://bit.ly/2WhNeUV
Top sale straight hair wig: https://bit.ly/2WuiDDr
Highlight water wave wig: https://bit.ly/3gxP2jr
Top sale Body wave wig: https://bit.ly/3gAJ2Xg
Top sale water wave lace wig:https://bit.ly/3gxDf4L
Straight hair bundles: https://bit.ly/3muKdLz
Loose wave bundles:https://bit.ly/3DlVu6G
613 Body Wave With closure: https://bit.ly/3gxDz3t
Follow us
Instagram: beaufoxhair.aliexpress
Facebook: beaufox hair aliexpress
WhatsApp: +8613080153636
Ema
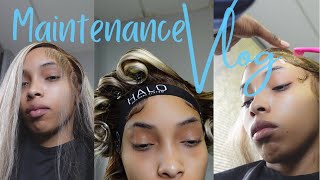
Guys welcome back to my channel in today's video. We are definitely doing another hair review. Today'S hair is from blue fox hair and they sent me a 18 inch closure and three bundles of 22 inches. The hair was body wave guys, and this is the hair. Without me, taking it out the pack or anything just so you guys can see how it came straight out. The box, my lovely model today, is sorry everybody say hey. We are going to now match the cap to her skin color. Before we even get into laying this closure - and today we did decide to do a quick weave guys, so this cap is completely put on. I didn't show you guys how i put the cap on, but all i did was put a socket cap over her braids and i did boo cool glass of glue hairspray every time. I do my quick weave, that's how i do them. The quick weave like the glue, never get on the hair. None of that. That'S just how i do my quick beads. So we are doing the glue uh lace closure show. I will have her hold it while i sew around the perimeter. The reason i'm sewing is because i don't be feeling like gluing it down and holding all that pieces down. I just throw it and make it easy peasy. Let me squeeze it and then i glue the rest in just so. You guys can see. I am sewing on the cap and like onto her hair because she do have two braids to the back. So just in case i was like what you sewing onto that's what i'm sewing onto and i just showed y'all. So i will also take and cut the excess little bands off the lace, because we want it to look as seamless as possible and those big bulky pieces. Just it don't make it look seamless at all, so we're gon na just get rid of them all together. We will be using boho today and you will need four layers of this glue. I will not be showing you guys me applying the whole four layers, but i'm just showing you how the layers should look. This is the first layer and you want to make it as thin as possible and let it dry completely clear and then you will go in and add the other layers on top of the clear glue. Don'T make it dry too much not just make sure it. Just turned clear so before i even start the quick weave, i want to make sure the closure is laid in place, how i want it to be so, of course i parted it down the middle and i'm going to also part out the baby hair. So we can lay that and glue them tricks in now that we parted out the baby hairs. We'Re going to use this. Can this spray y'all is really good. I don't use the guy to beat anymore when it comes to. You know spraying the lace after the glue is laid. I put that spray on it. I'M gon na get the direct name and tag it below for y'all, but this is a new love spray that came out, and i am in love with this spray. They have a yellow and a red can, and i'm telling you all the red candy starting to be my fave, yes, ma'am, don't mind my dog in the back. She is just being out of control with that toy. Every time i'm recording y'all. She wants to hate and play with that toy. I'M just confused like i said they did send me three bundles and a closure, so i'm going to quick, weave her hair in i'm just showing you guys the hair out the packaging we are using glue. Now i'm doing a little ghetto, y'all cuz, the top to my glue is gone, but i just want to show you all the process of me doing a few tricks and it's really so easy and it's all the same thing. This first track is how i will lay every last other track on her head, and when i did the cap, i did take out the glue and gel her hair up in the back and then put glass to be blue around the back of her head as Well, just so the cap could be all the way secure, and i told you i did spray a lot of got to be glue hairspray onto this cap, and here i'm just showing you guys that i did keep the tracks combined when i was putting the glue On just so, you can see how i got the fullness, because i don't like to really do single. You know single with anything. I don't really do that when it comes to undoing the fold and just doing the tracks on singly, i don't do that. I like it to be full and i want to use all of the bundles, so that being said, you have to double them when putting them in okay, so we are now at the top of the quick weave and i'm just closing it out at this point. Just so you guys can see oh and here's a little glimpse of my nails. They'Re really cute. I didn't show you all today, but whatever here's um, basically the finishing how the fullness looks in the back, you can't really see like the whole picture, but you get an idea of how full it looks and i'm just go drying her and getting her ready. So we can style her here. We are about to cut off all of the excess lace. You guys - and this part is pretty self-explanatory. All you're doing is just cutting off the excess lace and make sure you get as close as possible to where you glued that. Just so, it could be as seamless as possible. I'M going to also take this concealer just to outline her part. So i can take the black spray and you know make it look real crisp and done up that black spray is really my best friend y'all. It be having hair lately. We are now about to go in with our gorilla snot, just a gel, the um hair pack. This is one of my favorite parts. I cannot miss this part in the install, because i'm feeling like i'm sending when i do that this makes it really neat like it makes you it makes it helps you smooth the hair as flat as possible before hitting me with a hot comb, and when i Do this i sit my clients under the dryer for 15 minutes. Just so the hair can completely dry. The glue can dry. The edges can be laid. Everything is a 15 minute. You know drier time for me, so the style today is crimps guys. I really love crimps. Now, i'm really getting into it. I want to give me a smaller crimp iron, so i could do smaller crimps, but this to do and i'm just showing y'all a few pieces of how i crimped her hair. I did use the got to be glue blessing spray just to make the hair you know tacky and hard. I do prefer that to use pump it up, but i could not find my pump it up at the time, and i was just trying to finish recording this video, because i was already recording the video for at least a good four hours y'all. This video really took some time, but if y'all are ever interested in, like a behind the scenes of my day as a youtuber, a full video make sure you comment below, because i did make one for tic toc any day go crazy. Everybody really enjoyed that video. So if you guys want to see like a behind the scenes of a youtuber or how it is when i'm setting up in my videos what i do, how it goes comment below, because i really don't mind sharing that with y'all and i'm pretty sure a lot Of people would be very interested into knowing, like my setup and everything, so i really don't mind showing you guys that so, if you're interested just comment below and let your girl know what you want to see, but um yeah we're going to finish, cramping her out And then i'll just tune back in now before y'all say anything. I know her hair is giving balls five hours when i'm hot combing, but it's not a bald spot. That'S just the noodle cap. I didn't add a track over that part, but i did take the black spray and spray it once i got done. Um cramping all of her hair. I took the black spray and sprayed it over the noodle kit. Here'S a small video of her hair after crimping. It i'm now about to take this powder and add it to her lace just so we can get more of a skin type of vibe and then i'm going to style her edges. So the reason i am cutting the edges so long is because i'm curling it with the hot iron right there and i'm curling it, because it really gives off a really pretty look like. I love the curly ends and the just the naturalness of the edge. When i curl it so what i did was curl it clearly duh alexis, but i want y'all to know and i'm taking the guys to be spray and i'm just foaming the curl into the edge. How i want it to leak, simple, easy piece and, like i always say, take your time when you're laying the edges, because it's going to take time, don't rush it that's the first thing people are going to see when you walk into the store, walk anywhere. You want your head to look good, make sure you take your time on your edges, because it's not like an overnight thing. I know people be saying it's really hard, it's really hard, but once you get the hang of it, it's really not hard. It'S only hard to you because it's new to you so just take your time and really focus on it. I feel like once you play with it enough, because clearly you see, i'm not getting it right on the first try. I have to keep going until i get it. How i want it to look, so that's basically how it is you just got. Ta keep molding it until it looks how you want it to look as of now, i'm just finishing up this hairstyle, i'm taking the hot comb and just flatten it out a little because it was sitting up a little high and, like i said i did cover Up that patch with black spray, so you can't even see it anymore and here's the finishing look of my sister's hair. She looks bomb. Of course, yes, ma'am make sure you follow me on instagram and twitter at xcel underscore underscore get into it, get into it. Peria! Yes, sister, it was cute, this is the backyard. The hair was really really full. Those three bundles was more than enough most definitely well, it wasn't more than enough y'all. It was just enough not more than enough make sure you get three bundles. Don'T try to get two and be cheap, anyways. Here'S the full indie love y'all,


Comments
Imani Stewart: it's the products for me never knew ebin had hold spray
Towonda Grant: Gorgeous ❤️
Destiny Rakestrau: They have a black can of the ebin spray too, it’s my favorite!!
ForeverSadeBeauty: Did you fold the tracks or you cut them when laying the tracks on her cap??
Bentonia Ratlieff: It's the accent for me