How To Do Natural Sew In Weave With 7X7 Lace Closure The Best Curly Hair Celie Hair
- Posted on 02 September, 2019
- Lace Closure
- By Anonymous
Hey Love new video on this natural sew in weave Natural Sew in weave with 7x7 Lace Closure Hair from Celie Hair
elie Hair Deep wave 24 24 26 with 20 7x7 Lace Closure
Direct Hair Link:https://www.celiehair.com/brazilian-de...
★Celie Official Store : www.celiehair.com
( Use Coupon Code: “FabbulousC”Can Get Extra 5% Off )
Follow us get free gifts ➤http://bit.ly/2sD7ttm
Hot Recommend 360 Lace Frontal Wig➤https://www.celiehair.com/wigs/360-lac...
13x6 Deep Parting Lace Front Wig ➤https://www.celiehair.com/wigs/13x6-la...
Top Selling 13x4 Lace Front Wig ➤https://www.celiehair.com/wigs/13x4-la...
New Arrival Full Lace Wig ➤https://www.celiehair.com/wigs/full-la...
Celie Bundles With 6x6 Lace Closure ➤https://www.celiehair.com/bundles-with...
2019 Celie Fashion Sale ➤https://www.celiehair.com/promotions
Wholesale Price: WhatsApp/imessage +8617537405382 Email: [email protected]
#celiehair#celiedeepwave#deepwavewith7x7laceclosure
★Top Brand Celie Aliexpress Store ➤http://bit.ly/2Zus8mC
Celie Deep Wave With Lace Closure ➤http://bit.ly/2LfJ2fU
Celie Hair Top Selling➤http://bit.ly/2ZIehrW
Contact us :+8618539029540 Email: [email protected]
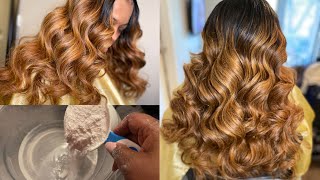
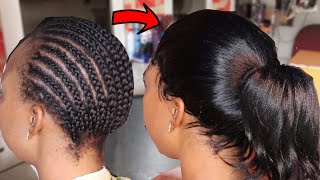
Hey, oh it's Caroline, so this is the new seven times. Seven lace closure install. Let'S just get started re. Also. The hair today is provided by silly hair and I'm saying the name wrong. I will list the name in the description box, for you guys to check out the hair came in this beautiful packaging. Silly hair sentiment is resilient, deep, wave, hair, three bundles of hair in a lace closure. This timing, 126, 126 and 124 long length bundle and then they send me a 20 inch lace closure, okay. So this is how the hair King and this Herod Emma justice, just how it looks on camera. This hair was extremely soft, even after I wet it and put it on the water. It was extremely salt is a beautiful cutter and it really turned out nice. So this is how the hair looks. The hair is just beautiful, curls very soft. I didn't have machete with it. It was just beautiful now this is the closure. This is your 7 times 7 list closure. It has a very deep Y parting space. They gave you the limit on having a frontal, but is not as as big as the frontal. The frontal goes from ear to ear this one just go over your forehead and it gave you that advantage of having a beautiful, hairline alright. So this is my closure. The first thing I like to do is prep my closure. Ok, the first thing I did was: I did bleach the not on this closure. Ok, now, all I'm doing is ha combing it. Why I'm plugging it out? Ok the closure. They come free plug already, but I still had to go in and pluck it out. So more just to get it to my desired. Hairline, ok and I like to use the white tower under the closure, and I use the hot comb why I am plucking it at the same time. They just gave me a more precise look of exactly where I'm plugging in hot in the hairline is looking. It just gave me a more precise look of how I would like my hairline to look once I have it on my head now. If I was doing this on my client most likely, I would put it on my client before I do it after plugging, but this is on myself and I like to do thanks before it gets over my head, because I don't want to be struggling to do It wise on my head, so I'm just I'm prepping my closure now and I'm looking at it as I do it and then I'm gon na take my tweezers and start to plop it out all right. Like I said, the hairline already came free plugs, I'm just plugging out a little bit more just to define my own hairline and just so thin it out really good how I want it to be okay. This is how I prep my closures before starting my sewing. Weather is frontal or a closure, alright, alright. So after prepping my closure, this is how it looks. I'M ready for my install. Ok, you can see how beautiful that hairline looks alright. So the first thing I'm going to be doing is doing a ball cap method. Okay, i'ma do the ball cap Matt. Take this just helps protect my hairline and my hair from the glue that I'm going to use in the front. It also helps gave me like a scab effect underneath my lace closure. That'S why I do the ball cosmetic. So once I put the seconds on, I go ahead and take my pair of scissors and put holes in an ear. This just helps the ear part lays down a little bit more flatter next, using my got to be hair spray, I'm going to use that right in the front of the stockings. This just hold the stockings in place so that the second does not move around once. I have the stockings secured in place, I'm using my thread and needle and I'm going to sew on the middle of the stockings, and that would keep the back of the stockings down and in place when I do mind so in next, once I have the front Secured and the back sewn down the stocking is in place. I'M gon na take my blow dryer now and blow the got to be glue spray so that it's completely dry after that I'm taking my pair of scissors and then I'm going to cut off all the extra stockings in the front. Next, after cutting all the extra stockings from the front and the back I like to go in with unweaving next for the back, I love to use weaving. That'S all of my sewing. It just helps your soul and lasts a little bit longer. It holds your thread in place, so I just love using the weaving net. So I'm going to measure that weaving net on to where the stocking stops and then I'm going to take my thread and needle and I'm going to begin to sort of weaving that in the back all right. So once my net is attached in the back, I'm taking my pair of scissors and I'm cutting off all the extranet around those so in so this is pretty much my base for mine so in whether is a closure or or frontal so in okay. Next, I'm just using a little bit of my foundation powder, I'm applying it to the stockings. This just helps in the stocking, so it matches my skin tone a little bit more and then I'm going to also take the same foundation powder and I'm going to apply it to the lace closure and that would just help the lace closure list matches. My skin tone also all right it's time to apply my glue, I'm just using some alcohol and wiping my forehead just removing any oils and makeup. Okay, using my ghost bank glue, I'm going to apply three layers of glue. I'M apply the first one. Let it dry clear and then I'm applied a second in the third one. Okay, you supposed to wait for it to dry completely, but I was in a rush with this part with the rest of the video. I had a brother party book and I was running through time and my friend was waiting for me, but I needed my hair done. Okay, so I was rushed to do this part. So I did not wait for the glue to dry completely, but you have to wait for the glue to dry completely all right. So after I apply my third layer, it was time to stick my closure down. Like I had a nice, my baby looks okay. That closure looks fine all right anyway. All I do is pull the closure to the front and just hold it and stick it down on the glue. Okay, if I was doing this on my client, it would be much easier, but I'm doing this on myself. So, of course, I am struggling a little bit, but I'm definitely getting it done. Okay, all right! Now that the front is secured and flat. Okay, we're gon na move on to the back section, I'm going to use my needle and thread and we're going to sew down the back section, moving all the hair towards the front. Okay, I'm going to make sure that the closure is nice and flat back there and then I'm going to take my thread and my needle and begin to do the sewing. I'M just going to sew from the left side and work. My way till the middle back of the closure and then I'm going to come to the right side and work my way to the middle back of the closure. Alright, so the closure is nice. This he killed his flat in the front and is securely soon down. In the back, ok, this closure is very beautiful to hear you guys can see. I watch this hair. I bleached the nuts okay and the hair just is still beautiful. It still has the curl putter, it's just a beautiful hair. Okay, I'm just checking now I'm parting, the hair, we're just making sure that I did so the coach shut down as flat as possible. I'M making sure that I don't have any lumps or bumps in between the closure, and that's all I'm doing and I'm checking and you can see how beautiful this hair is. Okay, now, after that, we're going to move on to putting the bundles in on in from the back all right, starting with my bundles in the back, I'm going to be using my thread and my needle and I'm going to begin to install the bundles okay, we're Gon na run through this okay, I'm going to start from one side of my ear and then I'm going to work my way across my nape area and then I'm going to move on to the other side of my ear. Using my thread and needle I'm going to start to sew down the bundles now you see that little stockings that I left on the side. I usually leave that there. When I do my ball cap, I doesn't cut that part off until I complete my so in in the back once my sewing is done in the back, then I will go and here put some water on that ear tab, and then I will remove that part Of the stocking, so I always leave it there just for extra security and extra hole for my bundles to be installed nicely near my closure piece. Now, while doing this install, I am doubling my tracks and what I realized is the space is very limited on my head with days 7 times 7 closure. Now, when I do a regular lace-front to an arrow to squeeze in 3 bundles of here, but with this 7 times 7 closure, because the culture is extremely big, that space on my head is very limited, so I wasn't even able to add 3 bundles of hair. I was only able to add 2 bundles of this curly hair because I didn't have much space to deal with, so this is about two bundles of hair that I have on maybe like one and a half, and I realized that was in my space. This closure is deep in the back, so it does take out most of my top part of my head, okay, so that was the owner space I had left, so I just wanted here and took my last piece. This was about maybe like a half a bundle that was left and I'm just going to attach it near the closure, and that would be pretty much it for this sewing. So this one only consists of two bundles only and I didn't even use all the two bundles. It was like, maybe one and over a half of the other bundle, and I still have a little bit of piece left, okay, but that was pretty much it. I could fit with this hair in this closure, so after applying the last piece, the last web near my closure. This is how the closing is looking. That'S the perfect closing okay, so my sewing is complete using just two bundles and there's seven chance of a lace closure. Okay, so my soul in install is done in the back, I'm going to move on to styling. So the first thing I'm doing is taking my pair of scissors and I'm going to cut off the extra lace in front of the closure. Then I'm going to go ahead and put some makeup on, because I've been giving you guys a bare face. Okay, I'm gon na put some makeup on and then I will finish up this tower brand new girl back with my makeup on so let's finish up this styling okay, we're gon na move on to the next step, which is melting, our lace and making baby here. So the first thing we're gon na do before melting our lace, we're gon na make some baby hair. I'M not a fan of too many baby here, but I'm going to make a little bit of baby hair for this hair because it's curly hair it just looked nice baby hair looks very nice with curly hair. I just don't like too many baby here. Okay, so I'm just taking a little bit of pieces and I'm cutting it and I'm going to use my Nairobi mousse so slick it down just to help conceal the lace in the front and just make this hair look much more nicer, all right! So after making my baby here, you can see how beautiful my legs look in the front. Okay, I didn't even do the meltdown, yet I can say what leis okay anyway, now I'm just taking my sanic scripts and I'm going to type my baby hair down just making sure that my lace is melted. Okay, then we're gon na move on to curling and styling and defining these curls next, I'm taking my big paddle brush and I'm going to brush out the curls. I love brushing out my curls before defining my curls. This just helps to remove any knots or tangles in my curls, whether it's in the back or the front, so I brush all of it out next, I'm taking my spray bottle of water and I'm just going to spray the entire hair. Okay, this just helped define the curls before I go in with any type of product now I did want a middle part with this hair, so I did give myself a middle part and then I just prayed the entire hair down using my curling cream from Canton. I apply that all over the hair after curly hairs is dry. He tends to get frizzy if he doesn't use the right brother. Using this prodigious help, keep the curls maintained the curls those days give it a wet look, and it just helps that curl stays less frizzy. Throughout the day, then I went in with my watch stick and I slicked out the top of the closure. Then I took my curling iron, which has been plugged and I just slid down the part, my middle part just to make sure that is nice and opening, and it's nicely why and the top is looking sleek okay. Next I took my cynics off and I realized that I really wanted the curls more defined because it was still looking a little big and puffy. So I went in with more water, even though I already put the powder in it, but I used more water and I defined the curls even more, and I love love love the finished. Look. It just gave me that natural curly look like it was like. It was my real hair. We all know it's not my real hair but girl there soul in look so good. I was so excited. I was so happy that I really tentacles and the way the closure was set up girl. This looks so natural and so beautiful, but that is it. This is my finished. Look after the curls are dry. Okay, look at how natural that looks, and one lace, though, what lace? Alright, all right, you guys! So I wanted to come to you guys to tell you guys about this hair. This is my day forth, going on my fifth day since I did the sole and install, but I was so amazed with this hair quality before editing this video. To put it up that, I have to come and show you guys how great of a curly hair that this hair is. Okay, I've been rocking it now for for going on five days and all I have been doing, I don't even tie it up at night. I just go to sleep and wake up in the morning. I just maintain it with my curly routine to keep the curls poppin, but I just want to show you guys how beautiful this hair is. Okay, so my fourth day on it - and I really really love love this hair and I'm not doing anything much we're just waking up and doing my curly routine and all I've been using on this hair. Is this reaming balls, leave-in conditioner, I'm using my regular spray bottle with water? I wet it down. I put the Remi leaving condition and then I'm adding a little bit of Canton cream, just a tiny bit all over it, and then I go in with my paddle brush. Okay. I know my brother brush has here or over again I'm using my paddle brush to clean it out and to maintain my curls and the curls has been popping okay. So I just want to come to you guys to talk to hell. You guys about this fabulous fabulous hair, so I'll leave all the information about this here in a discussion about because I'm actually been loving, loving this hair. Okay, thank you so much for watching. As always, I love you and I will catch you all in my next video bye,


Comments
Brittany Smith: . I just love how you take your time and explain as you go. Another perfect video
Sweet P'zzz: I think I'll try this, thanks to you! Great job again.
MsTina'sEverything: The hair is Beautiful I love it great job
Missy Grando: That's a bomb curl pattern.
Corletia NaaNa: I've missed you. Love watching you slay your hair.
Nuk D.: Yesss , you slayed that
Slim Coco: Beautiful.❤❤ How long did it last?
Dawn Evans: Love this!
beautifulonekg: Beautiful
Destynee’ Warner: omggg i love thissss i love your videos xoxo
Twana Pickens-Stevens: Beautiful
Flwls Barbie: Great video
LIFESTYLE with EDNA: Beautiful, you Facebook photo made me curious to see how you came off with the hair... beautiful
Gianni Boler: Love your accent, is it less maintenance compared to the frontal?
Glenda Rogers: Which hot comb is that pls ? The name ??
Lakendra Davis: Where are you !!! I need this style in my life I in fl
Lorpu Zeegar: Caroline, I love the hair