Watch Me Slay A Body Wave Lace Closure Install | Ft.Cynosure Hair
- Posted on 16 September, 2019
- Lace Closure
- By Anonymous
●▬▬▬▬▬▬▬▬▬Cynosure Hair▬▬▬▬▬▬▬▬●
#CYNOSURE HAIR Brazilian body wave
Brazilian Body Wave 3 Bundles With Closure➤
Bundles with Closure on Aliexpress➤
Top Selling➤
Lace wigs on Aliexpress➤
Free Coupons➤
●▬▬▬▬▬▬▬▬▬social info▬▬▬▬▬▬▬▬●
Follow us on IG & Facebook :
Instagram: @cynosurehair_aliexpress
Facebook: @cynosure
Whatsapp: +8618603991327
Want to promote ISEE hair???Contact: [email protected]
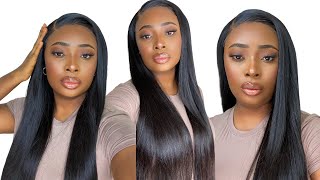
Hey guys and welcome back to my channel, we are back today with another lace, closure, installation and today I will be using here from a CMO Shorthair. They sent me over it's for body wave bundles of 28 inch in a 20 inch matching lace, closure and it's just a regular 4x4 lace closure. However, this help was extremely soft and so pretty and so long and as far as the closure it did come. Free plus, it looks like it's um light brown lace, so I'm just gon na go ahead and bleach the knots and I did not have to do any plucking for this lace closure. So pretty much. I just installed, as is after bleaching the not-self. Let'S just jump right straight into this tutorial, so I'm going ahead and bleach the knots and already put the foundation on both sides of the lace closure. So now I'm just gon na go ahead and begin to lay my closure down and now. How are we doing a center part today? You know with the body wave and I haven't done a body wave lace, closure installation as of yet on my channel so where, as far as like a sin apart, actually I did do a body wave, but that was with a 6x6. But today we are using a 4 by 4 and it will be a middle part like I mentioned so yeah, let's get two ways so first things: first, you want to go ahead and cut off those thick pieces on each side of that lace, closure and I'm Just laying the closure down in the center and as I'm sawing it all around, I will have her hold that closure in the front down that way. I can sew it down nice and flat and nice and tight, and that will help create a very, very like natural result and flat results when you are parting, this lace closure down the center and once I finished sewing disclosure down all around I'm just gon na Go ahead and take the second stocking cap, when I do my quick, weaves I'll, always use two stocking caps um to protect the hair from glue, so I'm just gon na go ahead and on flex that closure out of the way and begin to put down my Other cap and begin to bond in those tracks now I did not get into detail about blowing the tracks name, because this is pretty much self-explanatory and repetition. You just want to glue the trash from the bottom to the top, just starting down at the neck area and working your way up before I do my bondings, I like to just spray the caps with the pump it up, spritz that helps the glue, stick and Um yeah pretty much ups, the glue stick when you are laying the tracks down and I do use the 30-second pro a bonding glue. You can use the other regular bonding glue, really doesn't matter. It does the same thing, but I just like to buy the 30-second Pro because it comes in that big, huge bottle, so I don't have to buy blue too often and yeah. I'M just gon na go ahead and bond those tracks up on from the bottom to the top, like I said, I'm just going in a circular motion just from like one side of the head to the other side, creating like half circles all the way up to The top - and I do let my last track like right at the closure, not on top of the closure, because you might want to take the closure off and replace it so I'll just do it right underneath the closure that way, you can go back in and Cut the thread off that closure and replace it if you would like to, and that goes for a bonding or a so when I do the same exact thing so to frame the face. I do like to curve the trucks a little bit towards the front, and that way the hair can fall somewhere in their face and just not straight completely to the side. It'S just something. I'Ve always done. It'S not really like a reason. Why is it's not I'm not saying that you know the installation won't look right if you don't do exactly what I'm doing is just something I like to do, because when hair styling on other people is very important that you do from their face, you know so The style can fit them so I'll. Just pretty like do that with every client that I had. But, however, I'm just going to continue to glue these tracks all the way up to the top, and once I get close enough to the top, which is now I'm gon na, go ahead and cut that cap from on top of that closure and then glue the Other tracks, you know towards all the way up to the top. If you give it I'm saying I know I sound a bit confusing, but I think you guys see what I'm doing you should pretty much get it. But, however, now that we have finished blowing all of the tracks in and I'm going to show you how long and full this hair looks once we get towards the end of the video, because I just wanted to really zoom in so you guys can see what I'M doing um, but you guys can see the full length and thickness of it like I said this is four bundles of 28 inch, so yeah it was really really full, but now I'm just kind of going with my board whole active and I'm just want to Lay that glue the same width as that lace, closure and just taking my right toe palm. I'M just going to spread that glue out nice and flat, and I did three layers of this. I'M just showing you guys two layers here and you just want to repeat the same steps up to at least five times. It'S really up to you now. Lately I've been using more of like four layers for such a three, but you know it just really depends on what you want to do, but you can use up to five layers and once that dries clear, you will go ahead and pull your lace down until That glue and I'm just going to blow-dry that using a warm setting and then I'm gon na go in with my comb and just kind of like comb that lace into that glue as well. And this will help you melt that lace down into the glue like that glue were really soaked, and so that lays and that's exactly what you need to get the actual melt down that you want. So I'm gon na go ahead and do that and then I will proceed on with the next step. So now I'm just going to take my scissors and begin to cut away that extra lace moving my hands in a zigzag motion and you want to do that. So you can achieve the most natural results and, as you can see, this lace closure is looking very, very natural and someone actually like as far as lace color. What do you use for skin tone, or what do you recommend if you are a medium brown to dark brown? I recommend that you use the medium brown lace as far as lighter skin tones, I would say, use the transparent lace, because you can just apply your foundation color, underneath what you could do for any skin tone, especially when it comes to blonde hair. It don't matter what skin tone you just use their foundation, they should match, but or lace 10, but um. I do recommend for installations that lighter skin tones use, transparent lace. That way the medium brown lace doesn't really like. You want it to match and look most, you know as natural as possible, but if the lace is already darker than their skin, then it's not going to look as realistic but anywho. That was just answer that question for those who were ever wondering. But now I'm gon na go in with my love me: hair um wax stick. I couldn't find my shears bottom, so I'm just going with an alternative and I'm just going to hop home out her roots of this lace. Closure because you do want it to lay as flat and then smooth as possible, and it will look more neater and more natural that way as well. So I'm just want to take my time and really getting that closure and flat on those roots out to the tea honey, and then I'm going to go in with my new baby, which is the bed hair, hair styling spray, and this is a new thing. I'Ve been doing, and I actually like the results of it like before I lay or before I tied down any lace unit with the melt belt with my melt belt. I just like to take that Bed Head spray and just spray it right across the whole hairline and then tie it down and that just really really helps with the lashes being like really secured and laid down into the skin and melted. So you guys will see me do that right here. So this is the bed head, it says masterpiece, but it's a hair, styling spray and I like to spray they're all on a lace. It doesn't make it lift or anything it actually makes it feel a little tighter, and I just like to tie that down and let that dry and now why is drying? I am gon na go ahead and like put some Wong curls at the top, because you know after um washing out your body weight clothes. You do lose that pattern. So I'm just gon na go on with my wand, curl a little bit and curl that top area, but now that the top has dried. This is what it looks like after removing that melt bail, and I like this um hair styling stone, because I can just call me right out - and it's back soft, some somewhat like what the mousse does. If you want to use mousse and tie down the lace it gets hard, but once you comb it out is soft. So yes, this is why I am loving this bedhead styling spring, so I'm just gon na go ahead and comb that baby hair area out and just take my scissors and just chop it down to about an inch or less, and I will begin to swoop her Baby hairs and just make sure you blow-dry each baby hair as you move along. That just makes the process much easier and you don't have to worry about any lifting lace. But I'm just going to take that bad hairspray once again and just spray. The top area of this lace closure just to get every hair tech down smooth and in place, and then I will go ahead and get her part clean, smooth and secured, and I'm just going to take the end of that rat tail comb. And this is very important: do not just spray with black spray make sure you lay your tail end of the comb into your part, didn't spray the black spray and then go on with your concealer or foundation and using a concealer brush and just make them line In that part, and that's how you would get that really clean, really neat car, like don't just black straight, I heard people say: oh, I forgot to make a comb there and I just had to take alcohol and clean up. My whole part make sure you lay that comb and it just makes life so much easier, but this completes this install. As you can see, this hair is super long, super full and super pretty. So I hope you guys enjoyed this quick little tutorial and thank you for staying tuned. To I mean beautiful, has the TV till next time?


Comments
Brianna Jaliyah: This is so gorgeous ❤️
Lauren Glisson: Hi! This was a really helpful video! Did you use all 4 bundles that was given or 3?
Mariee Mariee: Thanks for the video , I am going to do this on my hair tomorrow
bxboo823: Looks beautiful
BraidsByNetNet: Beautiful!!!
La'Joia Creary: I love this !!
Princess Toyia: Amazing as usual!!!
Jenah Nelson: I love this
Mar: Thanks for going over the lace options
Byanca Santos: Fica quanto tempo ?
IAMBEAUTIFULHUSTLERTV: Thank you everyone
Marie love Desilme: I love u so much You make everything easier and simpler I have question Do I need to go to school to become a hairstylist or one on one lesson from a hairstylist?
Miata’s Touch: Slay per usual
MakemeupQuita: This came out cutee ! What’s the name of that black spray for the part
amari209: Great video! What’s the name of the concealer you use on the part?
LIFE OF MIYAH: What was the length of the closure and the bundles
J. Jay: shes pretty! so good hustla
Juspye Hair: Where can I find the black spray
Datasia: what brand , number concealer did you use ?
Juspye Hair: Was that got2b that you used for the baby hair??
Shay Woods: Do you make custom wigs ?
Pretty Niecey:
Katina Nicole: Cute
Jay🧿♥️: Any small channel want’s to grow together ♀️