Watch Me Slay This 5X5 Hd Lace Closure Wig | Deep Side Part | Ossilee Hair
- Posted on 31 October, 2021
- Lace Closure
- By Anonymous
Hey Lovelies, In this video we are going to be customizing and installing this 5x5 HD lace closure. I really hope you enjoy this video.
---------OssileeHair----------
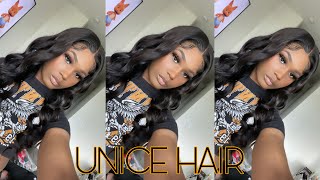
Hair Details: 5x5 HD Lace Closure Wig Deep Wave Wig 26inch
Prom code on Ali: OSSILEE3 $3 off over $100
OSSILEE5 $5 off over $200
Direct Hair Link➤➤
https://www.aliexpress.com/item/400043...
4x4/5x5/13x4 Hot HD Lace Straight Hair Wig
https://www.aliexpress.com/item/400037...
13x4/13x6/360 Body Wave Wigs:
https://www.aliexpress.com/item/400038...
613 Lace Front Wigs: https://www.aliexpress.com/item/400053...
Highlight Straight Wigs
https://www.aliexpress.com/item/400038...
Ossilee Hair on Aliexpress Shop Link:
https://www.aliexpress.com/store/14152...
Ossilee Hair Official Website:➤https://www.ossileehair.com/
Pls use “ossileehair”to save $6 on our Official Website
Contact us
Facebook: @Ossilee Hair Products
Instagram: @Ossileehair1
Email: [email protected]
Wholesale Inquire Whatsapp: +8619303748555
________________________
#5x5laceclosureinstall #5x5closure
INTRO: 00:00 - 01:04
BLEACHING: 01:05 - 02:32
PLUCKING: 02:32 - 03:37
INSTALLING THE WIG: 03:38 - 11:39
STYLING BABY HAIR: 11:40 - 13:42
FINAL TOUCH UP: 13:43 - 15:03
OUTRO: 15:04 - 15:37
Hey lovelies welcome back to my channel. I am the basil mercy in case you don't already know, and in this video we're going to be slaying. This 5x5 closure wig we're gon na, be making it look like a frontal giving it that frontal vibe. If that sounds like something interested make sure to keep on watching love you so lovelies we're just going to dive right into this video, so the wig i'm going to be using today is from ossilee hair. They sent me their 26 inch deep wave 5x5 closure wig. This is what it looks like straight out of the pack. It comes with these lashes, and this is what the hair looks like all right. It'S actually very gorgeous. I love the curl pattern, so you could just see how it's constructed. This is how it came. It came with three wig combs and also the adjustable strap. So the first thing we're going to get into is bleaching our knots. You can see how that does not look all right, we're going to lighten it up a little bit by bleaching our knots. So i just went in to use my developer and my bleach to actually bleach it. So the first thing i just use my got to be: freeze, blast spray and just spray that on the closure and then comb it back because you don't want that hair. Actually getting with your bleach because just going to turn it light all right, it's going to make it lighter, and you don't want that, so i'm just going to go ahead and apply that on my canvas head and then apply it in bleach. This is the consistency of my bleach. I think it's a little bit too thick, but it works all right. It'S a bit too thick i'll make it lighter than that. If i was to do this next time, but it works, i just didn't want it to sleep. I didn't want to have an over bleached knot. I i wasn't going for that today, all right, so i just go in to apply that very gently without pressing all right. You can see how gentle i am with the brush. You see why i started to see because it's very it's kind of hard to spread, but it works alright, so i just went in to apply the back for a while then later on, started applying the front, so i didn't put the bleach on. At the same time, just to give it time to you know maybe cook will i say that because it takes more time at the back than at the front. So this is what is looking like. I still have a little bit of dark knots in there, but it's really not that bad all right. So this is what it looks like after we're done. Glitching the knot. I just went ahead to wash it with my purple shampoo, my shampoo and my conditioner. So i'm just going to go ahead and pluck this wig for plucking coily hairs. I normally like plucking the water just to give you that very slight back look before i start plucking. So for plucking. You just want to make sure you're moving all right, you're, plucking and moving. That'S really the trick to it. There'S no big deal. You just make sure you're pulling the hair right from the knots. So you don't get a lot of flyaways and just make sure you're going and not staying in one place. Really, that's really it you just kind of vibe with it until you get your desired taste or your desired hairline all right. So that's all! I did for plucking, so i actually went in to just kind of pass it. So i don't over pluck the pattern, but i ended up not using this side pattern. I ended up using my other side, so it really didn't matter because i didn't even have both patches on the part that i plucked already. So i just kind of go ahead with my flat iron just to kind of see my hairline, and i want him to put a paper towel under it just so i kind of see my airline better. So now i'm going to install that wig on my head. All right, so i'm going to have to gel my hair all to the back and then i'm just going to take my alcohol and just kind of clean out any grease or any oil that will prevent my wig from sticking just to give it a very clean Surface then, i'm going to take my stocking and just kind of wear it and then kind of do a little something something to just make it stick. I didn't really do a broadcast board cap per se because i didn't actually just take my time and make it because you know it's going to be for a five by five closure and not for a front out. So i didn't really go all in with it. But yeah, this is what i did so i'm just going to go ahead and cut off any excess stocking cap that i feel is going to come out from the wig, because you don't want that. You don't want your stocking cap to be before your week or before your list all right, so i'm just going to go ahead and apply foundation on the area i'm going to be working on and also apply foundation to my lace, all right just to get that Very nice blend all right so much with my skin, because that's what we're trying to achieve all right. So this is what the list is looking like before, and this is what it's looking like after i mean that difference. Can you see it so we're gon na? Go ahead and put that wig on my head and baby: it's already it's already, given it's already given. Actually i'm actually, i love the process of putting this wig on. So now, i'm just going to determine what size to do. I was thinking this side or this side. I really don't know what good side parts for me. What side is it my left or my right? I'M not really sure. Let me know what you think, because i actually kind of just did it so you can choose for me. Is it the left or the right, but i ended up going with this side and i just thought it was cuter all right. Let me know what you think, so i'm just going to go ahead and clip that hair out to the back to avoid it from getting into my way, while i'm working on my list so the secret for getting that very flawless, install that very flawless laid down. Five by five closure: it's cutting off these tabs all right, cutting up this portable lace by the sides of your lace. All right, you want to make sure you cut it all off. That would help you get that very seamless blend, because that's what we're trying to achieve so i'm just going to go ahead and cut off mine. So i'm just going to go ahead and push that back, because now we're going to apply our glue today, i'm going to be using my got to be glue. So i'm just going to apply this on with the t end of my blade, all right, i'm already going to apply one layer because i'm not going to keep this wig on for long. So you can top up your layer as much as you want, depending on how long you're going to be wearing the wig. So i'm just going to let that dry, clear and then i'm just going to push the wig to wherever. I want my wig to start from all right, so there's no room to applying wigs for me. I don't think, there's any brew, it's just what works for you. What works for your face? What works for your face shape if you have a low hairline or you know, whatever works for you works for you, like i always say so, i'm just going to go ahead and use my comb to just push the lace on the glue all right just to Make sure the lace and the glue kind of marry each other all right, so i'm just going to go ahead and pack my hair upwards. Just so i can place my slick belt on the lace all right, so i actually like the sleek belt a lot because you can actually make it as tight as you want all right, you don't have to struggle with tying your. You know elastic band, so this is what is looking like. You just have to wait for 10 minutes or more depending on how you're feeling that day, all right, so i'm just gon na go ahead and take off the sleek belt, and you just see how how late that is already looking all right. But i'm just gon na go ahead and comb that hair off, because it's kind of slicked down because of the bell to put on it. So i'm just going to comb that off. So now, i'm just going to go into cutting my lace, all right. So cutting your lips, the trick is always make sure you cut in the zigzag pattern, don't cut in the straight pattern if not your lips will be very detectable, rather than when you cut in a zigzag pattern. So that's really the secret for cutting your lips. There'S nothing more to it, so i'm just going to go ahead with the ends of my take home and then just apply glue to bearings and glue down on my lace. All right, you just want to make sure you secure every part you don't want those teeny, tiny, tiny pieces standing out all right, so just make sure you go in with the glue to where it's needed. So if you plan keeping this for a long time, i advise you actually just go in to stitch the ear to ear you're going to see how i'm pulling it down. You just want to go ahead and stitch. Those two points i wasn't keeping this wig on for long, so i mean there's no need doing it, but i'm just telling you in case you want to do it so now, i'm just going to go ahead with my beauty, sponge and then i'm just going to Kind of get rid of that white cast using my foundation, then the next thing i'm going to do is bring out my baby hairs and guys. This is really a face that this is up to you. Whatever baby hair, you like being dramatic, be very little baby hair be very minimum. Whatever baby hair works for, you works for you all right, so i'm just going to go ahead and just kind of see how i want it, bring it out and then go in with my hot comb and comb it down. So now, while i'm slicking that lace down, i'm just going to go ahead and walk on the way, all right, so i'm going to go ahead and pass it to where i like, and how i want this. We already know we're going to be doing this side. I forgot to mention the wig is more towards to decide i'm going to be patting just so i have enough room all right, so i'm going to show you guys what i mean by that later on, but i'm just going to go ahead and pass it where I like and just see how deep that closure is. Obviously it's a five by five closure, so it's gon na be a little bit deeper than normal, but it's just really deep and i just really like it. So i'm just gon na go ahead with my wax. Stick and kind of just paint that down because you want it to be sleek. Okay, so i'm just gon na go ahead with my hot comb and just kind of slick that down, and i do the same for the other side. But i do the other side in sections, so lovelies, using the back of your hot comb is actually amazing because it gets the job. Well done. All right. So just take note: if it's not working with the comb itself use the back, it gets it's very sleek. So now we're done with that we're just gon na go ahead and walk on our baby hairs all right, so i'm just going to kind of measure out where and how i want my baby hairs to be, and then i'm just going to cut that out. So i'm just going to take my big flat iron and just go through my baby hairs and do the tik tok trend. I don't really have the smosh flat iron. I'Ve been looking for where to purchase, but i have not seen, but it works with the big straightener with the big flat iron. It still works. So i mean why not all right. So this is what it looks like after coiling it upwards. I found out that curling it upwards actually makes it a lot more easier when you're doing your baby hairs. So i'm just going to go ahead with my shine and jam gel and also my mousse and just play around with how i want the baby hair. To look like honestly, baby hairs are just vibes like if it's working that day it works. It'S not working that day. It'S not working that day really so i was going to go in for this, but i was like it doesn't look good, so i took it. The other way - and i just felt it was more cute. Let me know what you think of my baby hairs down below i just i was really cute taking it. This way done the other way, all right. So, that's basically how i sleep down my baby hairs using mousse and my shine and jam gel then after i get it to how i like it. I go in with a bit of got to be spray on my brush and kind of just brush that down all right. That'S how i really stick down my baby hairs so back to styling our wig, i'm just going to go in with my spray bottle and my auntie jackie's, not on my watch conditioner, i'm just gon na mix those two together and just kind of drench. My hair, like you, want to make sure your hair is literally drenched because you just want that very sleek. Very you know you want the curves to come out. You want them to pop out all right, so i'm just going to go in with my mascara wand. Just kind of define my pattern a little bit more, i'm not really. I didn't really over bleach. My knot like you can see, but i just felt doing that to just give those very instagram spray black kind of pattern. If you get what i mean so now back to the baby hairs all right, so i'm taking that off and then i'm just looking at baby hairs. If i like them, you can go ahead at this point and adjust them to how you, like it more kind of adjust it to your liking before you go in with your cut to be spray and make them kind of more stronger and more permanent. So that's what it's looking like, so i'm just going to go ahead with my earwax once again rub that in the palm of my hand and kind of just click back my hair, i'm doing this to prevent too much grease on the hair. So i don't overpower the hair with too much grease all right, so this is what is looking like when we are done and it's slapping it's slapping. You can't even tell me otherwise this has really given a frontal vibe and it's really giving it's giving so much. I love it and i really hope you enjoyed this tutorial. Please let me know your comments down below. Let me know what you think down below. Thank you so much for watching to the end of this video and, if you're, watching the end of this video, you already know you do what you already know: you're the real mvp. Thank you. So much and i'll see you in my next week tutorial love. You

Comments
Grace Meniru: The hair looks so lush❤️ I love it ❤️
TosTos TV: This hair is absolutely gorgeous on yhu!
DERANIE: Love this You go Girl!
Bukunmi Weke: It came out so well
Evelyn Harmon: Learn a lot from your videos thanks gal
Marvy Kim: I think this would look good on me
Seun Shey: Omo I want this
Marvy Kim: Made the right decision with the side you choose
JOAN THEO: What do you record with
Douglas Tonia: Please where is your location? Do you know anyone who does same in Abuja please I want to learn physically
vee naturals: Is it a synthetic wig?