How To Full Sew In With Lace Closure In 10 Minutes Tutorial For Beginners! Easy Protective Styles
- Posted on 04 March, 2018
- Lace Closure
- By Anonymous
SHOP MY HAIR & BEAUTY STORE - https://amorantasia.com/store/ How to do an Easy & Quick Natural looking FULL SEW IN with Lace Closure in 10 MINUTES TUTORIAL for Beginners! NO GLUE, NO LEAVE OUT! This is the fastest Sew in method installation for beginners. I've been using this method since 2013 in my earlier HAIR TUTORIALS! CHECK THEM OUT on my channel https://youtube.com/acurtis2007
✨WATCH MORE HAIR TUTORIALS HERE - https://www.youtube.com/playlist?list=...
SHOP MY HAIR & WIGS Company!
https://amorantasia.bigcartel.com
10% off daily code: YOUTUBE
IG @AntasiaHair
MAKEUP PRODUCTS USED
Maybelline Superstay 24 hour foundation in 355 "Coconut"
NickaK Pro HD Concealer "Lion"
Wet N Wild Natural Photo Focus Setting Spray
HAIR PRODUCTS USED
16 inch lace closure + 16,18,20 inch bundles of Brazilian body wave - http://amorantasia.bigcartel.com/produ...
ebin edge control
Conair Infiniti Curl iron 1 inch
Organix Coconut Milk Serum
FOLLOW ME ON SOCIAL MEDIA
IG @AmorAntasia
Twitter @AmorAntasia
===============================
ABOUT ME
Hi Loves!
To all my new subscribers, my name is Antasia, also known as Amor Antasia here on Youtube! I'm just an regular Christian girl who uploads different videos related to VLOGS, fashion, beauty, lifestyle advice videos, storytime videos, Cooking, health & fitness videos, & DIYs. In my channel you'll be able to find videos of different makeup looks, everyday makeup routines and makeup tutorials I have created as well as how I incorporate different pieces of clothing into multiple outfits like lookbooks, OOTDs, OOTWs, and a ton of back to school videos and regular content. Also check in monthly for favorites and clothing haul videos!
---SO make sure you stay tuned for new videos in my channel EVERY WEEK & TURN NOTIFICATIONS ON!
MUSIC
You’re free to use this song in any of your videos, but you must include the following in your video description (Copy & Paste):
Smells Like Summer (Original Mix) by Del https://soundcloud.com/del-sound
Creative Commons — Attribution-ShareAlike 3.0 Unported— CC BY-SA 3.0
http://creativecommons.org/licenses/b...
Music promoted by Audio Library https://youtu.be/Zyi9QUB-fyo
lace closure wig install, 10 minute sew in, fastest sew in method, Easy full sew in install tutorial, Full Sew in tutorial, how to sew a lace closure, Easy Natural looking Full Sew In, Sew In Healthy Protective style 2018 , Amor Antasia Hair Brazilian body wave
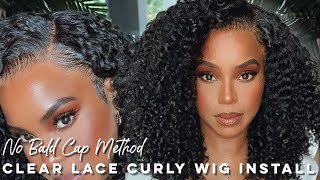
Hi everyone welcome to my channel, so today's video I'm going to show you guys how I got this fabulous so in full sew-in with no hair left out in it. Ten minutes: let's go comment below if you guys have ever tried this method or if you guys are interested in China's method and if you're interested in seeing how I got it, stay tuned now, first going to go ahead and go through the details of the hair. Okay, sixteen inch lace closure, a sixteen inch bundle or 18 inch bundle and a 20 inch bundle, so 16 18 and 20 inch bundles, and this is only 3 bundles, and this is a 16 inch lace closure. The hair is for my hair company, so you guys can check out the 15 percent off discount code or, if it gets art inspired, you can use the everyday 10 % off discount code. Now. This is not a braiding pattern for the middle part. You want to honestly my hair is already braids like this, but I would recommend a braiding part of going down to the side like these two down to the side down to the side down to the side, and maybe one going back, but most of them should Go down the side because you want the middle part to lay really flat, but it's still going to lay flat because my brains aren't really thick, so it's gon na be okay. Now I do have a lot of sewing tutorials with my braiding patterns, and I also did my own hair and I've done clients, so it so go ahead and check out those videos I'll try to link a few of them of my older videos or you can Just go to my channel and then go to go to videos and then click older videos, and then you can scroll it that way: lace closure! Now I did bleach the knots, but you can kinda tell now. If you don't know how to bleach, hair or bleach the knocks, what you can do is use your foundations and just you know brush it all over, but it's not make it flat. Just do like this make sure your settings are not too high, because we will melt your legs, make sure you make it as flat as possible like that. You can test to see how hot it is by going along the ends like trying to do it. Like start it like right here so in case you do melt it you girl, he knows in the outside, but I will keep it on like. Let'S say if it goes up to 20, if it goes up to 35 or 30, put it on 25, going to align the part right here, and if it's not super flat, you can always use a curling iron or curling wand. It'S the best to flatten it out or use a hot comb, but it so you're going to line it up with the part and you're going to leave it out about, let's say a half an inch you see this is where the braid is now. Some people have brains way up here, because their edges are super thick. I don't have it so you know don't worry, though, because you can always be long as you secure this part and back and around you can always go back in and then secure it. You know due west from the top, so I'll show you guys that later, but anyway, so for the rest of this video, I'm going to do a voice over so for now for doing the lace closure, all I'm doing is just sewing underneath the braids just to Secure the lace closure and to make it feel tighter and for the front part I'm gon na actually show you guys once I get around the other side, how I secured that part without any glue or anything like that, I'm just going in one direction for now And then, once I get on the other side, I'm going to go in a different direction underneath the braids. Now this would be handy if you have like type smaller braids that are closer to each other, so that you can just sew. But since my braids are bigger, I'm just filling in the gaps I just I'm going towards the next braid and it's fine. It'S still secured like I said this is a ten minute tutorial. So for you, you know you guys that don't have time to braid like super tight braids. This is just ideal, so I'm just going in a circle or you position and I'm just sewing underneath each braid and I'm just securing my lace closure and, as you can see, I'm going on the other side. You can use wig clips also to secure, not wig clips, but like banana clamps or clamps to clamp that hair together because it does get in the way. But now you can see I'm going in one direction, underneath the braid and then I'm going to go in the front side, underneath the braid to just secure the front part of the lace, since it is hanging out stuff like this, like going from the front underneath And then going from the back underneath now you want to be careful with your edges because you don't want to make it super super tight. I mean, as you brace grow, your hair is going. You know your hair, it's going to move, but for now this is just how it looks and I'm going to secure it after. I finish the whole thing so now I'm going to stick to actually install the u-part wig. This is actually a wig, and so, u part wig without any kind of closure. So what I'm doing is just aligning each side to the braid pattern and I'm just sewing through the lace closure and also connecting it to the wig so that there's no gaps in between and I'm also going underneath each braid and what I love about. This new car wig method is that it's just literally quicker. You don't have to sew track-by-track. You can like cut it within like two or three like different parts of your sewing, and then the whole thing will come down like after you cut. You know a few of the whoops instead of like having to literally take hours till I cut out each track. So to me this just just more convenient. I can take it down and tend to my natural hair underneath - and this is just a convenient selling. So also aside from this - u part that I'm actually sewing you have to you don't have to, but you can secure the sides and then the back perimeter of this solar. This is why it only takes ten minutes and, as you can see now, I'm doing these sides and I'm just literally going under the braid and then securing it that way. Now you to make it even more secure, you can just sew on the little piece of the cap, that's right on the edge and then so underneath the braid, if that makes sense, but I'm just lazy, so I'm just literally scooping underneath the braid and then over Through the wig - and I used a spandex tone cap to do this wig or to make this week, and so that's why it's so much easier to sew for the needle and that's basically it so now, I'm going to show you guys a quick hack on how To secure your lace closure, even if you feel like it's sliding back or if you need to refresh it or just resit, this is what you're going to do just make a straight line, boring horizontally and making sure that you're sewing like on a braid. It has to be a braid there so that it can feel tighter and do it about three or four times and then make sure you have a knot or make a knot, and then you cut it and then do it on the same side. On the opposite side, actually - and you can do this on two or three different parts of the lace closure - without ruining the lace, but this is just a quick way to do it without glue and to secure it. Now you can see that I can still comb through it and it still looks good. You can't even tell that I actually just did that so now, I'm just going to quickly style. This is easy, just a quick curling tutorial. So please give this video a thumbs up. If you thought that I did a good job with this hair and again, my hair company details will be listed in the description box and I'm just a perfectionist with my curls. So I actually had to go to my bathroom and do the other side, because it's just hard filming in front of this little mirror. Now you don't have to plug after you switch the knots, but I'm just plucking a little thin part in the middle and I'm just going to add a little bit of concealer to make it look more. Like my natural scalp, you can do this instead of actually bleaching and not also, and it will look just as natural, so this is it for the customization. Thank you guys for watching make sure you guys thumbs up and comment below with any other hair suggestions that you want me to try. If you guys in my next video


Comments
Amor Antasia: The intro has the hair details but the actual tutorial starts at 0:59 :) THUMBS UP this video if I did a good job!!
rtriceclay: Thank you, finally something I think I can actually do. I just need to learn to do a better braid pattern because I can’t braid my own hair that well.
Latoya P.: Love this! I’m making my first wig this week. Would you recommend this method being easier?
Pam Banks: I love it !! Quick and easy you weren't being lazy that's called wisdom.I will be trying that method.
Shakiyla Bellinger: Awesome tutorial!
elaine Nelson: Definitely did that! Very Pretty! tfs
Andrea C: Yes. Keep bringing us your tips and how to videos. I love them . ❤️❤️❤️
Picaboo76: I think you did an Awesome gorgeous job!!!
Trice Tyme: Yay!!! Yes very easy!
Eva Gibson: Beautiful it's look good love it❤❤ like who else think she did really good
TOWANDA the STYLIST: This is awesome!
Elle Encarnacìon: I enjoyed the tutorial but maybe you can make a longer version and use a light colored thread so beginners like me can see the positions easier.
Shane Accented: This is cute but since I usually wear my own hair, when I do this, I'm going to have to do the fan blowing test to see how it'll look if a gust of wind came blowing out of nowhere lml....The places my mind go sometimes I honestly cannot with myself.
Amelia White: Omg I saw your face and was like my GIRRRL!!!!! Yassss. Let's try to do this method this morning!
SAMUEL Blackman: Look Amazing ❤☺
trecp1969: You did that! Yesssssssssssss.
awklauryn: ok but i really just learned how to do a whole sew in that’s quick lol
Vicky D: That looks great
Chirlinn Rolle: Great job
Aleshia Monét: I would like a wig made with curly hair and a lace front. First time wig wearer...do you recommend trying to make my own wig or just buying it already made. I am pretty good with my hands when it comes to my hair.
Mahek Bajwa: I’m scared too do it fr but I gotta go to a salon to get my hair braided
extrememelonspillage yesyesyesyes: I need this in my life
real _coi: side note: you’re like soo beautiful
Jo Joh: Is the hair sold on the site with closure and wig or someone have to make it for me?
Samuel Ayo: How can I do that?i will start now how to do these braids
Tasha Staton: Ok! Great!
The Earthiverse: This is genius af.. whattttt
Tasha Staton: With this method can u go swimming?
fayfay Devan: I can do that yes yes
PromoSTK Sheilas Creations Way COOKING SHOW: Good morning ☀️
Rye Rose: 800