Step By Step Lace Closure Wig Install *Very Detailed* Ft. Westkiss Hair
- Posted on 21 April, 2022
- Lace Closure
- By Anonymous
***Watch in HD/1080p ***
Hey Friendss
Here’s a VERY DETAILED, beginner friendly lace closure wig install video. I will be going step by step with plenty of on screen tips to have a flawless first install all products are linked in my Amazon storefront as usual unless said otherwise.
▬▬▬▬▬▬▬▬▬♛#westkiss♛▬▬▬▬▬▬▬▬
Hair details: 180% density curly wave 5*5 lace frontal wig 22inch
Video Hair Direct Link➤https://bit.ly/36N7PFL
Hot selling HD lace wigs➤https://bit.ly/3x40E6Z
★westkiss official hair store➤https://bit.ly/3uLPFfr
Up to 43% off Lace Wigs➤https://bit.ly/3uLjfSw
Hot curly lace wigs➤https://bit.ly/3u0LZY8
#westkisshdlacewig #westkisswig #westkisslacewig
#WestKissHair Official Site Huge sale Big Discount
Join Our VIP FB Group Now (Free Giveaway )➤https://bit.ly/3lzmAA8
❤Follow West Kiss hair on social media :
Instagram @westkiss_hair_store: https://bit.ly/2OlKstu
YouTube @West Kiss Hair: https://bit.ly/2Ol5U1m
Wholesale WhatsApp: +86 13323741050
Shop my wig collection SHOPALESHAB
Website link : https://shopaleshab.com
Make sure to sign up for my email list to be the first to know about new arrivals and when I restock.
Make sure to subscribe and like this video! Also add me on social media and my follow my Amazon storefront ✨
https://www.amazon.com/shop/influencer...
DISCLAIMER:
Some links may be affiliate links where I receive a small commission from you clicking on the link and purchasing anything I have listed. No purchase is necessary.
Instagram/TikTok : @shopaleshab
Email: [email protected] for sponsorships, collaborations, and business opportunities.
Connect With Me!
Instagram @lesshhab
TikTok @lesshhab
About Me:
From: Virginia
Age: 23
Camera: Canon g7x
Sign: Gemini
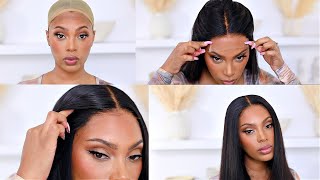
What'S up guys welcome back to my channel if you're new make sure to go hit that subscribe button? If you're, not, then hey girl? Today'S video is going to be on this hair from west kids hair. They sent this straight to me. This is not a amazon unit, guys this is a 5x5 hd lash closure, 180 density, 22 inches and the texture is curly wave. This is how it looks straight out of the box. It comes slightly pre-plugged, but not a whole lot. I did go in and bleach the knots and pluck it, and this is what it looks like after i've done everything we're going to be doing a cute little half up half down hairstyle with this closure unit, all right y'all. So i did go in and attach an elastic band in here. This is one of the adjustable strap ones. These actually come on my wigs. These are the ones that i use but um. These will be. I'M just going to add these to my amazon cart, because these are like a wig makers gift from god. They are so nice and especially because you don't know if every person's head is the same. Some people like their wigs, tight some people like their wigs loose. You just don't know when you're just guessing and attaching one of these. So this is really nice because it actually tightens up to whatever the desired tightness is, and you can unhook right here as well. So i did go ahead and attach one of these we're gon na get into the install i'm gon na be doing a half a pack down with this curly wig that i have from west kiss hair. All the details will be done in this description box. As usual, so i'll be showing y'all a half up, half down with the 5x5 closure um, this is a really cute style. I actually learned how to do this from caroline a on youtube, so y'all go check out her channel. I love her she's, one of like the main hair youtubers that i watch, but she did um a half up, half down style, so i'm actually gon na be doing the same thing with this unit, so keep on watching. So i want to come out with like a beginner wig series, so basically, i'm gon na make this a step-by-step, very detailed, how to install a lace closure unit step by step tutorial. So first thing you want to do is get your wig on and cut your lace. I use these small eyebrow scissors and i just go in a zig zigzag motion. I feel like these work. The best then you're going to take some type of hairspray. I just use the god to be hairspray and spray on the hairs. Take your hot comb and comb the hairs back. You want everything to be out of the way. So it's not in your way as you're, trying to lay your lace. The worst thing in the world is to have hair in the way. Alright. So after that, i'm using my lace tint everything that i use will be linked in the description box on my amazon storefront. This is on there as well. I use the color mocha and i'm going to be spraying that on the lace - and i use the hair dryer on warm heat to just dry. That in today is going to be a glueless install i'm using the liquid gold by the bold hold collection, and i want to be putting that directly on the skin. It is very safe to use it's like a gel, so this is also a no ball cap method. Y'All. I did not use a ball cap. I just put on the stocking cap you're going to want to lay down your glue of choice or whatever you're going to use i'm using this and just spread it out as thin as possible directly in front of the hairline. You don't want it to be too far down y'all. Your wig should not be in the middle of your forehead at all, very close to your hairline so again using my hair dryer to go in with cool heat, not cool heat, but like cool temperature, you don't want it to be hot okay, because this does turn White, if it you know, gets manipulated too much so now we're going to be pulling the lace down and sitting it right in that glue or whatever you use to make your wig stay and i'm going to be taking the back end of my comb and just Pressing that into the liquid gold, you don't want to do a whole, much whole bunch of manipulation because, like i said it will turn in white now, i'm going in with the black can even lace spray. This stuff is the goat. Y'All definitely go get you some, but i'm using it by spraying it on my finger and then putting it directly onto the lace. I actually saw this on tick tock, but it's a great um hack to use for your wigs, because this stuff is very sticky and very messy. So i definitely recommend to do that and then i'm going in with an elastic band and just going to be laying that lace down. So we can get that melt. Okay, the elastic band is really just going to help the wig to get that lace to lay into the skin how you want to so after we get that on. I'M about to show you all how to do the style. I do go in with my hair. Dryer on warm heat, just to warm up that lace underneath of the headband, the elastic band, because if you pull it off before it's dry, it will stick to that elastic band and we don't want that so getting into the hairstyle. Like i said, we did not do a ball cap method, so you will see the wig cap on the parting space. You can go in with some makeup to fix that, but ultimately it wasn't very noticeable. So i'm going in and i'm just parting directly in front of where the last track is right before the closure. So you have the where the closure is sewn and the track, and then you have the actual closure. So i'm parting right in front of that after i get my parts together, i go in with my wax stick and i put it on everywhere where the parts are so we can get this nice and sleek. You want it nice and clean. No messy ponytails over here then go in with that got to be hairspray. I do not use got to be delay. Wigs down y'all i only use got to be for hair styling. I feel like it is a very useful product. I'M not going to throw it away, i'm not going to throw it away because i love it. I just won't leave my lip wigs down with it anymore, but after i've done that i'm going in with my hot comb and just combing everything back like i said we want it. Nice and sleek. Take your time. You don't have to rush. We want it to be as clean as possible. After that's all done, let's go ahead and pull that elastic band off and we have melts okay, so i'm going in and i'm just cleaning up. This is just water. I could not find my alcohol - i don't know where that word it is, but i just went in with some water and cleaned up around the hairline. Now for the baby hairs, i am going to be uploading a detailed baby hair tutorial for a frontal next week, but this right here is good enough for closure, so you're just going to pull out a very thin area of hair um. How thin is going to be just depends on how well you plucked your wig, so keep that in mind. So after i pull out my hair, the very front first section of hair, i go in with some more of that: black even spray and spray it in between and we're going gon na lay it down with the elastic band again. This is just to help that hair to lay down. We have to train the hair on the frontals, because it's not it's not our real hair, so we have to train it to lay down like edges. So after we get that we're going back in with our hot comb to just make it even more neater, i'm obsessed with making stuff clean, like just obsessed, so i went back in again with my hot comb and when y'all see me cut those hairs in the Front we're not going to leave them that long, that's just so they're, not in my face, while i'm trying to get the hairstyle done. I use a regular black hair tie and i tie it around there two to three times whatever your desired tightness is, and that's my ponytail. If you want to add more hair like it's too skimpy for y'all, you can go in behind the ponytail in the back and just add more hair to it. But this hair is super super full. So i felt like it was fine. I didn't even want to water the hair down or anything, because i just loved how it looked like i didn't drench it. I just defined that ponytail part just water and a little bit of mussol and my denman brush. Of course, that is not from amazon. I actually got that from sally's for like twenty dollars, it is a real denman brush. So now for the baby hairs going in with your eyebrow scissors again, i don't like to use razors. I prefer the eyebrow scissors you're going to go up in an upward cut, not down and upward cut, so you want the hair in the front to be longer than the hair. That'S on the back of the baby hair. It will help it to sweep better. Now. I'M going in with my mini flat iron. I got this from my beauty. Supply store for literally ten dollars. Y'All do not spend a whole lot of money on a flat iron. It'S not necessary going in and i'm just flipping my baby hairs up depending on what type of baby hair you want will determine if you go up or down using a regular old edge brush and i'm just swooping those hairs over and you're going to want to Use mousse and gorilla snot. That'S what i use perfect combo. I learned this from somebody on tick tock. I learned everything from tick tock like why not there's so much useful information on there, but i realized that i had too much hair out. So i'm just combing that back into the hairline, but this combo is perfect after you swoop your baby hairs to your desired like style. However, you want it to look, you can go in with that comb side. I only use the comb side y'all. I do not use the brush side, you can go in with that comb side and just go across the bottom of the baby hair to create that line and to make it a lot. Crispier. Looking and you'll see exactly what i'm talking about so right. There i took the end of my comb and i just combed across the bottom to make it a lot cleaner after i've gotten that done. I usually have a lot of product on my hand. That'S left over, so i just take the brush side and dip it into that product and just comb. The hairline i just like to do this because it really makes the hairline pop off like the plucking and stuff. It just really makes it look nice and like clean. I don't know how else to describe it. Just looks so good, so this was the finished look after the baby hairs and everything. I think it looks really really good, but i did notice this white line on certain angles. So i just took my makeup brush that i did my foundation with and i went around the edge and if y'all aren't new, you know how i feel about makeup, but i did not go in heavily. This is literally just the brush that i had excess makeup on and nothing else added, so y'all can use that um. Any type of foundation is fine, ruby, kisses, whatever y'all want to use, and then this is your final look and it should look a lot like this tag me. If y'all do this, um tutorial on instagram definitely go follow my instagram or if you do it on tick, tock tag me and i'll see you on my next video
Comments
Destiny ReGene: this was so perfect & looks easy to do!!
Quamira Lumpkins: Killed this!! Ima learn how to do my own wigs.
Destiny ReGene: now i wanna do this
Julia Nduka: Literally the best tutorial
West Kiss Hair: Super cuteeeeeThank you for sharing West Kiss Hair~
Janis Ford: Omg so pretty
Mikyra J: