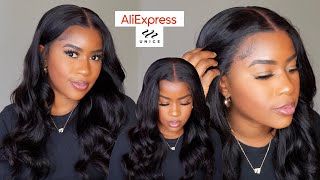
Valentines Day Burgundy Lace Closure Wig Install | Low Hairline | Unice Hair | Missuniquebeautii
- Posted on 15 January, 2021
- Lace Closure
- By Anonymous
#Burgundylaceclosurewig #wiginstallwithlowhairline #Unicelaceclosurewig
Valentines Day Burgundy Lace Closure Wig Install | Low Hairline | Unice Hair | MissUniqueBeauti
In this video, I was able to show you guys exactly how I install a lace closure wig with my low hairline. Having a low hairline means that your hairline begins less than 1 inch away from your eyebrows. A lot of people struggle with this and have no idea how to lay their closure wigs. This wig is from a company called Unice Hair on Amazon. Like this video, share it with your friends and family, and don't forget to subscribe to my channel to be notified of my future uploads.
Follow Me On Instagram@: https://www.instagram.com/missuniquebe...
Follow My Business Instagram@: https://www.instagram.com/missuniquebe...
Shop My Website https://pressedbymissuniquebeautii.com...
Discount Code: YouTube25 for 25% off the Entire Website!
Shop for your favorite beauty essentials! Press-on Nails, Lip Gloss, Mink Eyelashes & MORE!
I also make and sell Headband Wigs, Half Wigs (without the headband) Lace Closure Wigs, Frontal Wigs, & Drawstring Ponytails. If you are interested in having me make a wig or drawstring ponytail for you, please send me an email at [email protected]. SERIOUS INQUIRIES ONLY!
Hair Details:
Our website: https://amzn.to/2TRF14r
+ link to same 99J Burgundy Human Hair straight wigs➤: https://www.amazon.com/gp/product/B08G...
★6% Off #Coupon code:LOVEUNICE
------------------UNice Hot Selling Wigs ------------------
★#Ombre blonde highlighted straight human hair wig: https://www.amazon.com/gp/product/B08F...
★#Body wave human hair lace wig: https://www.amazon.com/gp/product/B08K...
★#Curly lace human hair wig: https://www.amazon.com/gp/product/B08D...
Products Used:
Got 2 be Glued Freeze Spray
https://www.amazon.com/gp/product/B086...
Olive Oil Heat Protectant (Similar Product)
https://www.amazon.com/gp/product/B01A...
Conair 1-inch Curling Iron
https://www.amazon.com/gp/product/B000...
Medium Brown Lace Tint (Similar Product)
https://www.amazon.com/gp/product/B08F...
Equipment Used:
Wig Stand Tripod Metal Adjustable Mannequin Head Stand Holder with Smartphone Clamp Mount
https://www.amazon.com/gp/product/B07Q...
Cannon SL2 https://www.amazon.com/gp/product/B071...
Neewer Back Drop Kit https://www.amazon.com/gp/product/B07P...
Ring Light https://www.amazon.com/gp/product/B08D...
Rose Gold Backdrop https://www.amazon.com/gp/product/B01C...
Facebook: @pressedbymissuniquebeautii
Website: pressedbymissuniquebeautii.com
E-mail: [email protected]
burgundy hair,wig install tutorial for beginners,natural hairline,how to install a wig,melted hairline wig,melted lace closure,preplucked hairline,Valentines Day Burgundy Lace Closure Wig Install | Low Hairline | Unice Hair | MissUniqueBeautii,Low hairline wig install,Burgundy lace closure wig,unice burgundy lace closure wig,fake scalp closure wig,Valentines day hair,valentines day wig,valentines day hair 2021,small forehead wig install,lace closure wig install
So hey my beauties, it's me scenic beauty in the building and i'm back with another video. If you are new to my channel tap that subscribe button so that you won't miss out on any of my new uploads and if you have already subscribed, what's good. What'S poppin welcome back to my channel in today's video, i will be showing you guys exactly how to install a lace closure wig if you have a very low hairline, just like i do now. This hair was sent to me by a company called you, nice hair, and they were kind enough to send me a 16 inch. T-Part lace, closure wig in the color, burgundy and right here. I'M just showing you guys me unboxing the hair and exactly how the hair would come when you receive it. If you guys decide to go ahead and buy this hair along with this hair, you will receive a edge scarf and a wig cap that you can use when applying this wig now. This is what the hair is looking like, as i continue to un-package it out of its packaging, and i'm going to show you guys exactly how the construction of this cap is looking like and look at this color guys. This color is so beautiful. Now, underneath the lace closure area, there is something they call a fake scalp, which is very similar to a silk base. This just takes away the extra step of bleaching your knots. Now i am showing you guys that there is three combs on the inside of this cap and an adjustable strap at the bottom. This wig is a straight wig and i kind of wanted to add some curls in just to give the hair a little bit more body, and i also wanted to go ahead and test how well this hair holds its curls and how good it takes to heat. Now the products that i'm using while curling is the got to be glued free spray and the olive oil ors heat protectant, shine and mist. So that's what i'm using to help me. While i am curling this hair, as i curl each small piece, i am using a clip while the hair is cooling, and this will allow your curls to last a lot longer after they are done cooling down from the heat. I just want to mention that the curling iron that i am using is by con air and it is a one inch curling iron and it only goes up to 400 degrees and 400 degrees was good enough to curl this hair. Now, whenever i curl my hair every time, i go up a row, i curl in the opposite direction. So in the first row i curled away from the face and the second row, as you guys, can see i'm curling towards the face. Now, when you do this technique, this hair will give you the most maximum volume once you brush your curls out in the end, and you guys will see that towards the end of this video now, when you guys are doing the curling process, you want to take Your time you want to allot some time to complete this process. It didn't take too long. I want to say it probably took me about 15 minutes to completely curl this entire wig. So just take your time if you're in a rush, just allow an extra few minutes for curling your hair. If you guys are interested in any of the products that i am using in this video, i will leave the link to all of the products that i'm using down below, so that you guys can go ahead and check them out. Now i'm going to go ahead and finish curling the rest of this wig and i'll be back to show you guys the finished product. This is what the wig is looking like after i completely curled the entire wig and look at the color of this wig. I can't it's so beautiful. Oh my gosh with the products that i did use. This hair is not stiff at all and it has amazing shine and there is no heat damage on this wig whatsoever. Now, let's get into the installation now for my natural hair. All i did was braid my hair back in eight cornrows, going straight to the back, and now i'm going to go ahead and apply some style factor edge: booster pomade to my edges, just to smooth and sleek them down and nice and flat so that they're, nice And out of the way now, as you guys can see, i did do some color on my eyebrows, because i did want to match my hair to my eyebrows. For this look, so i hope you guys, like the look. Let me know in the comment section down below if you do like it, but i just wanted to try something different now, if you guys are interested in seeing exactly how i got my eyebrows to look just like this go ahead and follow me on my instagram At miss unique beauty, i did do an instagram live and i saved it on my instagram so that you guys can go ahead and watch it over there. Now i'm gon na go ahead and apply my wig cap to my head and i'm going to position my wig cap slightly behind my hairline, because my hairline is very low and i'm going to show you guys exactly how i installed the wig. Look at the curls. Look at this color look at the wig. Doesn'T it match my eyebrows? Do y'all think i did a good job. Let me know now: i'm gon na go ahead and cut the lace off the front section of this wig and i'm cutting it as close as possible to the hairline without snipping any of the hair in the front of this wig away. Now i'm just going to apply the wig to my head and i'm going to secure the back section of the wig first down and then i'm going to pull the front section forward and position it exactly where i want it to lay now. I know you guys are gon na question me and say: oh, why didn't you put like up on the cap? And so and so? And so it's because makeup on the cap will not matter because this wig already has a fake scalp in the front section of the wig. So if you do want the wig to match more with your skin color you're going to have to go in to the parting section of this wig with your foundation or any kind of coloring, you want to do to make the part match your skin color. Now, when i position my wigs with my low hairline, i do not bring the wig in front of my hairline. I position it kind of slightly behind it very, very close to my hairline, but a little bit behind my hairline, and now i'm going to go in with the got to be glued free spray and i'm just going to spray it. On the front section of this wig just so that the wig will not move once it's on my head, i'm only spraying this along the lace area of the front section of this wig. Now i'm just using my fingers to go ahead and spread out the got to be glued spray in the front section of my hair, just to make sure that the spray is reaching every inch of that lace in the front section of my head now, i'm going To go in with the head scarf that unites, sent me, and i'm just going to use this to tie down this front section and i'm going to leave it on for 10 minutes or until it's completely dry. And then i'm going to remove it and come back and show you guys what it looks like this is what the wig is looking like once the freeze spray has completely dried, and this wig is not going anywhere now. I did decide to go in with this lace tint in the parting section and along the front section of my hair, but i started to realize it was a bad idea to use it in the front section because it went everywhere. So if you do decide to use this on, your hair, just be very careful with how much you're spraying, because i did spray a little bit too much, but i was able to fix it in the end now. In order for me to blend my edges in with this wig, all i'm going to do is go ahead and take a little bit of baby hairs from the front section of the wig and brush them into my edges. In the front section of my head and by me doing this, it just allows my baby hairs and the wig baby hairs to blend seamlessly together in the front section of my head. I really hope that makes a lot of sense, but all i'm doing is just taking some of the baby hairs from the wig and just blending and brushing them together, along with my baby hairs and the front section of my hair. Now, as i go ahead and take the curls down and fluff them out, brush them out run my fingers through it. You guys will start to see this look coming together perfectly now, of course doing this process with hair that matches my hair color. It will blend so much more seamlessly, but i think this burgundy color looks fire what y'all think in this video. I was able to show you guys exactly how i installed this burgundy. You, nice lace, closure wig. If you have a low hairline now, i will leave the link to this wig in the description box below so that you guys can go ahead and check it out. This wig will be perfect to wear for valentine's day or, if you just want a beautiful pop of color. I really hope that you guys enjoyed this video comment down below any questions that you may have like this video and don't forget to subscribe bye. My beauties. You


Comments
CAPABLE OF GREATNESS: i must admit, i being watching your vidoes, and i notice and observe how you chose to and i can really learn few tips from you
CAPABLE OF GREATNESS: sorry as i was saying i like how to you teach, you teach from how a person can learn from you, i hope you understand what i trying to say
Delique SuperBeautyD: Very nice
MzCrystalj: Hate it