(Very Detailed) How I Install My Lace Frontal Wigs (Beginner Friendly) ⎮ A Love Letter To Asia
- Posted on 25 March, 2020
- Lace Closure
- By Anonymous
VERY DETAILED)How I Install my lace frontal wigs (BEGINNER FRIENDLY) ⎮ A LOVE LETTER TO ASIA
Hey guys, in today's video I'll be showing you guys how I install my lace frontal wigs and how to melt your lace so that you can serve SCALP This video is step-by-step and super easy to follow. This video is perfect for beginners too! I hope you guys enjoy!
Don't forget to Comment, Like, and SUBSCRIBE: https://www.youtube.com/c/AsiaLoren
Make sure you turn on your notifications so you don't miss any of my posts‼️
Socials
- Personal Instagram: https://www.instagram.com/asialorenn_/...
- Makeup Instagram: https://www.instagram.com/allta__/
Featured Products
- Ombre Bob wig: https://www.evahairwig.com/ombre-150-d...
- Esha Absolute Lace Glue: https://www.amazon.com/Esha-Absolute-L...
Keep Watching!
HOW TO GET PERFECTLY BLEACHED KNOTS: https://youtu.be/XPA-C9SF83U
THE BEST WATERPROOF LACE GLUE IN THE WORLD?!: https://youtu.be/QZTcQ326Hek
SECRETS TO CREASEPROOF/SWEATPROOF MAKEUP: https://youtu.be/37hekjjBQ_w
POISON IVY MAKEUP TUTORIAL: https://youtu.be/SY7-zqdhWbQ
EFFORTLESS SLAY: GREEN & GOLD GLITTER EYE TUTORIAL: https://youtu.be/jQooarh0sMU
FAQ
Name: Asia ⎮ Ethnicity: Black ⎮ Age: 21
FOR BUSINESS INQUIRIES: [email protected]
Music Featured in this video: https://www.youtube.com/watch?v=IGNwBF...
tags: #lacefrontalwiginstall #lacefrontal #stockingcapmethod #howtomeltyourlace #wiginstall
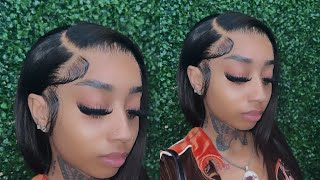
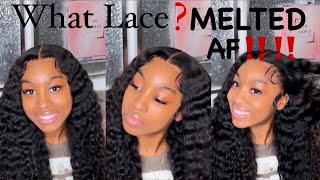
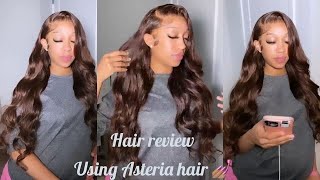
Hey guys and welcome back to my channel, thank you so much for tuning in today in today's video, I'm gon na be showing you guys how I lay my lace front units as well as how to really get your lace melted. If you guys are new here, make sure that you go ahead and subscribe and with all that said, let's get right into the video okay. So I'm gon na start off by placing my wig cap on my head, because today we're gon na be doing the bald cap method, and this is what is really going to protect our edges from the glue that we're about to use. So I'm just going to be placing that around my ears and once I've done that I'm gon na be going in with my got to be glued freezing spray and make sure that I'm pulling my wig cap all the way down past my ear so that I'm Covering up all the hair right there, next to my ear and then I'm just gon na start spraying, my got to be good spray around the perimeter of my hair. This is what's going to adhere our we cap to our head so that it protects our edges, and this is also what keeps our we cap in place. So that are we cap in the slide back, which will make your week slide back eventually and once I've done that I'm just going to be going in and cutting holes for my ears in my wig cap, so that my wig cap will lay flat. And I'm just Fanning this to help this dry down, it usually doesn't take long to dry down. So I just use a fan. You can use a blow dryer, but I like to skip that because I'd like to use as minimal heat as possible on my edges and we're gon na be using a lot of heat later to melt our lace once that's dry, I'm gon na be going in And cutting off the excess lace I like to start in the middle and then start to cut down the sides, be careful when you're doing this, because you can cut your forehead. I have done it before and it is not fun. So I'm just gon na be following the perimeter of the glue to cut the lace off. You want to make sure that you leave enough of the cap so that it's covering all of your baby hairs and all the hairs around like the perimeter of your ears, because that's what we are trying to protect from our glue. But you also don't want to. Let your cap come down too far, because this is where we're going to be actually laying our week already has to cover all this, and you don't want your edges in your eyebrows, so you still need to make sure that you're kind of aligning it to where You watch your frontal delay once I feel like I've got my wig cap, where I want it. I'M gon na be going in with my gut to be glued Jill. The black kind and I'm just gon na - be laying down the perimeter of my weak cap. So once you cut your base, you kind of have like these little light spots. Where you, you know, you cut the perimeter of your lace and it's kind of sticking up a little bit, so I'm just gon na be using this glue to really melt that. To my skin and make it seamless, because if you have these little lighter spots, showing when you actually lay your wig they'll, still show through your week, okay! So once I plate that jar, I'm gon na be going in with a face powder that matches my skin tone just like any pressed powder and I'm gon na be using that to press around the perimeter of my we cap. Basically, just wear, like my part, is going to show, I feel, like this part, is really optional, because I feel like this, like your scalp, is lighter than your actual skin complexion anyway, but I just do this just to make it. You know, look a little bit more natural and you know closer to my skin tone. So now we've kind of got our weight cap prepped, how we want it so we're actually gon na be taking the wig that we're going to be using today and placing it on our head to kind of match it up to where we want it to lay. I just do this to make sure that you know the lace that I've cut is not too far down or it's you know, place kind of how I want it so that the week will cover everything when I lay it. How I want to, I actually did a prior video to this that was kind of like a part one to this video, where I bleached the nuts in this week. So, if you're interested in seeing how I did that, I will link that up below like in the cards but yeah. So right now I'm just kind of measuring it to my head and just trying to see like if everything that I won't cover it is covered and just kind of adjusting my wig cap to that. Next, I'm going to be going in and placing my wig glue. So the only lace clip that I use is the Isha absolutely glue because it is so bomb. It'S long, lasting and it's waterproof. So now I'm just gon na be taking that and placing that around the perimeter of my wig cap, and so you just want to place it in little dots, and this just helps me to get an even application without placing too much glue. And once I have placed an even coat, I'm just gon na go in with a flat surface and kind of thin that out and kind of make sure that I really get a really even application of this first coat. You want to make sure that you use something, that's disposable when doing this, because I swear once you get this lace glue on anything, it's tacky forever and it's gon na attract all the hair, all the lint, all the unwanted things forever. So I think I'm just using like the back of or like a section of like you know like what comes on your bobby pins like a little bobby, pin, holder thing. So I'm just using that to apply this and make sure that I get a even first coat and then after I do this, I'm just gon na go in and do two more coats. I like to do three coats to make sure that my week really last as long as I needed to um so yeah, I think after I apply this, is my wig lasted a week and a half so yeah this week. Lou is absolutely bomb. I actually have a two toriel on how to use this in a review on this week, Lu as on my channel as well. All part of this you know kind of beginner lace series, so I will link that above as well and make sure you check that video out as well to help that dry a little bit quicker. I'M gon na be going in with my blow dryer because we want this to be. You know basically clear before we start applying our week and once that is dry not to my liking. I'M gon na go in and start lining up my wig to where I want it to be placed, so you want to make sure that you're just kind of lightly. You know tugging your wig forward to kind of see like where you want it to lay before you actually place it down, because once you even tap your wig to this glue, it's stuck like that's part of the reason why I love this wig glue, but you Just really have to be careful during this step to not actually touch the weak to the glue so that it doesn't go ahead and adhere before you want it to and to help me get my hair out of my way. I'M just going to knit up with these two alligator clips, because you don't want your hair falling forward, while you're trying to place your weak because again the weak and just like the hair can get stuck in the weak like where you don't want it to. And it's just a whole fiasco, so yeah, I'm just gon na, be pulling that forward and aligning that to where I want it and once I feel like I have kind of like my ear tabs, where I want them to be, and the wig is placed where I wanted I'm gon na go ahead and just Pat down the center to go ahead and adhere that first and then I'm gon na be taking a comb to comb through my wigs. This is how I like to make sure that my wigs are really adhere to to my head. I like to take a comb, because it just really helps it to apply more pressure than my fingers can do to really make sure that the week is stuck in place. And then I'm just going to be taking that comb and just kind of coming around the perimeter of my hair to lay my week where I want it once I have the first side laid I'm gon na be going in and cutting my ear tabs. I like to do this after I've adhered the week because I just feel like it's easier to see kind of like where the wig is lined up, but I mean you're perfectly welcome to cut it before some people do that. But I feel like once my wig is glued down. It just makes it easier to see like where I need to cut my ear tab so that I don't cut off too much hair and you just want to make sure that you cut enough so that you can easily and comfortably tuck your hair behind your ear. So once I've laid both sides and I have cut the ear tabs on both sides - I'm just gon na be going in and using my blow dryer and that comb to really melt down my lace, I'm just adding this heat on top of the glue that we've Fed here it just really, you know, melts your weave to your head and makes it look really natural. So I just like to do this for maybe like 2 or 3 minutes, just to give the glue a stronger finish and to give my hairline a more natural look. Okay, so now, I'm actually gon na go in and start cutting the lace. So I just like to cut my lace in sections because it just makes it easier when we get to this next step. So yeah, I'm just gon na, be cutting the lace in like these four little flaps, so that it makes it easier to cut the lace off now. I'M gon na be going in with an eyebrow razor, and this is what I'm gon na use to cut the lace around the perimeter of my hair, so by using an eyebrow razor, it just makes it look more natural because if you use scissors it just you Know it's very hard to make it look natural just because your scissors are gon na cut in a straight line so by using the eyebrow razor. It kind of gives you that jagged look so yeah, I'm just gon na be going in and cutting with this eyebrow razor and then like any parts that are just too jagged. I'M gon na go back and clean up with my scissors and you just want to get as close to the hairline as possible without actually cutting any of the hair. So once all the lace is cut off, I'm just gon na be going back in around the perimeter of my lace and annex and more glue. This is just because around this part, I kind of have some the edges of my. We are sticking up a little bit, so I just want to make sure that everything is glued down and secure. So I'm just gon na add one more layer of glue around that perimeter and I'll just be using my blow-dryer to again kind of melt that down and make sure that everything is seamless. Once you get done with this, and you kind of you know, got your lace completely laid, you can choose to just leave it like this. With a little bit of foundation like around the perimeter, it'll or powder it'll be completely natural, some people choose to leave it. This way, but I like baby hair, so I'm gon na, go in and do that step as well. Okay, so now we're kind of getting into the styling part of the week. So I'm not really going to talk too much in this part, I'm just gon na kind of let this play out, because this part is really up to you, how you want to style your wig, but now that we got the wig kind of place, how we Want just to flatten out the top of my wig a little bit, I'm gon na go in with some foam and a hot comb to really flatten out the top of my wig, because you know sometimes things will be kind of you know. I don't know bulky at the top, but we want it to look flat so that it looks like it's actually our hair. Now, once I finished flattening out the top of the hair, I'm just gon na go in and straighten it and finish off by doing some baby hairs. But again, I'm just gon na kind of let you guys watch this part because it's pretty self-explanatory. If you guys have any questions, just let me know but yeah. I hope you guys enjoy this part, and I will see you at the end to close out this video. Well, that is all for this video today guys. Thank you so much again for tuning in don't forget to check out those videos that I mentioned earlier on. The week loop that I use in this video, as well as how to perfectly bleach your knots if this video was helpful, for you guys make sure that you give it a big thumbs up as well as leave a comment down below about what you liked about. The video or you know any topics that you want to see. Next, if you haven't already make sure that you go ahead and subscribe to my channel and I'll see you guys in my next one

Comments
Jenn A.: This is a very good video! Very informative, there's a bunch of thing I did not knew, like seriously!
Slay With Trace: PERIOD LAY THAT WIG SIS!!!!