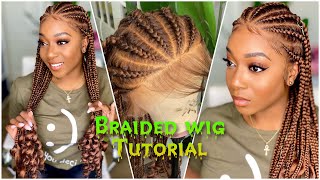
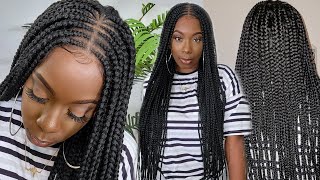
4*4 Lace Closure Bohemian Braided Wig Detailed & Beginner Friendly Ft. #Unicehair
- Posted on 10 August, 2021
- Lace Closure
- By Anonymous
P R O D U C T S U S E D
#Unice #BraidedWig #BeginnerFriendlyWig
Super Deal UP TO 58% OFF
Within 30 Days NO Reason Free Return
Using The Special Code Get $$$ OFF JEANN05 & JEANN10 (Full $59-$5,$99-$10)
●▬▬▬▬▬unice.aliexpress.com ▬▬▬▬▬●
I’m Wearing 24 inch 180% 4*4 body wave wig ➤https://s.click.aliexpress.com/e/_puJI...
Newest Highlight Curly Lace Wig ➤ https://s.click.aliexpress.com/e/_pyE7...
TOP NO.1 Straight Selling Highlight Wig➤https://s.click.aliexpress.com/e/_pJdw...
Hot Water Headband Wig ➤https://s.click.aliexpress.com/e/_pz7L...
Recommend 13*4 Loose Deep Wave Wig ➤https://s.click.aliexpress.com/e/_pRBq...
https://www.unice.com/ ► https://bit.ly/3wo8K6l
Contact to wholesale: +8613782365322
Customer Service Number/ Whatsapp: +16614809525
Contact to promote [email protected] & +8615803749447
C O N N E C T W I T H M E:
My Website
Hair Appointment Booking
https://wynnejean.com/pages/hairtour
Instagram @WynneJean
https://www.instagram.com/wynnejean/
Facebook @WynneJean
https://m.facebook.com/WynneJean/?ref...
Twitter @WynneJeann
https://twitter.com/WynneJeann?s=09
For business inquiries [email protected]
F A Q:
Ethnicity: African American
Height: 5'7
Age: 23
Measurements: Bust 36'' Waist 26'' Hip 38''
Shoe Size: 8
F A V C A M E R A G E A R:
Camera - https://amzn.to/2NJcPPs
Camera remote - https://amzn.to/2CDAsm2
SD card - https://amzn.to/2Qim76w
Umbrella lights - https://amzn.to/351lJxv
Soft Box Lights - https://amzn.to/2O9zzXF
Full size ring light - https://amzn.to/2XcmDo4
Traveling ring light - https://amzn.to/2XaDLdQ
Traveling Tabletop Ring Light - https://amzn.to/2NJbisG
Lighting & Backdrop Kit - https://amzn.to/2OgmTP4
Backdrop - https://amzn.to/2CHxA7W
Mic - https://amzn.to/2KlQrcJ
*This video may include affiliate links / paid promotional content & product placements. However, all opinions are my own*
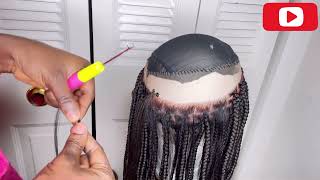
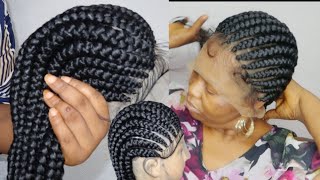
You want a supermodel pose, like my real friend, winnie, hey loves, it's winnie, jean welcome to my channel, if you're new here and if you're, returning, hey girl, how you doing i've been getting lots of questions about how i wear my hair in colombia this past time. So i'm making this tutorial to show you guys exactly how i did it. Today'S video is sponsored by you, nice, i'm using their 24 inch. 180 density 4x4 closure wig. I know i know it looks like a frontal, but it's not the link to this hair as well as a coupon code will be down below in the description bar, so you guys can check it out. You know i got you so i'm starting off by spraying down the baby hairs and brushing them back, so i can go ahead and bleach. The knots the key to a good closure install is to treat it just like a frontal bleach. The knots, if you need to pluck it, fortunately, this unit was the perfect density, so i didn't need to plug, but i am going to go in with some 30 volume developer and some bleaching powder and that's just going to help to make the knots the same. Color, as my skin tone, if you guys, are familiar with making wigs - and you already know this process, but i figured i would put it in here just so you know and for any beginners who don't exactly know what to do with a new wig. This is how you get it to look super natural, so i went in and rinsed out the bleach. I also wash and conditioned the hair, so you can really see the natural waves it's gorgeous. I love that the wave pattern isn't too deep. It'S just very beachy. Very pretty - and i wanted to play that up by adding some braids and creating this really pretty bohemian hairstyle. But, as you can see bleaching, the knots made a huge difference and it looks so good honestly. I could have worn it just like this, but to go ahead and start to create the style first, i want to cover up this track in the back. That way, we don't have to worry about it once we start braiding, so i'm parting out about a half inch section right in front of the track, and then i'm going to go ahead and press that down using my hot comb just to get it nice and Flat and i'm going to do the exact same thing around all of the sides of the closure. This just really helps to make sure that we don't end up braiding, any hair that we need to cover the tracks like you want to have the braids looking cute, but you do not want your tracks out. So let's just go ahead and take care of that and, as you can see, everything is blending really seamlessly. The closure looks so natural and the lace is a really nice quality. So i've really been enjoying this wig now it's time to get into the styling. So i'm going to go ahead and part the hair right down the middle, because i wanted to put two braids on top, so i figured if i had a center part, then i wouldn't have to worry about it being all lopsided. So i went ahead and used my hot comb on it to get it nice and flat off camera, and now i'm just parting about three quarters to an inch to the left of the part. And this is the section that we're going to go ahead and braid to get this style now, if you want to make sure your parts are really crisp, i like to put a little bit of edge control on the part, and it just makes it a lot Easier to get a really nice and crisp part, because all of the hair will lay flat when you grab it. I hope that makes sense it's kind of similar to the technique that you would use to get braids on your natural hair. You know you got to put a little bit of edge control on it to keep it nice and tidy. I'M also going to part out a little bit of hair for the baby hairs, because you know we got to have some baby hairs and i'm just going in with my hot comb and pressing that towards the direction of the braid and that way it'll lay really Flat to the scalp and look natural once we start braiding so now that we have the section parted out, i'm just going to braid it as normal. I'M not doing anything too fancy, it's not a stitch braid, it's literally just a french braid going back and it's actually not even super perfect. I was going for a very bohemian beachy vibe with this hairstyle, so it does not have to be perfect at all and i'm braiding it about three quarters of the way down and once i'm comfortable with the length. That is that i'm going to add a knot at the bottom to secure it, so i'm grabbing a few strands of hair and tying them around the base of the braid, and this just helps to keep everything nice and secure. It'S a really good knot to use. If you don't want to put any glue - and i was thinking that i may take these braids out and wear it a different way - so i definitely didn't want to put any glue in here and for some added security, i'm going in with a little bit of Edge control and i'm going to put that right where the knot is and it'll help to keep it. You know from unraveling, because that would just be tragic. Now i'm going to do the same thing on the other side, i'm going to spare you guys to talk through, because i'm sure you guys can see what i'm doing here. It'S really really simple and i feel like it added a really cute touch to this wig. Now i'm just going in and grabbing random sections of hair and braiding them. I felt like it added a really really really cute touch so, instead of me having just the random two braids on top, i wanted to tie it all in. So i added about 10 braids throughout the hair and, as you can see, i'm putting one right on top using the hair on the closure, so i could have this really pretty face framing braid too. I love the way it came out. It looks so so pretty i'm also grabbing hair from under the wig, so i can have a few braids on the bottom too, and they don't have to be perfect at all. They don't have to be the same size. Nothing like that, the more messy it looks. Honestly, the prettier to me this is the finished look. This is how the wig came out. Okay, so the wig is ready. Now i just have to put it on. I'Ve actually been wearing her, so the braids don't look like as tidy, i kind of like it. A little bit more messy, though the waves are so pretty, i'm excited okay, so i already have my adjustable straps going in the back. I'M just gon na just pop her on really quickly because i low-key got ta go and i'm only going to be wearing the wig for like a day, so i'm actually going to use got to be glue to install it. I'M just going to spray! Oh spread! A little bit right in the middle of the hairline and then i'm just gon na place it down, and then i'm gon na spray a little bit on top and rub it in okay, i'm gon na just tie it down, but after being tied down for about Five minutes it should be ready for us to do the baby hair. It'S not even done yet, but it's survived. I like it, okay, okay, so this is the finished look. I went really like chill super soft on the baby hairs. Nothing too crazy. I really wanted to be more of like a beachy boho look, so i hope that you guys really enjoyed this video. If you like this video, then like this video - and i will see you guys in my next one - i love you so much.
Comments
Kiana Charese: Super cute look! Summer/ festival vibes for sure
Queen Chronicles: You definitely favor Gab Union! Also, you absolutely slayed this look
AlwaysAmeera: SUPER CUTE!!! ❤️❤️❤️❤️
Indescribably Stasii: This is cute ❤
Abdul H: Colors seem brighter when you're around.