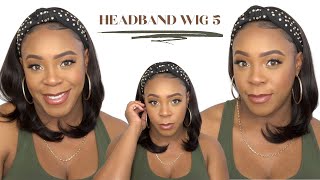
$5 Braided Headband Wig | No Wig Cap, No Lace Closure | Diy Braided Headband Wig | Belle_Graciaz
- Posted on 28 July, 2021
- Lace Closure
- By Anonymous
$5 BRAIDED HEADBAND WIG | NO WIG CAP, NO LACE CLOSURE | DIY BRAIDED HEADBAND WIG | BELLE_GRACIAZ
THINGS YOU NEED
A SCARF/LONG BAND
BRAIDED HAIR/ ATTACHMENT
NEEDLE/THREAD
#braidedheadbandwig #braidedwig #crochetwig
Hello, everyone welcome all come back again to my channel. I am bill presses and in today's video i'll, be showing you how to turn make this right here. This is. These are actually suggested by lita's nails and polishes. Sends me something on instagram and told me: i should try this out and i love this. I decided to try it out. So thank you for suggesting this and if you have videos you want me to make, please don't forget to you know, leave that in the comment section or send me a message and i'll try them out. So let's just jump right into the video okay. Okay, so for this the first thing you need is to have your band, which is this right here, so i made my from the scratch. So if you have a scaff that you're not using or whatever you could actually make it yourself, okay, so mine was um. Five inches wide and um 120 inches long, so i joined two strips together in order for me to make it that long and i'm just cutting it after cutting the edges right there, i'm going to fold it into two and i'm just going to sew so, like I said this part: you don't really need to do it if you do not have. If you don't know how to do it, you could just get a scarf or like a very long strip. You have at home that you are not using anymore and you could work with it, but i wanted to do this from the scratch for myself, so i could wear it. However, i wanted to so. This is like optional. So, after doing that, the next thing you want to do is take the second reference of your head and add um an inch to it. So mine was 22 or 22 and a half and i added an inch which made it 23 inches. So if you do not have a measuring tape, you could also use anything you have, you could use a thread or you could use a rope or whatever you have, that can that can roll around your head and yeah, i'm just showing you me using a thread And that is it so after doing that, the next you want to do is to find the midpoint of your band after finding the midpoint of your band. You divide the 23 inches by two. So that's what i did right there and what i got is eleven 11.8 and um, i'm just finding that there and when i find it, i'm just going to pin it down on both sides of the strip. So i think you don't pinning it down this uh. Third places you are going to um fix your attachments on, so that is why you needed to find that measurement so that you do not go overboard that or make it lesser than it needs to be. So i already pre braided this like a long time ago, and i just started to use this attachment right here. So what i'm doing right now is. I am sewing this onto the strip, so i am seeing on one side. I am showing right now that i'm only seeing on one side of the fabric and the other side isn't going to look like anything, has been sewn on neat so that way, nobody knows that this is actually the braid is actually sewn on the fabric itself. Okay, so just make sure they are only sewing on one side of the fabric. You don't even know me like that, are you and if you notice, i'm also swimming very, very close to each other, because you do not want any space there, because this is obviously going to be just a long strip wig. So you obviously want everything sewn as close to each other as possible, so that there is no space to show that this isn't an entire wig with the lace and everything - and i really love this, because this is so. You could just literally wear this on the go and just go about your day. Activity is okay, so i'm gon na swing everything down. This is what you'll have. As you can see. I use this rack as a support, so you can use whatever you have as a support for your band so that you can sew this properly onto the hair or onto the band itself. And now what you want to do is to put this in hot water. So the reason why i'm putting mine in hot water is because i've had this um hair for a while, so it's kind of stiff and i want it to be flowy, so i'm putting it in hot water. Is i'm just saying? Okay, so after doing that, you find the midpoint of this band, then you um measure out five inches away from it on both sides. Then you paint that down there and the reason why i am doing that is because you're going to want to insert a comb on this. I feel like, if you just go like this, without inserting a comb, it can easily slip off your head and we do not want that. So i'm trying to find the side. So i'm going to insert a comb in the center of this and i'm going to insert on both sides of my of it as well, so that when i put it on, i'm going to have it comb in the center and have it come on both sides Of my head, if that makes sense, so yeah, i'm showing you right now that i am just putting it there and because this comb right here has like seven combs. So i'm putting i'm finding the center of that, which is the fourth one on from both sides, and i'm sewing that i am putting that in the middle and i'm just sewing it. I don't know if that makes sense, but i'll explain again so that comb right here has seven um mini combs. You could call it and when you find the center, you place the center of that comb at the center of this band and for both sides as well. You do the same thing. You find the center of the comb and you place it where the pin is located at so after doing that. This is what you all have and you're basically good to go. So i'm going to show you how i'm going to wear this and how i take it off. It is really really easy and i love the fact that it's versatile, so i'm also showing you two styles. You could style this with in this video as well. So let us just jump right into that right now, so this is what it looks like after you're done putting it on and i'm going to take it down just to show you um what it looks like inside okay. So this is, it's like you can see. Like it's just an entire stream, nobody would know that you know where you need, don't think you are literally wearing a wig or you braided, your hair or something so i'm showing you how i am going to um wear this wig. You call it right here. So i am just inserting the combs from the middle first then on both sides to make it easier for me and after inserting it i'm going to just tie it at the back. First then wrap it like you would a scarf um. So, as you can see, i also wrapped it in order for me to cover the first band so that you know the attachment and the band that do not show. So you wrap it very well to conceal all those things, okay, so after wrapping it, this is what you will have. As you can see, we do not want that. We cap they're, showing we don't want anything showing. So what you're going to do is you're just going to take your time in arranging all those attachments in place and making sure that you're concealing it well um. So i was using my um camera in looking at what i was doing and it was a bit difficult for me to do so. I had to go off camera and just use a mirror to do this properly, um, but yeah. That'S basically it and after that, i'm going to show you what it looks like with two styles. The first one is just a basic ponytail and the second one is basically um. Half up half down style come a little closer like that. Okay. So this is what it looks like with a ponytail excuse, my voice. I'Ve been i'm having the cold or something - and i know it's not the best, but you know it still did the job, and this is what it looks like half up, half down and yeah. I really really like it and this wasn't planned, but, as you can see, there are two different colors on both sides but yeah i really like it regardless. Thank you. So much for watching and i'll see you all in the next video of bye,


Comments
simplydemi: That’s so creative, innovative idea , beautiful colors as well , you styled it beautifully ❤️
Odette Young: You are a genius, so easy to make. Looks great.
Mary Moe: This is actually innovative
Ndauya Katso: will totally try this. Can you style the wig? How many packs did you use?
Ibidunni Osho: This is really a game changer tho! This would make up for a lot of errand or market days.
Mary Moe: This is so casual, throw this on and run your errands
Mama At Home: Bravo
Katherine Useh: This is very creative, just like the headband wigs Except that this is just one line of braids.
Music Marketers Botswana: You got skillz booo!!!